
Configure the Chrome Force-Installed Extension List policy to install and manage browser extensions for Google Chrome on Windows devices. Use this policy to force install JumpCloud Go, JumpCloud Password Manager, or any other extensions available in the Chrome Web Store. Force-installed extensions are automatically installed without user interaction, and users can't remove them.
This policy is for orgs that do not use Google Workspace and Chrome Enterprise (formerly Chrome Browser Cloud Management (CBCM). If your org uses Chrome Enterprise, instead manage extensions in the Google Admin Portal on the Apps & Extensions page using the Force-Installed Extension List. See Google's Chrome Enterprise Core and Create a Universal Browser Patch Policy to learn more. This policy isn't designed to be used with Chrome Enterprise, and doing so can cause conflicts in how Chrome policies are applied and prioritized. See Google's Understand Chrome policy management to learn more.
Use this policy to install the JumpCloud Go browser extension on managed devices, which is required for JumpCloud Go. JumpCloud Go enables secure passwordless user authentication to JumpCloud-managed web resources. See Get Started: JumpCloud Go to learn more.
![]()
This is a device level policy that applies system-wide to the device and all of its users. You can bind this policy to individual devices or device groups. For policies that apply to a specific user's profile across devices, see Get Started: Policies and Learn More section of this article.
Prerequisites
- The target device is running Windows and the JumpCloud agent is installed. See JumpCloud Agent Compatibility, System Requirements, and Impacts.
- Google Chrome must be already installed on the target device.
Creating the Policy
To create a Chrome Force-Installed Extension List policy for Windows devices, do the following:
Selecting the Policy Template
- Log in to the JumpCloud Admin portal.
![]()
If your data is stored outside of the US, check which login URL you should be using depending on your region. If your organization uses LDAP, RADIUS, or requires firewall allow list configuration, the Fully Qualified Domain Names (FQDNs) will also be region specific. See JumpCloud Data Centers for the URLs, FQDNs, and IP addresses.
- Go to Device Management > Policy Management. The Policy Management page is displayed.
- On the Policy Management page, click +Add New.
- Select Device Policy to assign the policy to devices and device groups. On the New Device Policy page:
- Select the Windows tab.
- Search and select the policy name and click Configure. The Details tab of the policy is displayed.
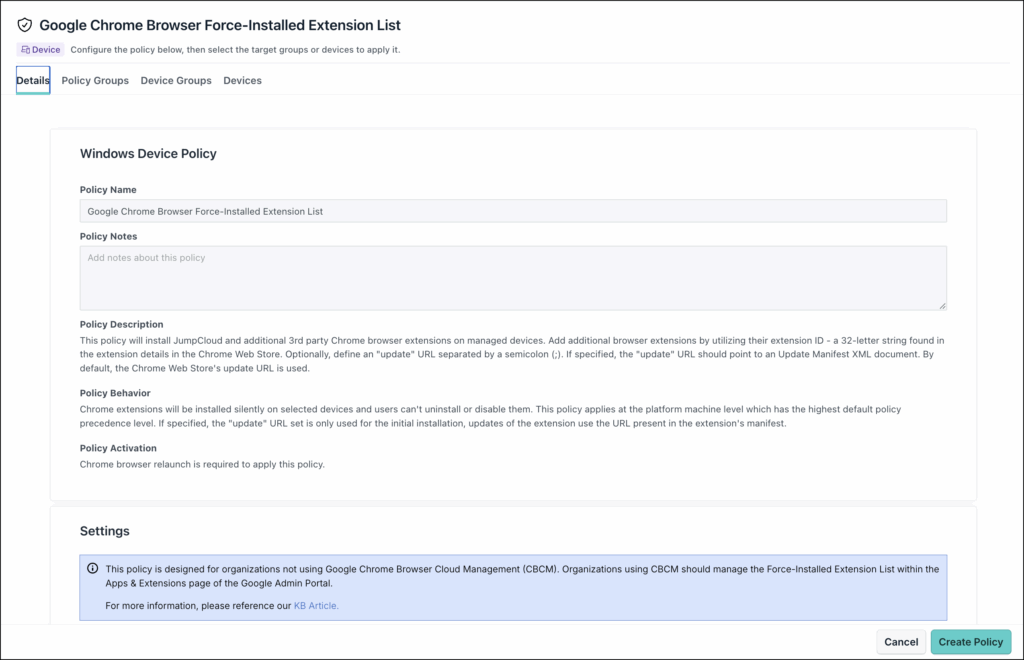
- On the Details tab, configure the required policy configuration settings.
- (Optional) In the Policy Name field, enter a new name for the policy or keep the default. Policy names must be unique.
- (Optional) In the Policy Notes field, enter details such as creation date of the policy, and information on testing and deployment of the policy.
Configuring the Policy
- Under Settings, complete these fields:
- Select JumpCloud Go to force install the browser extension on selected devices.
- Select JumpCloud Password Manager to install the browser extension on selected devices.
- (Optional) For Additional Chrome Browser Extensions, enter the Extension ID of any additional browser extensions you wish to force install. The extension ID is a 32-letter string found in the extension details in the Chrome Web Store, or in Chrome > Extensions > Manage Extensions with Developer mode enabled.

- (Optional) Under Update URL, define an update URL separated by a semicolon (;). This should point to an Update Manifest XML document. By default, the Chrome Web Store's update URL is used.

Applying the Policy
- (Optional) Select the Policy Groups tab. Select one or more policy groups where you want to add this policy.
- Select the Device Groups tab. Select one or more device groups where you want to apply this policy to. For device groups with multiple OS member types, the policy only applies when a user logs into a supported Windows device that is enrolled in MDM.
- Or, select the Devices tab. Select one or more devices where you want to apply this policy.
- Click Create Policy. A success message is displayed indicating the completion of policy creation.
![]()
You must select either a device or device group to create and apply this policy.
Viewing Policy Status
- Select the Status tab.
- To see the last Result Log for a device where this policy is applied, click view.
![]()
- If any errors occur, they're listed in Exit Status. If you have an Exit Status of 0, no errors occurred when applying or enforcing this policy.
![]()
For this policy to take effect, you must specify a device or a device group.
![]()
To verify the policy has applied on the device, go to Chrome and in the top right corner click the Extensions icon (puzzle). Verify that configured extensions are added.
Removing Devices from the Policy
If you used this policy to deploy browser extensions, you can remove associated devices or device groups in the Admin Portal to remove the extension from those devices.
To remove device or device groups from the policy:
- In the JumpCloud Admin Portal, go to Device Management > Policy Management.
- Select the Chrome Browser Force-Installed Extension Policy from the list, then click configure.
- For device group associations: Click the Device Groups tab, locate the group, and clear the checkbox to remove the association.
![]()
Removing a device group from the policy will remove installed extensions on all devices in that group.
- For direct device associations: Click the Devices tab and clear the checkboxes next to the associated devices.