Configure User Attributes for SAML Connectors
Use JumpCloud SAML Single Sign On (SSO) to give your users convenient but secure access to all their web applications with a single set of credentials. To customize user roles and permissions in a SAML application, you can configure user attributes in SAML connectors.
- For information about constant and group attributes, read SAML Attribute Notes
- Learn how to configure pre-built connectors and the Custom SAML App
You can create custom attributes for user groups, then configure them on SAML connectors. Learn more in Using Group Inherited User Attributes.
About User Attributes in SAML Connectors
Service Provider Required User Attributes
When you configure user attributes for a pre-built connector, you see some user attributes that are pre-populated. These user attributes are required by the service provider for SAML Single Sign On (SSO) authentication. You can edit the Service Provide Attribute; you can’t edit the JumpCloud Attribute Name.
JIT Required User Attributes
Some pre-built connectors support Just-in-Time (JIT) provisioning and require additional attributes. JIT required attributes are pre-populated and are enabled for JIT provisioning by default. Keep the following in mind when working with JIT attributes:
- You can’t edit the JIT required Service Provider Attributes.
- You can customize the JumpCloud Attribute Name and the Constant Value for JIT required attributes.
- Toggle off the attributes if you’d like to opt out of sending the attributes in the SAML assertion. Learn more about SAML.
Find about more about JIT provisioning.
Additional User Attributes
You can add additional user attributes to customize user roles and permissions for an application. To configure additional user attributes for SAML connectors, use Step 1 and Step 2 in this article**.**
Step 1: Populating and Adding Attributes to Your Users
Before you configure user attributes for SAML connectors, make sure you’ve populated the standard and custom user attributes that you plan to use with SAML SSO. User attributes are unique to each user. Some standard user attributes are required when you create a new user, like username and company email. You’ve populated some of the attributes that you might want to use with SAML SSO if you filled out attribute fields in the following sections in the User Details panel:
- User Information
- Employment Information
- Personal Employee Information
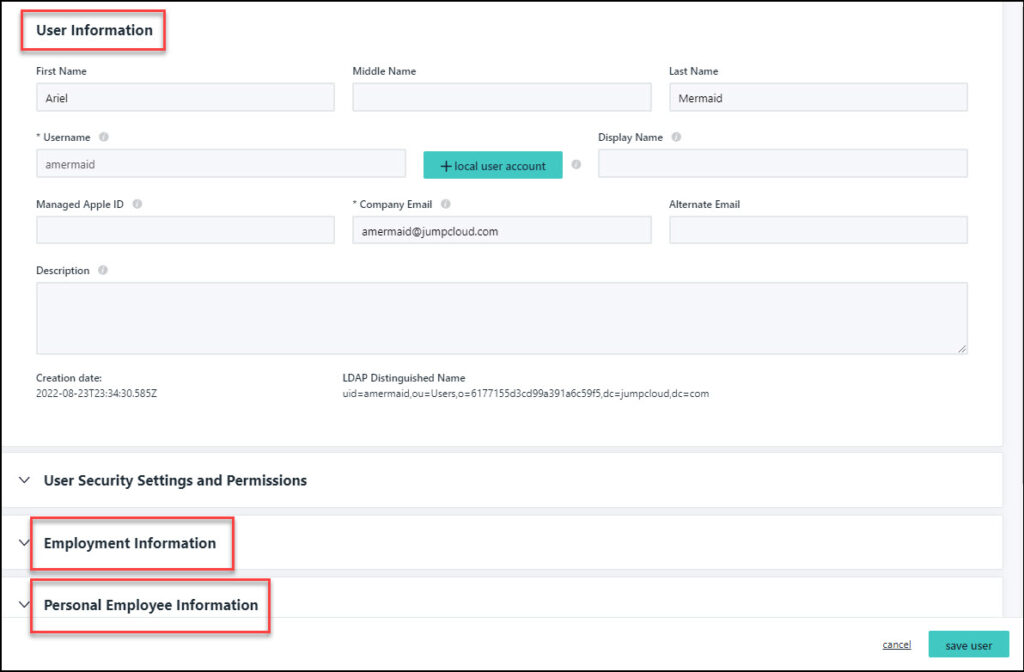
To learn how JumpCloud Attribute Names map to User Details attribute fields, see Mapping JumpCloud Attribute Names to Attributes in the User Details Panel.
To add standard and custom user attributes to a user
- Log in to the JumpCloud Admin Portal.
If your data is stored outside of the US, check which login URL you should be using depending on your region. If your organization uses LDAP, RADIUS, or requires firewall allow list configuration, the Fully Qualified Domain Names (FQDNs) will also be region specific. See JumpCloud Data Centers for the URLs, FQDNs, and IP addresses.
- Go to Identity Management > Users, then select a User or create a new user.
- To add standard user attributes to the user, fill out fields in the User Information, Employee Information, and Personal Employee Information sections.
- To add custom user attributes, fill out the Custom Attributes section**.** See Custom User Attributes.
- When you're done adding attributes, click save user.
Mapping JumpCloud Attribute Names to Attributes in the User Details Panel
To find out how JumpCloud Attribute Names map to attributes the User Details panel, use the following table:
| JumpCloud Attribute | Attribute Location in User Details |
|---|---|
| User Information | |
| username | User Information |
| firstname | User Information |
| middlename | User Information |
| lastname | Use Information |
| displayname | User Information |
| fullname | When this attribute is included in the SAML connector, JumpCloud sends the users’ firstname and lastname as a single attribute in assertions. This attribute is not found on the User Details tab. |
| company | Employment Information |
| costCenter | Employment Information |
| department | Employment Information |
| description | User Information |
| employeeIdentifier | Employment Information |
| employeeType | Employment Information |
| jobTitle | Employment Information |
| location | Employment Information |
| addresses | Employment Information, Personal Employee Information. See Adding Collections of User Attributes. |
| phoneNumbers | Employment Information, Personal Employee Information. See Adding Collections of User Attributes. |
Step 2: Configuring User Attributes for SAML Connectors
When you configure user attributes for SAML connectors in JumpCloud, you see fields for the JumpCloud Attribute Name and fields for the Service Provider Attribute Name.
You can get the Service Provider Attribute Name from the service provider. An example of this name might be surName.
JumpCloud includes the JumpCloud Attribute Name in assertions, such as lastname. For JumpCloud Attribute Name fields on pre-built connectors and in the Custom SAML App, you can select a JumpCloud user attribute from a pre-populated dropdown list. You can find a list of how JumpCloud attribute names map to attribute fields in the User Details panel in Mapping JumpCloud Attribute Names to Attributes in the User Details Panel.
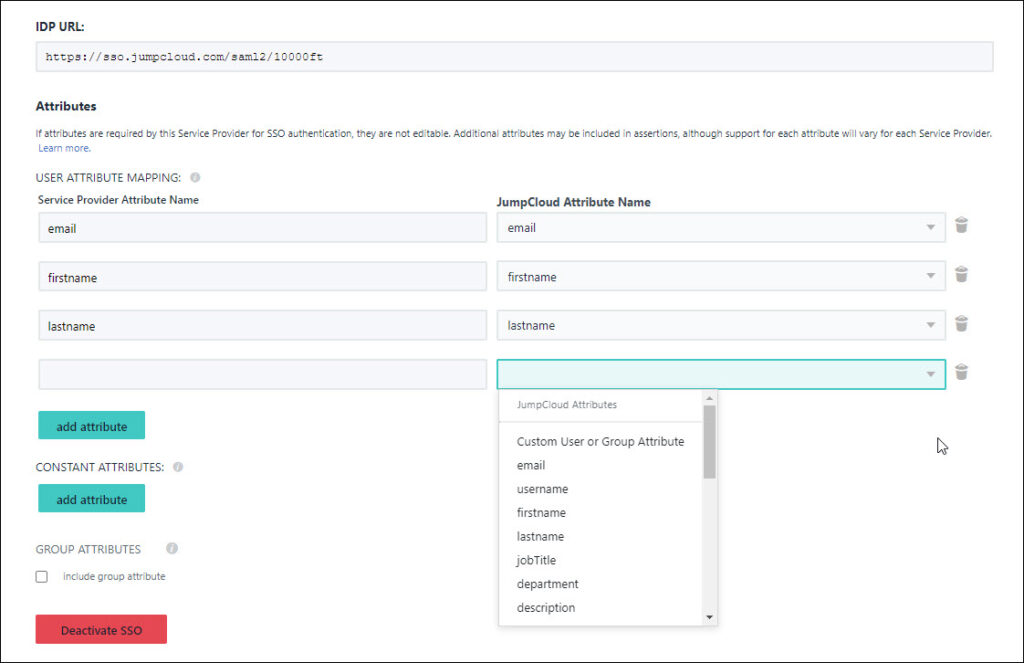
To start configuring user attributes for SAML connectors
- In the JumpCloud Admin portal, go to Access > SSO Applications.
- To configure a new application, click + Add New Application.
- Search for and select the prebuilt application connector.
- Complete the General Info and Single Sign-on Configuration sections to use the application for SAML/SSO. See Getting Started: Applications and SAML Configuration Notes.
- In User Attribute Mapping, click add attribute.
- Service Provider Attribute Name - enter the service provider’s name for the attribute
- JumpCloud Attribute Name - select the corresponding attribute from the drop down list
If you want to add a custom attribute, select Custom User or Group Attribute, then you can manually enter the custom attribute name. Make sure it matches the custom attribute name you entered when you configured the custom attribute in the User Details Panel or the User Group details panel. See Custom User Attributes and Using Group Inherited User Attributes for more information.
- Click Save.
Adding Collections of User Attributes
You can add collections of user attributes for attributes that have more than one type. The following attributes have more than one type:
- phone numbers
- addresses
Phone Number Attributes
Phone number attributes have the following types:
- work
- work_mobile
- work_fax
- home
- mobile
To add a phone number attribute, match the Service Provider Attribute Name to a JumpCloud Attribute Name. For example, say a Service Provider’s phone number attribute name is workphone and JumpCloud attribute name is phoneNumbers.work. You would enter workphone in the Service Provider Attribute Name field, then select phoneNumbers.work, from the JumpCloud Attribute Name dropdown list.
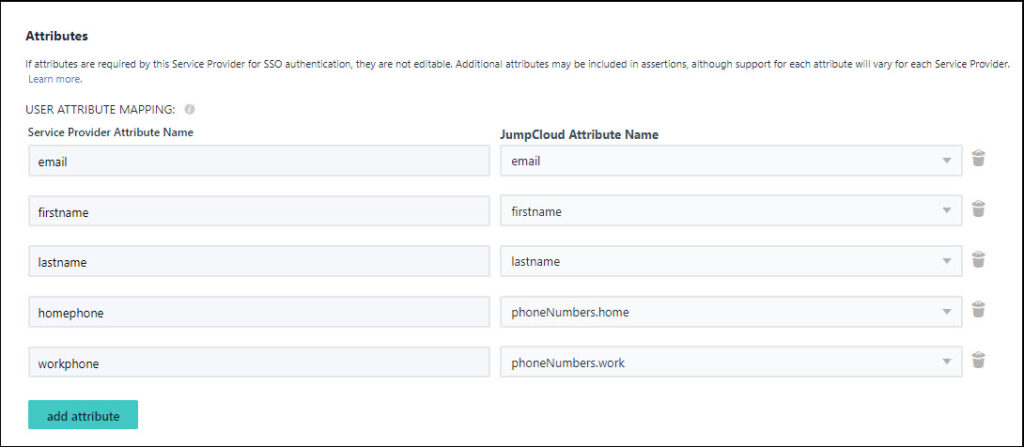
In the Admin Portal you can only create attributes for the previously listed types. However, in the API you can include any type with a maximum character length of 1024. For example, phoneNumbers.beach_house_phone.
Address Attributes
Address attributes have multiple types and components.
Address attributes have the following types:
- home
- work
Address attributes have the following components:
- poBox
- extendedAddress
- streetAddress
- locality - component for city
- region - component for state
- postalCode - component for postal / zip code
- country
To add an address attribute, match the Service Provider Attribute Name to a JumpCloud Attribute Name. For example, say a Service Provider’s address attribute name is workstreetaddress and JumpCloud attribute name is addresses.work.streetAddress. You would enter workstreetaddress in the Service Provider Attribute Name field, then select addresses.work.streetAddress, from the JumpCloud Attribute Name dropdown list.
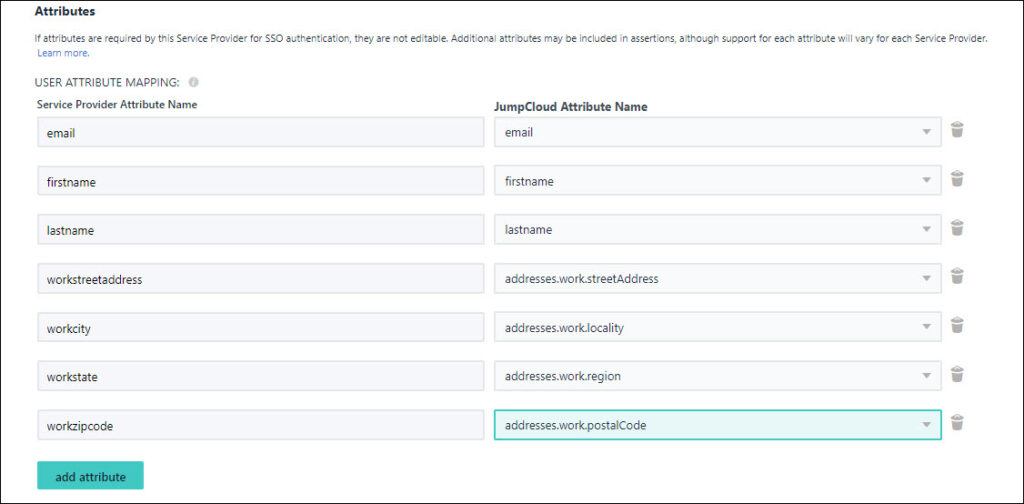
In the Admin Portal you can only create attributes for the previously listed types. However, in the API you can include any type with a maximum character length of 1024. For example, addresses.beach_house.
Was this information helpful?