
When JumpCloud groups are created, by default they are Static User Groups - groups with fixed memberships that must be changed manually. Static user groups are best for situations when the membership is primarily unchanging, and the membership in the group cannot be formed using an easily-defined criteria. But, modern-day IT operations are complex and challenging. IT admins no longer manage Windows-only environments with local users secured by a firewall. Today's trends entail enterprise mobility, BYOD management, multi-OS environments, etc., making IT operations both complex and crucial.
Dynamic User Groups facilitate automatic membership changes, depending upon the membership conditions set by the admin. If a user meets a particular criteria, they get added to a group. Likewise, if a user no longer meets the criteria, they are automatically removed from the group. Onboarding new users or adjusting group membership when conditions change for individual users and groups is seamlessly and instantly completed.
Benefits of Dynamic User Groups:
- Group Membership updates - nightly updates and also when the following events occur:
- A change is made to the group – rules or otherwise
- A user attribute value changes
- A new user is created
- Automatic Access - after a user or group’s conditions change, they are automatically assigned to the appropriate resource groups, like device or application groups.
- Compliance - admins can review reports on dynamic and static membership group assignments.
Enabling Dynamic User Groups
![]()
Guide Me: Enable and Configure Dynamic User Groups
- Log in to the JumpCloud Admin Portal.
![]()
If your data is stored outside of the US, check which login URL you should be using depending on your region. If your organization uses LDAP, RADIUS, or requires firewall allow list configuration, the Fully Qualified Domain Names (FQDNs) will also be region specific. See JumpCloud Data Centers for the URLs, FQDNs, and IP addresses.
- Go to Identity Management > User Groups.
- Create a new group or choose an existing group.
- Navigate to Details > Membership Controls.
- Select the Dynamic radio button. Optionally, if you would like to review membership updates before they implemented, select:
- Require administrator review of updates - to review group membership updates in the Admin Portal
- Receive emails when administrator review is needed for updates - to receive approval emails notifying all administrators of membership changes
- Require administrator review of updates - to review group membership updates in the Admin Portal
![]()
If Require administrator review of updates is not selected, dynamic group membership changes will be automatic with no notification. As a result, you may experience unplanned system disruptions. It is highly recommended to use the Require administrator review of updates option first to verify group membership changes. After verifying group membership is functioning as desired, then deselect this option.
Configuring Dynamic User Groups
![]()
There is no validation when creating a dynamic user group, so you can potentially create illogical or contradictory user group rules resulting in incorrect group membership. Previewing your group's membership before saving it is highly recommended.
- After enabling Dynamic User Groups, select All (default) or Any of the following conditions must match for these users to be added to this group:.
- Expand the Attribute dropdown and choose one of the following attributes from the list:
- Company
- Cost Center
- Department
- Description
- Company Email
- Employee Type
- Job Title
- Location
- Manager
- User State
- Member Of
- Custom Attribute
- Expand the Operator dropdown and choose one of the following for each attribute:
- equals
- not equals
- starts with
- ends with
- contains
- does not contain
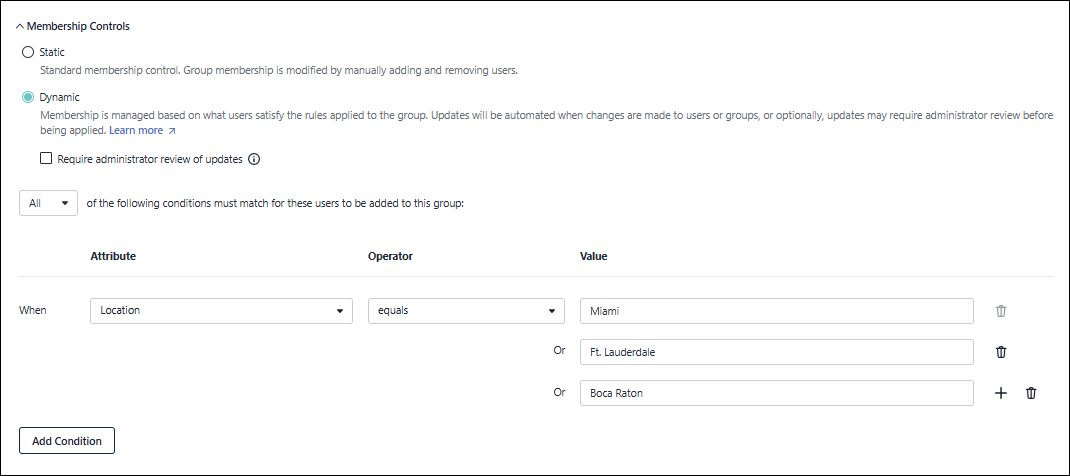
- In the Value text field, enter the desired value. Select (+) to add multiple values to one group attribute. This acts as an “or” operator for the different values. Using the example below, the group's membership includes users whose Location equals “Miami” or "Ft. Lauderdale" or "Boca Raton".
![]()
The values are case-sensitive and must match exactly to what is entered in the user's record. Using the example below, if the dynamic group's rule is Location equals "Ft. Lauderdale" and the user's Location is "Ft Lauderdale" (without the period), the user will not be included in the group membership.
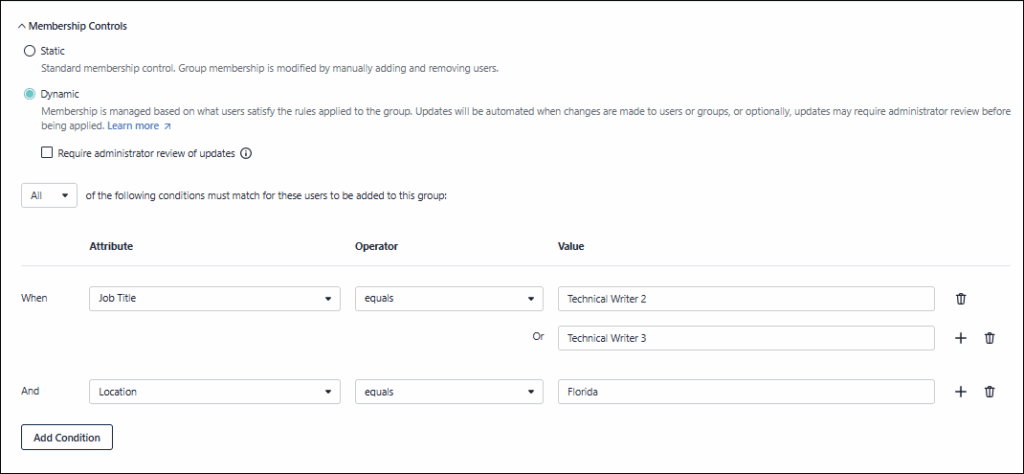
- Select Add Condition to add multiple attributes to one group. This acts as an “and” operator for the different attributes. Using the example below, the FL Technical Writers group membership includes users whose Job Title equals “Technical Writer 2” or "Technical Writer 3" and Location equals “Florida” for a Florida-based Technical Writers user group.
![]()
The operators And/Or can used to combine attributes and rules, but they must match; you cannot mix them. An example of invalid rule:
- Job Title contains Engineer Or Department equals Engineering And Company starts with JumpCloud
![]()
An attribute may be added multiple times with different conditions. An example would be:
- Job Title starts with Eng And Job Title contains FTE and Department does not contain Prod
- Click Preview to see which users are affected by the conditions of the group.
- After reviewing the group membership, click Close.
- If the preview is incorrect, modify the conditions and click Preview again
- If the review is correct, click Save Group
- You will receive a User Group saved successfully message.
To use the Member Of attribute
When configuring a dynamic user group, you can use the Member Of attribute to check for membership in a separate group and consolidate group rules to manage membership and in turn resource access accordingly.
For example, you have an Engineering group and you want to create a new group specifically for India Engineering to grant users access to a specific application.
For this, you can create a Dynamic Group called India Engineering with conditions as:
- When Member Of contains Engineering
- and, Location Equals India
This will result in:
- Any user who is a member of the Engineering group and located in India, will be automatically added to India Engineering.
- When they are removed from the Engineering group, their access to the India Engineering group is automatically removed.
You can verify the users using the Preview button.
![]()
You can use the Member Of attribute to create a sequence of group memberships. However, avoid creating circular relationships. For example, if Group A depends on Group B, Group B cannot depend back on Group A. Such configurations will trigger an error and disrupt dynamic membership.
If a circular relationship is detected, impacted groups will appear in the User Groups page in the Needs Attention tab. You can remediate such groups by modifying the rules so that the circular relationship is removed.
To use custom attributes
Custom attributes can be used to store additional information about your users that isn’t provided in one of JumpCloud's standard user attributes. There are some limitations when configuring custom attributes for users and other limitations when using those custom attributes for dynamic group membership:
- Maximum number of custom attributes per group is five (5)
- There is no validation done for custom attributes - the value entered must match the users' custom attribute(s) exactly, including case
- Group membership rules configured with custom attributes that are not present in user records will not be applied to those users, even if the rule has does not contain or not equals
- Custom group inherited user attributes are not supported for dynamic group membership
Reviewing Membership Updates
When configuring a dynamic user group, you have the option to enable Require administrator review of updates before membership changes are made. All administrators, except those with Read Only or Help Desk roles, will be able to review and accept or reject membership updates in the Admin Portal. You can also enable Receive emails when administrator review is needed for updates to receive Suggestions emails.

To review membership updates
- Click Review Suggestions in the Suggestions email or Review next to the group in the Admin Portal.
- The Review Group Membership window will appear showing which users are affected by the conditions of the group.

- After reviewing the suggestions:
- If incorrect, click Close, modify the conditions and save the group. Click Review again
- If correct, select the users to be added and click Accept and Save
- Click Save Group.
![]()
Actions to unbind a policy* that has been bound to a user or device through its membership in a dynamic group will not take effect; the rules of the dynamic group will re-bind the user or device. If you want to remove a policy* from an individual user or device, you must create an exemption for that user or device within the dynamic group.
*Or other types of bindings, such as SSO applications, commands or software.
Using Exemptions
The workflow below shows three different flows when implementing Dynamic User Groups with user exemptions.
- Jason is bound to the Denver group but has recently relocated to Chicago. He still needs certain resources that are associated with the Denver group. If Jason is added to the User Exemptions List, he will remain in the group though his Location has changed from “Denver” to “Chicago”. If he is not added to the User Exemptions List, he will be instantly removed from the Denver group when the admin updates his Location in his User Details.
- Mark is bound to the Denver group and his Location is “Denver”. He will stay in the group regardless of the User Exemptions List.
- Stacy is not bound to the Denver group. If Stacy is added to the User Exemptions List, she will never be added to the Denver group. If Stacy is not added to the User Exemptions List, she will be instantly added to the Denver group when the admin adds “Denver” as her location.

To add users to the User Exemptions List
![]()
Configure groups strategically using rules to result in the targeted membership, using exemptions sparingly. If you find you can't reach the desired group membership without a large number of exemptions, reach out to JumpCloud so that we can understand what additional rules or conditions may be needed.
- In the Exemptions section, click in the field underneath Users to include or Users to exclude.
- Start typing in the name of the user you would like to add to the list and then select the box next to the user in the dropdown.
- Users will appear in alphabetical order
- Selected users will appear as pills below the Search bar
- Add up to 50 users to the exemption list
- When finished adding users, click Save Group.
![]()
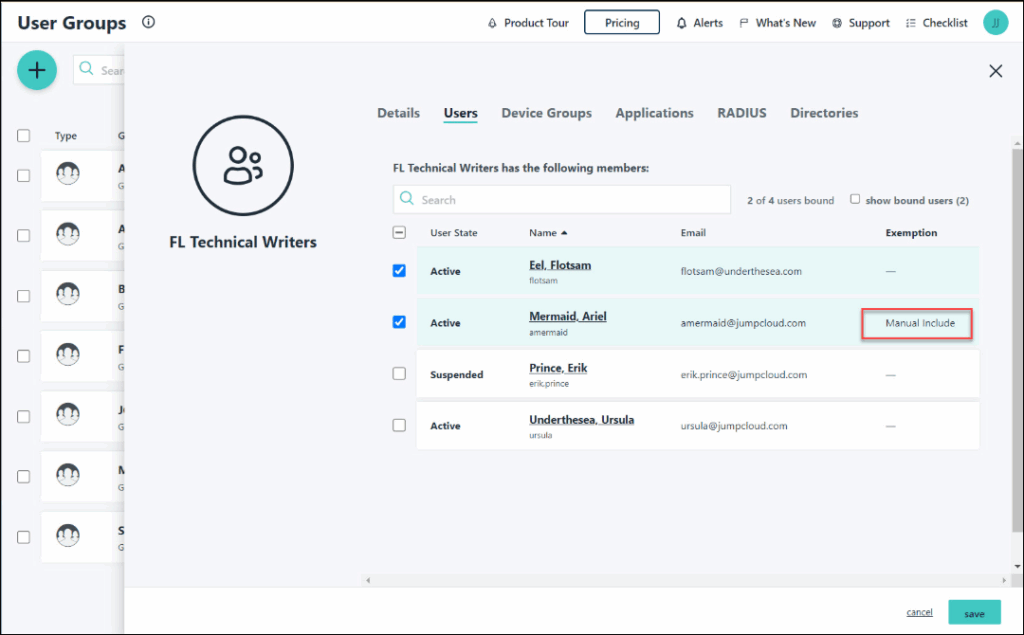
Exemptions configured to include or exclude a user from a user group are NOT reflected in the Preview Group Membership modal. You can review the Exemptions List by looking at the pills beneath Users to include or Users to exclude or by navigating to the group's Users tab and confirming that Manual Include is listed for that user in the Exemption column.
To remove a user from the User Exemptions List
- In the Exemptions section, find the user's pill underneath the Search bar.
- Click the ‘x’ next to their name.
- When finished removing users, click Save Group.
Disabling Dynamic User Groups
When you convert a dynamic user group, the group becomes a manually controlled static group moving forward, with user membership preserved as-is in that moment.
![]()
The attribute-based rules that were configured for the previously dynamic group will persist for the group, making it easy to revert back to a dynamic group.
- Log in to the JumpCloud Admin Portal.
![]()
If your data is stored outside of the US, check which login URL you should be using depending on your region. If your organization uses LDAP, RADIUS, or requires firewall allow list configuration, the Fully Qualified Domain Names (FQDNs) will also be region specific. See JumpCloud Data Centers for the URLs, FQDNs, and IP addresses.
- Go to Identity Management > User Groups.
- Select the group for which you would like to disable automation.
- Select the Static radio button and then Change Group To Static.
- Click Save Group.