
Integrate Entra ID as an Identity Provider (IdP) with JumpCloud allowing users to securely authenticate with their IdP credentials to gain access to their managed resources.
Prerequisites:
- A JumpCloud Administrator With Billing account to configure an IdP
- Microsoft Entra Admin Center login with the permission to create Enterprise Applications, like a Global Administrator or Application Administrator
- Existing users in JumpCloud
Considerations:
- Federated authentication will be applied to only specific user groups:
- See Routing Policies for Identity Providers to learn more
- Creating the IdP won't automatically result in users logging in with that IdP
- User Portal access will be available with a federated login:
- If you don’t want User Portal access, create a policy to deny this
- Learn how to provision users from your Entra ID directory to JumpCloud
Preparing your IdP to Configure with JumpCloud
To register JumpCloud in Entra
- Log in to your Microsoft Entra Admin Center.
- In the left hand navigation, go to Manage > App registrations.
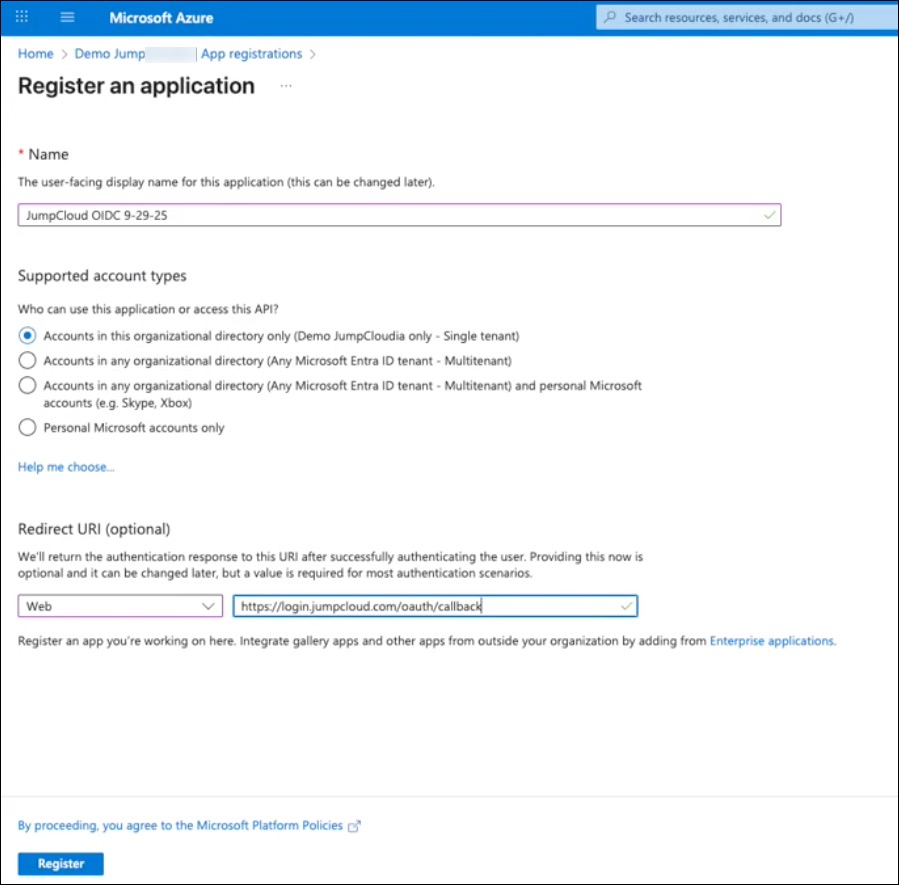
- On the next page, click + New registration and enter the following:
- *Name - Enter a name associated with JumpCloud.
- Supported Account Types - select Accounts in this organizational directory only.
- Redirect URI- click the Select a platform dropdown menu > Web.
- URI - enter https://login.jumpcloud.com/oauth/callback
- For organizations using the EU data center, enter https://login.eu.jumpcloud.com/oauth/callback

- For organizations using the EU data center, enter https://login.eu.jumpcloud.com/oauth/callback
- Click Register.
- On the new JumpCloud app page, go to Manage > Authentication.
- Scroll down to Implicit grant and hybrid flows, and select ID tokens (used for implicit and hybrid flows).
- Click Save.
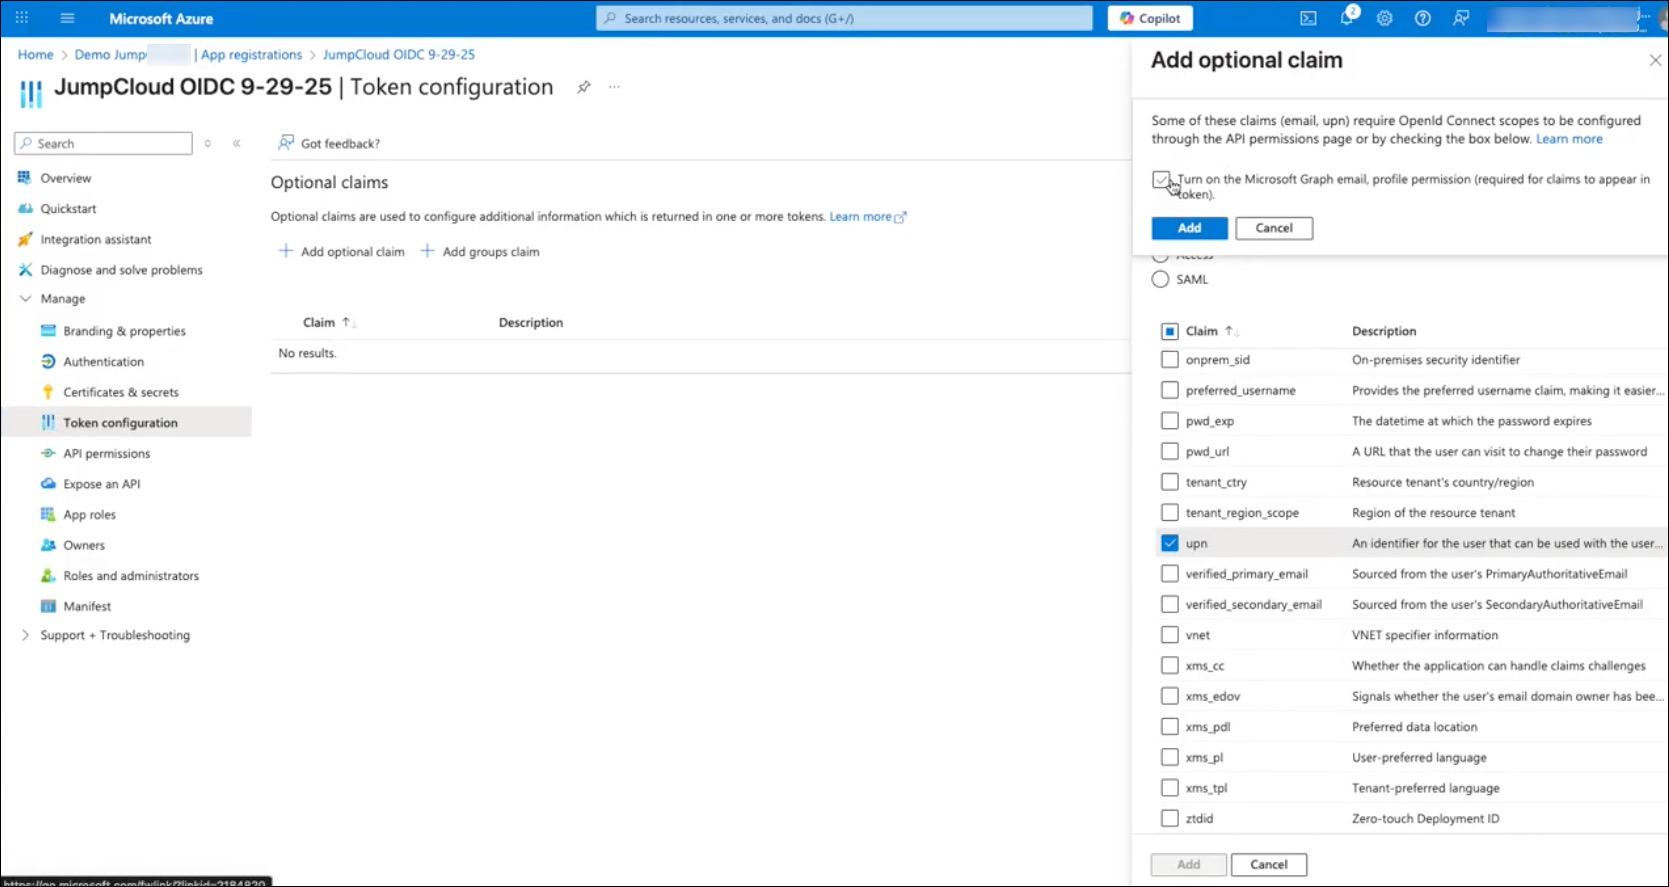
- Go to Manage > Token configuration > Optional claims.
- Select +Add optional claim.
- Token Type - select ID.
- When the list of claims appears, select email and upn
- Click Add.
- At the top of the Add optional claim slide out, select Turn on the Microsoft Graph email, profile permission.
- Click Add.

- Go to Manage > API permissions. Under Configured permissions, select Grant admin consent and then click Yes.
- Go to Manage > Add a certificate or secret > + New client secret and enter the following:
- Description - enter a description for your new secret.
- Expires - select an expiration in dropdown menu.
- Click Add.
- The new Client Secret will populate on the page with a Value and Secret ID. Copy and save the Value which will be entered as the Client Secret to configure JumpCloud.
![]()
The Client ID and Secret (token) may only be shown once. Copy them to a secure location, like the JumpCloud Password Manager, for future reference.
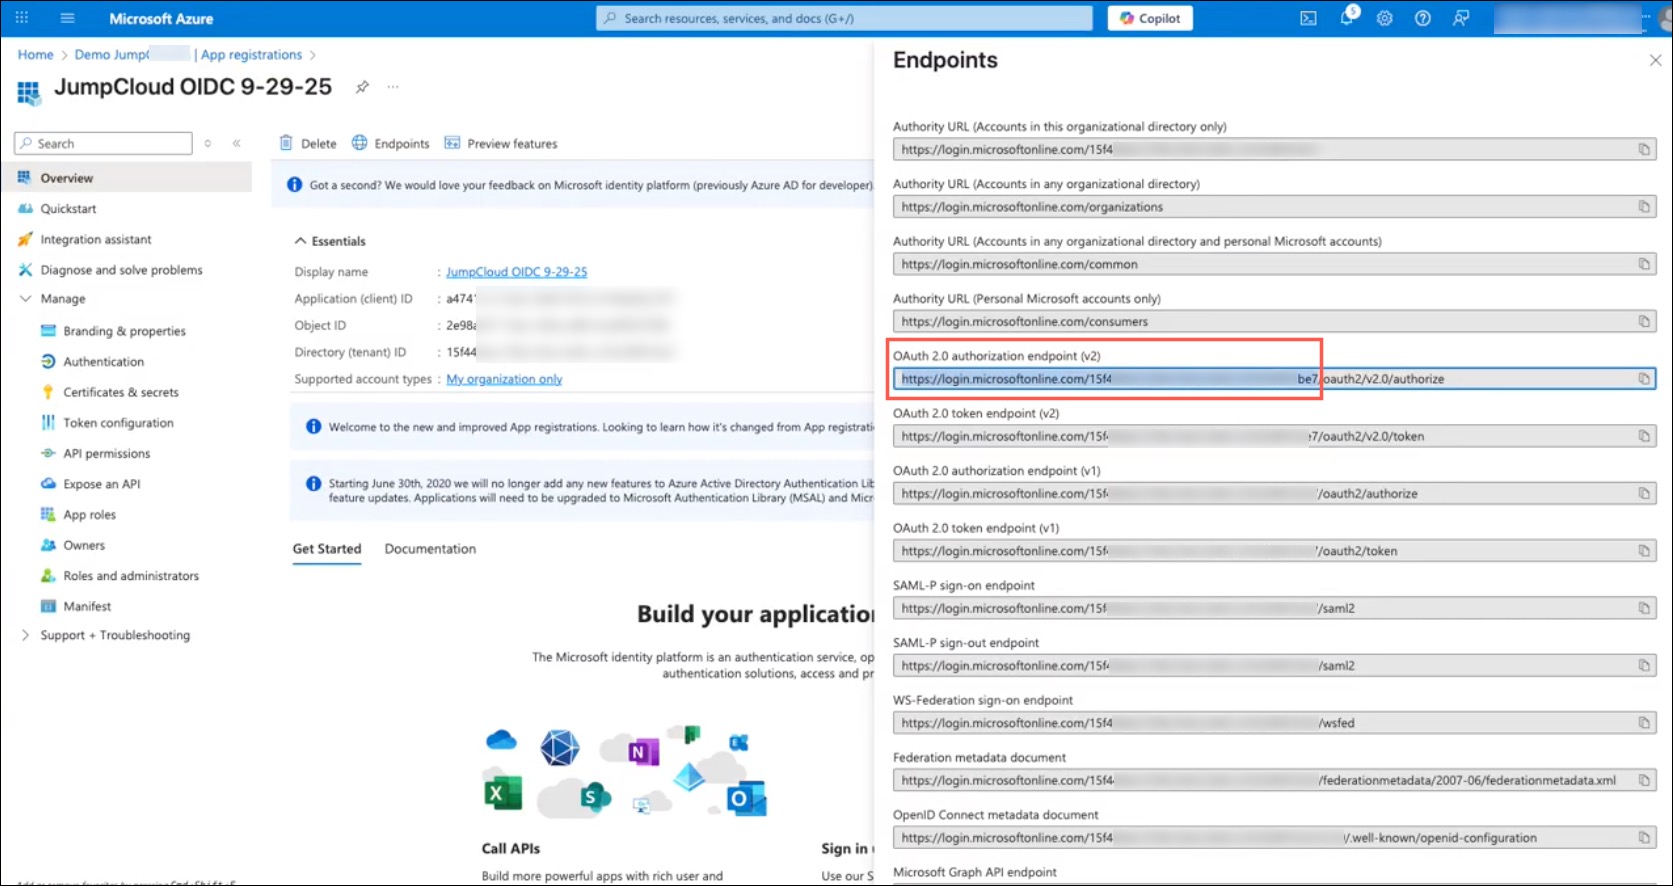
- Copy and save the following values which will be required to configure JumpCloud in the next section:
- Azure IdP URL
- Go to Overview > Endpoints. A list of URLs will populate, in the OAuth 2.0 authorization endpoint (v2) field, copy the entire URL up until the /oauth2/v2.0/authorize.
- Click X to exit the Endpoints window.
- Important: Only copy the URL and Directory Tenant ID, ex: https://login.microsoftonline.com/0e8458f5-85a1-4f18-a405-0e0d5e2265b2/

- Important: Only copy the URL and Directory Tenant ID, ex: https://login.microsoftonline.com/0e8458f5-85a1-4f18-a405-0e0d5e2265b2/
- Client ID
- Go to Overview and copy the Application (client ID).
- Azure IdP URL
Now, you have a connection to JumpCloud in Entra. Next, you’ll want to configure the connection in JumpCloud.
Configuring Entra ID as an IdP in JumpCloud
- Log in to your JumpCloud Admin Portal.
![]()
If your data is stored outside of the US, check which login URL you should be using depending on your region. If your organization uses LDAP, RADIUS, or requires firewall allow list configuration, the Fully Qualified Domain Names (FQDNs) will also be region specific. See JumpCloud Data Centers for the URLs, FQDNs, and IP addresses.
- Go to Identity Management > Identity Providers.
- Click the Add Identity Provider dropdown menu, select Azure and enter the following:
- Identity Provider Name - enter a name (i.e., Entra OIDC).
- Azure IdP URL - copy/paste from the previous section in Step 17a https://login.microsoftonline.com/<Directory (tenant ID)>
- Client ID - enter the Application (client ID) associated with the new application you created in the previous section in Step 17b.
- Client Secret - enter the secret value you received when you created the client credentials in the previous section in Step 16.
- Click Save.
- In Authentication, click +Routing Policy.
- In the User Groups search bar, search for and select all user groups that will log in with Entra ID.
- You’ll be prompted to verify that you want to enable Federated Device Authentication for your users’ login. Select I understand the impacts above, then click Yes, Continue.
- Click Create when finished.
- Now, you can go and test the connection to ensure everything is working as expected.
Creating a New Entra User
![]()
You should have existing users in the JumpCloud Admin Portal.
- From your Microsoft Entra Admin Center, in the left hand navigation, go to Users > All Users > + New user > Create new user.
- On the next page, enter a User principal name.
![]()
The User principal name should match as the existing JumpCloud user's Company Email.
- For Mail nickname*, the option to Derive from user principal name is selected by default. You can change this if you’d like to.
- Enter a Display name*.
- For Password*, keep the auto generated option selected.
- For Account enabled*, keep the checkbox selected by default.
- Click Review + create.
- On the next page, review your new user’s details and then click Create.
- The new user should populate in the list of Users, if it doesn’t, click Refresh.
Managing the IdP
To manage the IdP:
- Log in to your JumpCloud Admin Portal
![]()
If your data is stored outside of the US, check which login URL you should be using depending on your region. If your organization uses LDAP, RADIUS, or requires firewall allow list configuration, the Fully Qualified Domain Names (FQDNs) will also be region specific. See JumpCloud Data Centers for the URLs, FQDNs, and IP addresses.
- Click Identity Management > Identity Providers.
- You can update the Identity Provider Name, Entra IdP URL, Client ID, and Client Secret.
- Under Authentication, you’ll see that Federation is applied to your users, allowing them to authenticate with an IdP.
Deleting the IdP
To delete the IdP:
- Click Identity Management > Identity Providers.
- At the bottom of the IdP Configuration page, under Delete Identity Provider, click Delete IdP.
- You’ll be prompted to confirm your deletion, then click Yes, Delete.
Additional Resources
Walk through a guided simulation for Configuring Entra ID as an Identity Provider