
![]()
Apple Business Manager is now Apple Business. You might still see references to Apple Business Manager or ABM in this article or in the Admin Portal while we update our content. Both terms refer to the same platform.
This article explains how to enable and configure account-driven user enrollment within the JumpCloud Admin Portal. You must configure enrollment before users are able to enroll their iOS and iPadOS devices to be managed by your organization.
Account-driven enrollment is the preferred method for enrolling Apple iOS/iPadOS devices into JumpCloud MDM. With this method, end users can enroll their devices directly by using a Managed Apple Account provided by your organization instead of downloading a profile from an external link or scanning of a QR code in the JumpCloud User Portal.
![]()
This process must be used for all devices running iOS/iPadOS 18 or later. Profile-based user enrollment, where the user downloads a configuration profile onto their device, will fail for personal device enrollments on devices running iOS/iPadOS 18 or later.
Prerequisites
- Account-driven user enrollment is supported on iOS/iPadOS 15 and later.
- The Apple Business Manager option is supported on iOS/iPadOS 18.2 and later.
- Users must have a Managed Apple Account (formally known as Managed Apple ID, or MAID) associated with their JumpCloud user account. Jump to Creating Managed Apple Accounts.
- Your Apple Business Manager must be configured correctly to validate that the Apple account used to sign in to iCloud is managed by your organization.
- In Apple Business Manager, go to Access Management > Apple Services and set Allow Managed Apple Account to Any.
Considerations
- Account-driven user enrollment on macOS and visionOS is not supported in JumpCloud at this time.
- Account-driven device enrollments are not supported in JumpCloud at this time.
- Apple's Stolen Device Protection, when activated, might impose a one hour Security Delay for MDM enrollments if the device is not in a familiar location. To avoid delay or errors during enrollment, ensure the user is in a familiar location, or temporarily deactivate the feature before attempting enrollment. See Apple's Use Stolen Device Protection to learn more.
Creating Managed Apple Accounts
To use Account-driven Enrollment, your users will need Managed Apple Accounts (MAAs) to enroll their devices. You can create MAAs using JumpCloud's direct integration with Apple Business Manager (ABM). This integration uses SCIM to automate the provisioning, updating, and deprovisioning of users in ABM from JumpCloud. After the Managed Apple Accounts are created through the SCIM integration, they are automatically associated with JumpCloud user accounts. See Integrate with Apple Business Manager to learn more.
Alternatively, you can create Managed Apple Accounts manually in ABM. If you create accounts manually, they must also be associated with JumpCloud user accounts manually. See Run the MAID Import Script to learn more.
![]()
Reference the following Apple documentation on creating Managed Apple Accounts:
Next, set up a well-known URL on your domain. Depending on the method you choose, you will host an enrollment file at this URL directly or you will place a redirect from this URL to the JumpCloud service discovery URL.
![]()
If your organization meets the requirements, you can also use the Apple Business Manager (ABM) option, which fetches the redirect URL directly from the MDM server configured in ABM. Jump to Configuring Apple Business Manager to learn more.
Setting Up a Well-Known URL
Prerequisites:
- The well-known URL must be hosted on a domain that can handle HTTP GET requests and is the same domain that your end users sign in to. This allows devices to initiate a service discovery process to retrieve the information and direct your users to the JumpCloud enrollment endpoint.
On your web server, implement the following well-known URL for MDM service discovery, replacing yourdomain.com with your org's domain:
https://yourdomain.com/.well-known/com.apple.remotemanagement
Next, configure the redirect from this URL or host a file at this URL.
Configuring a Redirect
To configure account-driven user enrollment using a redirect:
- Log in to the JumpCloud Admin Portal.
![]()
If your data is stored outside of the US, check which login URL you should be using depending on your region. If your organization uses LDAP, RADIUS, or requires firewall allow list configuration, the Fully Qualified Domain Names (FQDNs) will also be region specific. See JumpCloud Data Centers for the URLs, FQDNs, and IP addresses.
- Go to Device Management > MDM.
- On the Apple > Home tab, scroll to iOS Enrollment.
- Under Account-driven User Enrollment Configuration, select Redirect.

- On your web server, define a redirect rule from the well-known URL you implemented above to the JumpCloud service discovery URL, making sure to place your JumpCloud org ID accordingly.
- From:
https://yourdomain.com/.well-known/com.apple.remotemanagement - To:
https://apple.mdm.jumpcloud.com/account-driven-service-discovery?organization_id=XXXXXXXXXXXXXXX
- From:

![]()
The steps to configure the redirect will look different depending on your solution. Below are resources for placing a redirect with popular web servers:
- Apache: Redirect Directive
- NGINX: Beginner's Guide
Configuring a Redirect in Cloudflare
See Cloudflare's Create rule in the dashboard for more information on this process.
To set up a redirect using Cloudflare Rules:
- Log in to your Cloudflare account.
- Select the domain you want to redirect.
- From the Rules tab, click Redirect Rules.
- Click Create Rule and give the rule an descriptive name.
- Under When incoming requests match, select Wildcard pattern.
- In the Request URL field, enter
https://example-domain.com/.well-known/com.apple.remotemanagement*whereexample-domain.comis your root domain. Remember to include the asterisk after com.apple.remotemanagement. - In the Target URL field, enter
https://apple.mdm.jumpcloud.com/account-driven-service-discovery?organization_id=XXXXXXXXXXXXXXXXXXXXXwhere XXXXXXXXXXXXXXXXXXXXX is replaced with your JumpCloud Organization ID. - For Status Code, choose 301.
- Leave Preserve Query String unchecked.
- Click Deploy.
Once the redirect rule is active, any requests to the specified path will be redirected to the specified URL. It may take some time for the rule to take effect due to Cloudflare's caching.
Configuring a Redirect in Shopify
See Shopify's Creating and managing URL redirects for more information on this process.
To set up a URL redirect in Shopify:
- From your Shopify admin, go to Settings > Apps and sales channels.
- From the Apps and sales channels page, click Online store.
- Click Open sales channel.
- Click Navigation.
- Click View URL Redirects.
- Click Create URL redirect.
- In Redirect from, enter
/.well-known/com.apple.remotemanagement - In Redirect to, enter
https://apple.mdm.jumpcloud.com/account-driven-service-discovery?organization_id=XXXXXXXXXXXXXXXXXXXXXwhereXXXXXXXXXXXXXXXXXXXXXis replaced with your JumpCloud Organization ID. - Click Save redirect.
Configuring a Redirect in Squarespace
See Squarespace's URL mappings documentation for more information on this process.
To set up a URL redirect in Squarespace:
- Open Developer Tools.
- Click URL Mappings.
- Click into the text field to add the redirect, following this format, where
XXXXXXXXXXXXXXXXXXXXXis replaced with your JumpCloud Organization ID.:
/.well-known/com.apple.remotemanagement -> https://apple.mdm.jumpcloud.com/account-driven-service-discovery?organization_id=XXXXXXXXXXXXXXXXXXXXX 301
- Click Save.
Configuring a Self-Hosted File
Although a self-hosted file is less flexible than a Redirect, it may be useful if you do not have access to your web server configuration.
![]()
For more information about the service discovery process, see Apple’s Discover Authentication Servers from the Apple Developer website.
To configure account-driven user enrollment using a self-hosted file:
- From the JumpCloud Admin Portal, go to Device Management > MDM.
- On the Apple > Home tab, scroll to iOS Enrollment.
- Under Account-driven User Enrollment Configuration, select Self Host.

- A JSON configuration snippet appears. Click Download JSON.
- Publish the file on the well-known URL you created above.

Setting up a Web Server to Host the File
To host the JumpCloud enrollment information on a web server, you must define the path to your web server. If the verified domain you use for Managed Apple Accounts is already configured to host files, you can host the enrollment information at the same hosting location. If your environment is not configured to do so, you must set up a web server to host the information.
![]()
JumpCloud recommends consulting your internal web services and hosting team to help you complete this task.
Prerequisites:
- The web server must have the same fully qualified domain name (FQDN) as the verified domain that the Managed Apple Accounts belong to, and web services must be enabled.
- The SSL certificate for the web server must be issued by a trusted certificate authority. For a list of trusted root certificates, see Apple's List of available trusted root certificates.
- The JSON file must be hosted on a server that supports HTTPS GET requests. Requests contain query parameters, such as user-identifier and model-family, which are passed through to JumpCloud when the device is redirected for enrollment.
The resulting URL for the file must be similar to the following, where example_domain.com is the same format and domain as the Managed Apple Accounts' email address: https://example_domain.com/.well-known/com.apple.remotemanagement
Configure the server to return the appropriate Content-Type header with the file, as follows: Content-Type is 'application/json'
![]()
Your server software may refer to Content-Type as "MIME type."
For more information about how to modify the MIME type, see the following documentation:
- Apache: Apache Module mod_mime
- NGINX: Full Example Configuration
- Microsoft: Adding Static Content MIME Mappings
Configuring Apple Business Manager
With iOS 18.2, Apple added a fallback service discovery method that allows devices to retrieve the redirect URL directly from the MDM server configured in Apple Business Manager (ABM) or Apple School Manager (ASM). If you haven’t configured Account-driven Enrollment or a well-known URL yet, you can use this as the primary method as long as your devices meet the requirements.
Prerequisites:
- Because Apple specifies this method as a fallback, if you’ve already configured a well-known URL, you’ll need to temporarily disable your existing well-known URL configuration before testing this method.
- This method is supported on iOS/iPadOS 18.2 and later.
- Apple Automated Device Enrollment (ADE) must be configured in JumpCloud to use this option. See Configure ADE to learn more.
- You must configure the following settings in ABM or ASM:
- Verify your domain in ABM or ASM. See Apple’s Add and verify a domain in Apple School Manager or Add and verify a domain in Apple Business Manager to learn more.
- The Default Assignment for devices must be set to the JumpCloud MDM server. See Apple's Set the default device assignment to learn more.
To configure Account-driven Enrollment using Apple Business Manager:
- From the JumpCloud Admin Portal, go to Device Management > MDM.
- On the Apple > Home tab, scroll to iOS Enrollment.
- Under Account-driven Enrollment Configuration, select Apple Business Manager.

- Click Enable.
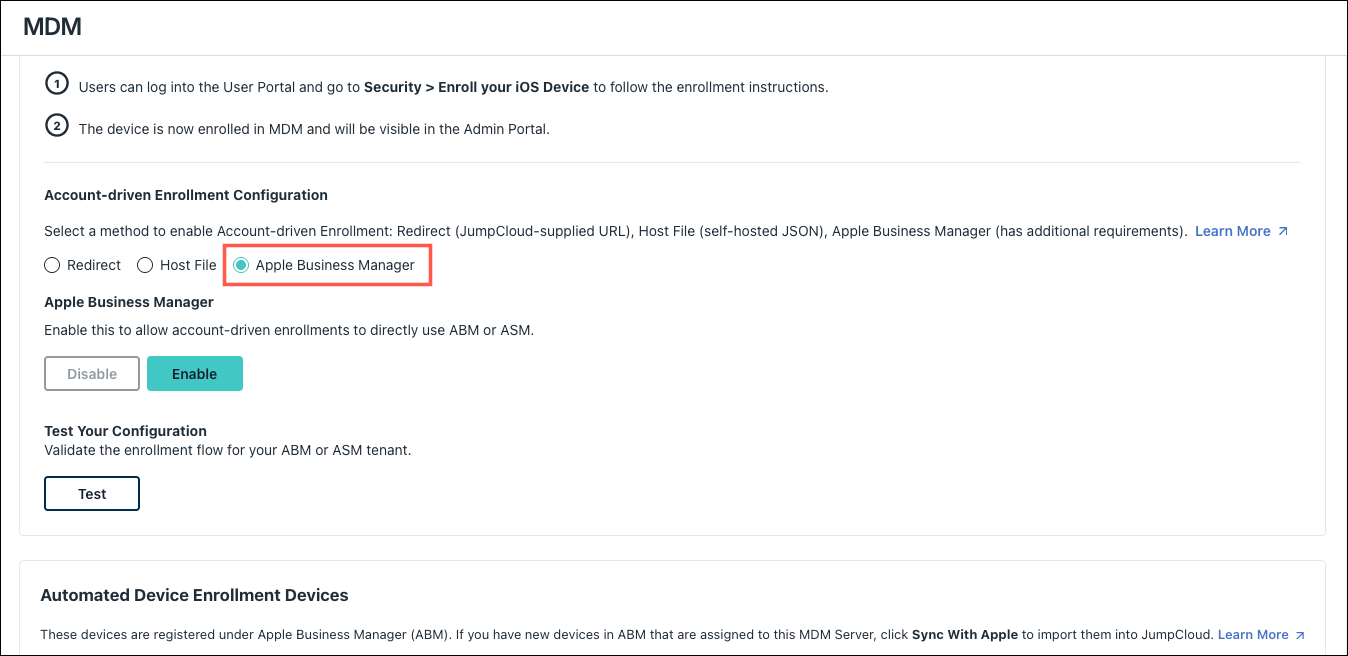
Testing the Enrollment Configuration
To test your configuration:
- Back in the JumpCloud Admin Portal, under Under Account-driven User Enrollment Configuration, enter your domain in the Test Your Configuration field and click Test.
- If successful, the JumpCloud Admin Portal returns a success message: "Account-driven Configuration Successful for {Entered Domain}"
- Alternatively, if incorrectly configured, you will receive an error message similar to the following: “An error occurred. Account-driven Configuration for {Entered Domain} could not be verified.”
Troubleshooting Error Messages
- Verification failed to get a well-known URL. Please check your info and try again. - Invalid domain entered. Check the configuration.
- An issue occurred during verification. Refer to the help article for remediation tips. - A status code other than 200 was returned. Check the configuration.
- During verification, an unexpected content type was returned. Please check your info and try again. - Content not in JSON format was returned.
- Either unknown content or improper content length was detected during verification. Refer to the help article for remediation tips. - Response length received from the domain was too large. Check the configuration, as we expect a simple JSON response.
- Verification failed to read the response body. Refer to the help article for remediation tips. - Unreadable data in response. Check whether the response contains the proper data.
- Verification failed to understand the JSON response. Refer to the help article for remediation tips. - Readable data was returned in unexpected JSON format. Check the JSON configuration.
- There was an invalid configuration of a well-known URL response during verification. Refer to the help article for remediation tips. - Either the version or baseurl parameters in the JSON configuration is incorrect.
- There were too many redirects during verification. Refer to the help article for remediation tips. - Check that the well-known url is properly redirected and not in a redirection loop.
After ADUE has been configured in the Admin Portal, users can follow the steps to enroll their devices (iOS 15+). See Users: Enroll Your Personal iOS Device.
![]()
In order for users to enroll their devices, you must select the option to Allow users to enroll personal mobile devices and access Enroll Your iOS Device in the User Portal.

Troubleshooting
During iOS enrollment, users might receive the following error when signing in with a Managed Apple ID: "Your Apple Account does not support the expected services on this device. Please contact your administrator to sign in."
This error typically occurs due to restricted settings in Apple Business Manager (ABM) or because Apple's Stolen Device Protection is enabled on the user's device.
Verify Apple Business Manager Settings
Ensure that your ABM environment permits Managed Apple Accounts.
- Log in to Apple Business Manager.
- Go to Access Management > Apple Services.
- Verify that Allow Managed Apple Account is set to Any.
Disable Stolen Device Protection
If your ABM settings are correct, the user might need to temporarily deactivate Stolen Device Protection to complete the enrollment. Jump to Considerations to learn more.