
Connect


Contents
Keeping Rocky Linux up to date is crucial to maintaining optimal security, stability, and performance of your distribution. These updates ensure that you have the latest technology and solutions to keep your server secure against various threats and vulnerabilities. Any given update may include improvements in the following areas.
- Security: Many updates include patches that will enhance your security by addressing known vulnerabilities, strengthening the security posture of your server, or reducing the risk of unauthorized access and system compromises.
- Bug Fixes: Bugs can lead to system crashes, unexpected behavior, or even data corruption. With each update, developers from the Rocky Linux community work to identify and fix these bugs, improving the overall stability and reliability of the system.
- Performance Optimization: Updates often include performance improvements, optimizations, and enhancements to your Rocky Linux system. These improvements result in faster execution times, reduced resource usage, and improved responsiveness.
- Compatibility: Compatibility is crucial when switching from other Linux distributions like Red Hat Enterprise Linux (RHEL) or CentOS to Rocky Linux. Rocky Linux is a community-driven distribution that’s built on RHEL’s source code and aims to maintain binary compatibility with RHEL. This means that applications and packages developed or tested on RHEL or CentOS should work smoothly on Rocky Linux without any issues.
How to keep your Rocky Linux Up to Date
Keeping a Rocky Linux server up to date is essential for maintaining optimal security, stability, and performance. In this tutorial, we will explore the best practices to ensure your system is regularly updated, providing you with the latest bug fixes, security patches, and feature enhancements.
Step 1: Log in to your Rocky Linux system
First, make sure that you have a terminal or SSH client installed on your local machine. If you’re using Linux or macOS, you can use the built-in terminal application. For Windows users, you will most likely use the Putty SSH client.
Open the terminal and type the following command replacing username and server_ip_address with your own:
ssh username@server_ip_address
If it’s your first time connecting to the server, you will see a security warning about the authenticity of the host. You can verify authenticity by typing ‘yes’ in the terminal.

Then, enter the password so you can log in to the system:

Step 2: Enable automatic updates
In Rocky Linux, the package manager dnf offers two primary methods for performing a comprehensive system upgrade.
The first method is by using a utility called dnf-automatic, designed to automate the installation of security patches and other crucial upgrades for your server. To install this tool, you can utilize the dnf package manager with the appropriate command.
The second method is executing the upgrade command without specifying a particular package, which upgrades all packages on the system. Alternatively, the upgrade-minimal command can be used to update packages solely to the latest bug fix or security patch release. This approach ensures necessary maintenance, while minimizing the risk of encountering disruptive changes from upstream sources.
In order to set up the automatic update process, you’ll first need to install the dnf-automatic since it’s not available by default on your Rocky Linux server.
This command requires either sudo or root privileges in order to be executed.
sudo dnf install dnf-automatic
Type ‘yes’ to install the package.
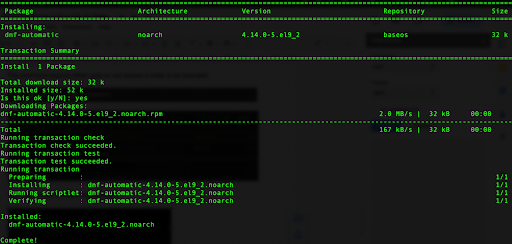
After that, the installation is complete.
Step 3: Configure the dnf-automatic service
Once the installation is complete, edit the configuration file using your preferred text editor.
sudo vi /etc/dnf/automatic.conf
In the configuration file, locate the line that starts with upgrade_type, then press the ‘i’ key in order to enter the edit mode. Replace the value from ‘default’ to ‘security.’

By default, this option in this .conf file is set to ‘default’. If your intention is to enable automatic upgrades in a proactive manner, it is advisable to modify the default behavior to only include security upgrades. This ensures that unexpected changes in functionality are avoided.
In order to write the changes and exit the file using Vi editor, press ‘Shift + :’ then type ‘wq’ and press ‘Enter’.
Step 4: Enable the service and check the update schedule
You want to make sure that the dnf-automatic service is enabled when you start or reboot your system. To do that, open Systemd on your server and run the following command:
sudo systemctl enable dnf-automatic-install.timer

In contrast to certain Systemd services, dnf-automatic operates as a timer rather than a continuously running background service. Consequently, it is normal for the status to appear as ‘Active: inactive (dead)’ as long as the service is loaded and the logs indicate successful executions.
You can check the current status of dnf-automatic by running the following command:
sudo systemctl status dnf-automatic-install
As an output, you will see that the service is currently inactive.

Next, check when your security updates are usually performed on schedule. Again, you’ll use Systemd to check your timer unit:
sudo systemctl cat dnf-automatic-install.timer
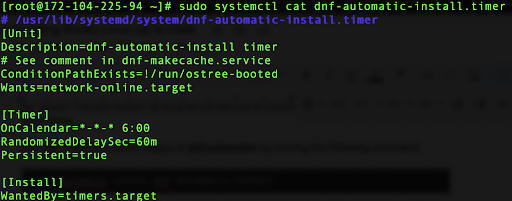
Based on the output, you can see that dnf-automatic-install.timer is a Systemd timer unit that triggers the dnf-automatic-install service. It is scheduled to activate every day at 6:00 AM, with a randomized delay of up to 1 hour.
Step 5: The manual update process
There are certain times when you may need more control and oversight over the update process. Manually updating packages on your Rocky Linux system allows you to carefully review and test updates before applying them to your system, ensuring compatibility and stability.
This is beneficial in scenarios where you have certain custom configurations, critical applications, or specific dependencies that require careful consideration. In that way, you can minimize the risk of breaking packages or data corruption on your system.
In order to check available updates on your system, run the following command:
sudo dnf check-update
You will get a similar output:

If you want to update only one package from this list, you can do so by running the following command:
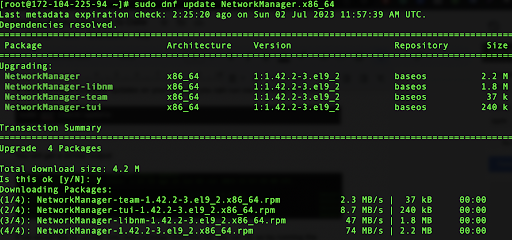
sudo dnf update NetworkManager.x86_64
Type ‘yes’ for the confirmation. This will start the upgrade process.
You can also use the upgrade-minimal command to only install important bug fixes and security patches without the risk of introducing potentially damaging changes.
sudo dnf upgrade-minimal
When executed, this command performs the following tasks:
- Retrieves the package metadata from the configured repositories
- Compares the installed packages on the system with the available updates
- Installs the latest bug fix or security patch releases of the packages while avoiding any major updates or changes that could potentially cause compatibility issues
If you want to update all, without any package selection, you can do so by running the following command:
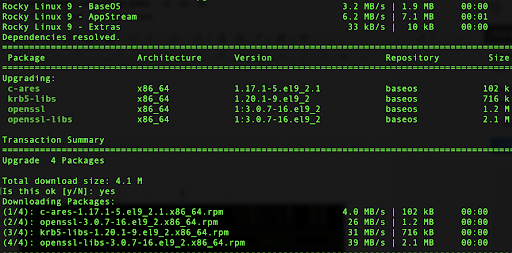
sudo dnf update
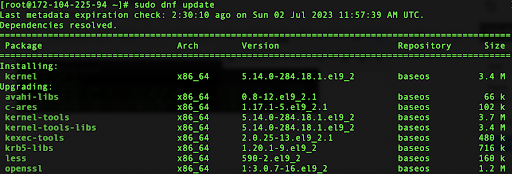
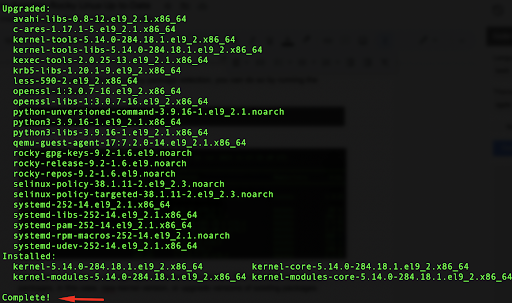
Carefully review the list and type ‘yes’ in the terminal prompt. This will install new packages (in this case, a new kernel version or upgrade version of existing packages).
Review the output of the update command to ensure that the desired packages were successfully updated without encountering any errors.
You can also verify package updates by running the rpm command:
rpm -q package_name
Replace package_name with the name of the package you updated. This command verifies the updated package’s version. When executed, the command will display the version, release, and other relevant details of the specified package if it is installed on the system. If the package is not found, the command will return an error message.
In this example, you can verify one of the packages:
rpm -q avahi-libs-0.8-12.el9_2.1.x86_64
and you should get the following format:

If you try to search for a package that doesn’t exist, you will get an error message:
rpm -q nginx

Learn More about Managing Rocky Linux
If you found this tutorial helpful and you’re interested in more Rocky Linux how-tos, check out our other tutorials on this distro: