
Connect


Contents
LAMP is one of the most popular and widely used software stacks. It stands for Linux, Apache, MySQL, and PHP, and is used for hosting both static and dynamic web applications. It’s a common hosting stack among developers and sysadmins, and is well adopted by most major hosting companies. Let’s briefly flesh out the components of the stack.
Apache HTTP server is a free and open source cross-platform web server that is used for hosting websites and web apps. It’s fast, feature-rich, and highly customizable to suit your hosting requirements.
MySQL is a popular relational database management system (RDBMS) that stores data in rows and columns inside tables. This is crucial when running applications that need to capture and handle data in a structured format. Over time, MariaDB has proved to be a popular alternative.
This is due to its powerful storage engines, faster replication, better security features, and improved performance. MariaDB is a fork of MySQL that was created following Oracle’s acquisition of the database. Other alternatives include Persona and Postgres. Read about MySQL and LDAP integration (including other databases) with JumpCloud.
PHP is a popular backend scripting language used to develop dynamic applications and access the database. Code written in PHP is interpreted by the web server using the PHP processor module, which generates the resulting webpage. WordPress is an example of a popular PHP application that’s the most common CMS on the web. It’s commonly paired with MySQL or MariaDB as well as Apache on the back end.
In this guide, we take you through how to install and configure the LAMP stack on Ubuntu 22.04, also code named “Jammy Jellyfish”.
Prerequisites
Before getting started, ensure you have the following:
- An instance of Ubuntu 22.04 server.
- Need to upgrade? Read How to Upgrade from Ubuntu 20.04 LTS to Ubuntu 22.04 LTS.
- A sudo user configured on the instance.
- A registered domain name for configuring the virtualhost file (recommended). The domain name should point to the public IP or elastic IP of the instance.
Step 1: Install Apache HTTP Server
The Apache package is available in the default Ubuntu 22.04 repositories, so you can easily install it using the APT package manager.
First, log in to your server instance and update the local package index as follows:
$ sudo apt update
Next, install Apache HTTP as follows:
$ sudo apt install apache2 -y
Once installed, Apache HTTP service starts automatically and no intervention is required to start it. To verify that the service is running, run the following command:
$ sudo systemctl status apache2

Consider enabling the Apache service to start automatically as a daemon service at start up as follows:
$ sudo systemctl enable --now apache2
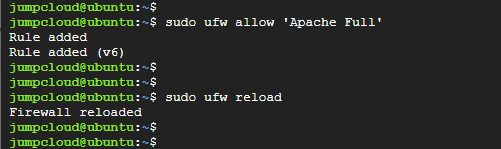
Ubuntu 22.04 comes with the firewall already installed. When enabled, all inbound traffic is blocked by default. As such, you need to allow Apache traffic through the firewall in case it’s enabled. To achieve this, run the command:
$ sudo ufw allow "Apache Full"
This profile opens both port 80 (normal, unencrypted web traffic) and port 443 (TLS/SSL encrypted traffic). You could also use the profile “Apache” which opens only port 80, or “Apache Secure” which opens only port 443.
Then reload the firewall for the changes to come into effect.
$ sudo ufw reload
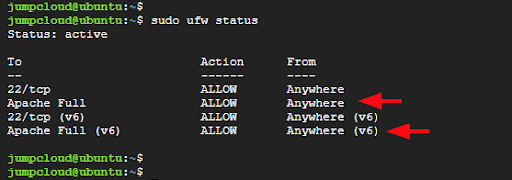
To confirm the changes made on the firewall, run the following command:
$ sudo ufw status
To ensure that the web server is accessible from a web browser, browse your server’s IP address or registered domain name.
The default Apache welcome page will be displayed:

If you are able to view this page, your web server has been set up successfully.
Step 2: Install MariaDB Database Server
The next component of the LAMP stack is the MySQL database server. However, in this guide, we opt to install MariaDB instead due to its high performance, and wealth of features and functionality.
To install MariaDB on Ubuntu 22.04 run the following command:
$ sudo apt install mariadb-server -y
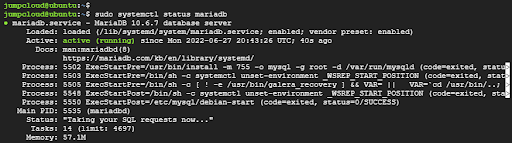
Like the Apache service, MariaDB service starts automatically once MariaDB is installed. To confirm this, run the command:
$ sudo systemctl status mariadb
Once the installation is complete, start and enable MariaDB as follows:
$ sudo systemctl enable mariadb
To check the version of MariaDB installed, run the command:
$ mariadb --version

From the above output, you can see that we have installed MariaDB 10.6.7.
Hardening MariaDB
The default settings that come with MariaDB are weak in the face of database intrusions or breaches. Your database is easily prone to external attacks. As such, you need to take an extra step and secure the database by running the mysql_secure_installation script.
To start this process, run the shell script as follows:
$$ sudo mysql_secure_installation
The script walks you through a couple of prompts. First, you will be required to specify the root password for the database server.
Press “ENTER” since you have configured it already and decline switching to Unix Socket authentication which is considered less secure.
Next, provide a strong root password and confirm.
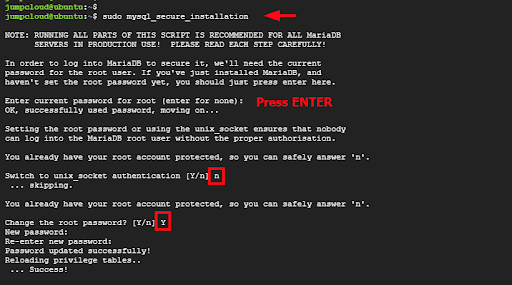
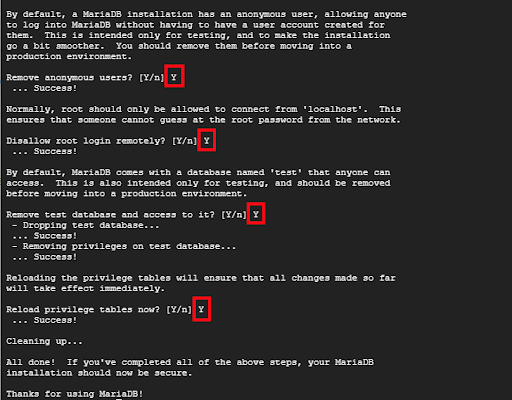
For the remaining prompts, type “Y” to secure MariaDB to the best security standards. This removes anonymous users, disallows root login from remote locations, removes the test database and access to it, and finally saves the changes.
Step 3: Install PHP and PHP Extensions
Now that you have Apache and MariaDB installed, proceed to install PHP and the required extensions. PHP is available in the default Ubuntu repositories. You’ll also need php-mysql, a PHP module that enables PHP to interact with MySQL-based databases. To allow Apache to handle PHP files, you also need libapache2-mod-php.
The dependencies for core PHP packages will be installed automatically. Run the following command:
$ sudo apt install php libapache2-mod-php php-mysql
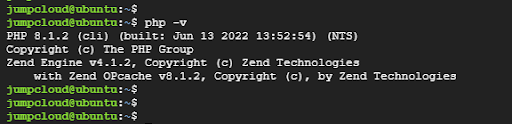
Once the installation is complete, confirm the version installed using the following command:
$ php -v
Now, let’s test out PHP integration with Apache web server. Create a sample info.php file in the document root directory.
$ echo "" | sudo tee /var/www/html/info.php
Restart Apache to apply the changes made.
sudo systemctl restart apache2
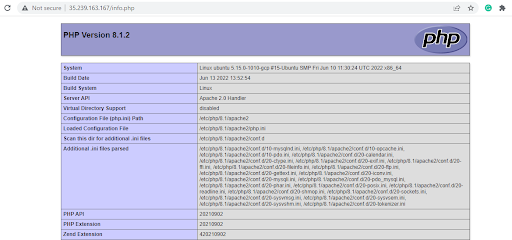
Next, open a web browser and go to the following address:
http://server-ip/info.php
You should see the following webpage detailing the version of PHP and information regarding PHP modules:
Step 4: Set Up a Virtual Host for Your Website (Optional)
A virtual host file is an Apache directive that enables you to host multiple websites on a single host. By default, Apache comes with a virtual host file called 000-default located in the /etc/apache2/sites-available/ path.
This section demonstrates how to set up a virtual host file for your registered domain. For illustrative purposes, we will use the linuxtechgeek.info domain.
First, create the website directory that will contain the websites.
sudo mkdir -p /var/www/html/linuxtechgeek.info
Next, configure the required directory permissions and ownership for the website directory.
$ sudo chown www-data:www-data -R /var/www/html/linuxtechgeek.info
$ sudo chmod 775 -R /var/www/html/linuxtechgeek.info
Then, create a sample HTML page for testing the virtual host on the browser.
$ sudo vim /var/www/html/linuxtechgeek.info/index.html
Paste the sample HTML code as shown:
Save and exit. Next, create a virtual host configuration file.
$ sudo vim /etc/apache2/sites-available/linuxtechgeek.info.conf
Paste the following lines of code and be sure to replace every instance of linuxtechgeek.info with your own registered domain name.
Save the changes and exit the virtual host file. Next, enable the virtual host as follows:
$ sudo a2ensite linuxtechgeek.info
Then reload Apache.
$ sudo systemctl reload apache2
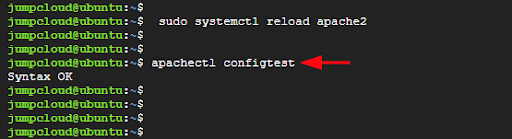
Confirm the Apache configuration file is error-free.
$ sudo apache2ctl configtest
Now head over to your browser and check if the virtual host is enabled and working.
http://domain

Conclusion
This guide demonstrated how to install the LAMP stack on Ubuntu 22.04 and configured a virtual host file for a sample domain.
Are you managing an Amazon Linux 2 system as well that needs the LAMP stack installed? Check out the following tutorial: How to Install LAMP Server on Amazon Linux 2.