Connect


Contents
Ubuntu 22.04, codenamed Jammy Jellyfish, was released by Canonical on April 21 2022. It is the latest long-term support (LTS) release after its predecessor, Ubuntu 20.04 LTS.
Ubuntu 22.04 provides major enhancements, new capabilities, and a number of new software packages such as:
- PHP 8.1.2
- OpenSSL 3.0
- Ruby 3.0
- Python 3.10.4
- MySQL 8.0.28
- PostgreSQL 14.2
- Linux kernel v5.15.0-25 & MESA 22
For a comprehensive list of all the new features and software packages, check out the release notes.
In this tutorial, we will walk you through the process of how to upgrade Ubuntu 20.04 to Ubuntu 22.04.
Prerequisites
Before you begin the upgrade, ensure you meet the following requirements:
- At least 20 GB of free disk space. You can check the available disk space using the df -Th command.
- Ensure you have a regular user configured with sudo privileges with access to SSH or the terminal app. This is the user you will use to perform the upgrade process.
- In addition, ensure you have a fast and stable internet connection. Do not cancel the operation once it’s begun.
- Ensure your UPS or battery are fully charged and working.
- Close all open applications.
Step 1: Backup all your data
It is prudent to take a backup of all your databases and files before embarking on any major upgrade of an operating system. This ensures you will not lose your data in case something goes wrong during the upgrade process.
Cloud server providers offer snapshot services. Therefore, if you are running a virtual machine or cloud VPS, ensure you take a complete snapshot so that you can restore your instance in case it breaks.
Step 2: Upgrade all the system packages
Once the backup is in place, log in to your instance and upgrade all the packages to their latest versions. This upgrades the entire system to the latest Ubuntu release.
To list upgradable packages, run the command (note: if you haven’t done this in a while, you may want to run the sudo apt update command first to get the most current details possible):
$ sudo apt list --upgradable
Next, refresh the local package index and upgrade the packages in one single command as follows:
$ sudo apt update && sudo apt upgrade -y

This might take a while depending on the number of installed packages with pending upgrades. Once the upgrade is complete, reboot your system to take advantage of the latest kernel that will come with the upgrade.
$ sudo reboot
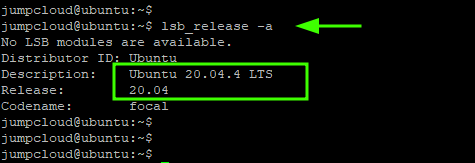
Then log back into the system and confirm it has been upgraded to the latest release, which, at the time of publishing this guide, is Ubuntu 20.04.4 LTS.
$ lsb_release -a
Step 3: Open TCP port 1022
If you are connected to your Ubuntu instance via SSH, the upgrade tool will open another SSH port (1022) as a fallback port in case the SSH connection drops on port 22.
To simplify things, we recommend that you open port 1022 on your firewall as follows. We also recommend speaking with your networking team beforehand to ensure you are minimizing potential security risks. Be sure to follow Step 6 below to close the port when you are done.
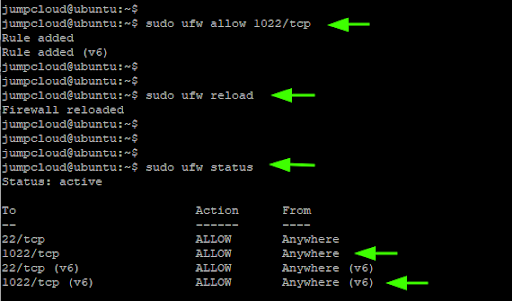
$ sudo ufw allow 1022/tcp
To apply the firewall rule, reload the firewall.
$ sudo ufw reload
Then verify that the port has been opened by probing the firewall status as shown.
$ sudo ufw status
Step 4: Upgrade to Ubuntu 22.04 Jammy Jellyfish
At this point, upgrading to Ubuntu 22.04 will be a straightforward and seamless process. There are two ways to upgrade to the latest Ubuntu version: You can use the do-release-upgrade tool, which works for both CLI and GUI instances, or the GUI update tool.
In this guide, we will use the do-release-upgrade tool. If it is not installed, you can install it by running the command:
$ sudo apt install update-manager-core
To commence the upgrade, run the command:
$ sudo do-release-upgrade
During the upgrade, the upgrade tool will probe for the latest LTS release and walk you through a series of prompts.
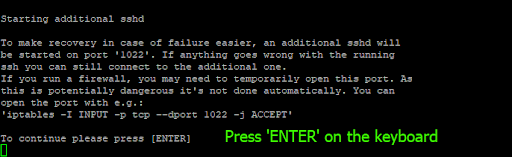
First and foremost, it will detect your SSH connection and notify you that an additional SSH service will be started on port 1022. Simply type “Y” to proceed.
Next, the upgrade tool will notify you to open port 1022, which will be used as an alternative SSH port in case of an SSH connection interruption on the default port. Since you already opened the port, just hit ENTER.
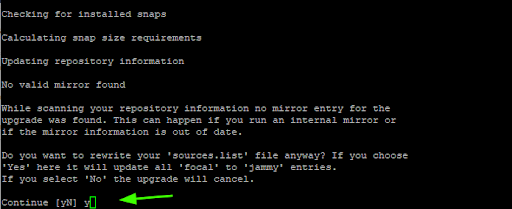
Next, you will be prompted to update the “sources.list” file from ‘focal’ to ‘jammy’ entries. To proceed with the upgrade, press “Y” and press ENTER.
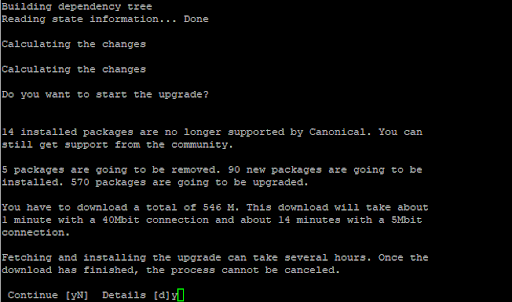
The update tool will calculate all the changes and provide a summary of the following:
- Installed packages that are no longer supported by Canonical.
- The number of packages to be removed.
- The number of new packages that will be installed.
- The number of packages that will be upgraded.
- Total download size and how long the download will take.
To continue, once again, press “Y” and press ENTER.
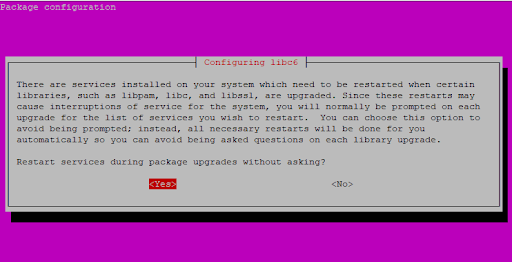
Some services will need to be restarted once some libraries and packages are upgraded. On this pop-up, select ‘Yes‘ to restart these services during package upgrades without being prompted.
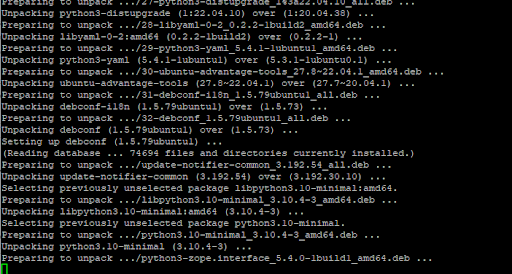
From here, the upgrade tool will proceed to download all the requisite packages from the official Ubuntu repositories and upgrade them.
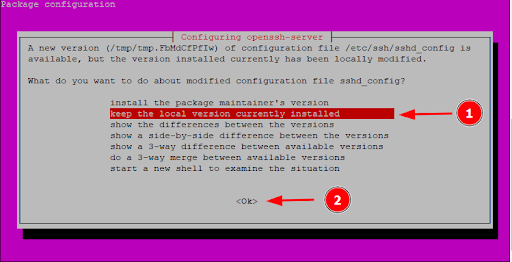
When prompted on what to do with the modified “sshd_config” configuration file, you can choose to install the package maintainer’s version or keep the local version installed. Then, select ‘Ok’.
Next, press “Y” and hit ENTER to remove obsolete packages.
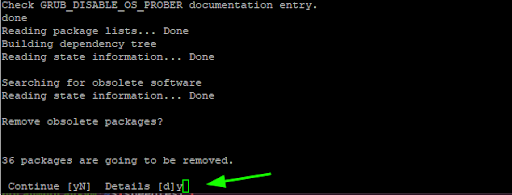
Thereafter, all the old packages alongside their configuration files will be removed.
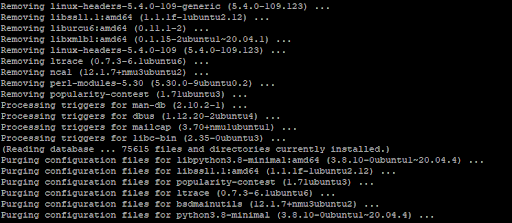
The entire process takes quite some time, so patience will be required. This is a good time to take a break and grab some coffee.
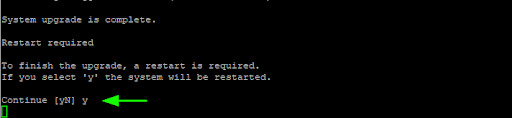
Once the upgrade is complete, you will be prompted to restart the system to finish the upgrade. Press “Y” and hit ENTER to reboot. This will cause you to lose connection to the server.
Step 5: Verify the upgrade to Ubuntu 22.04
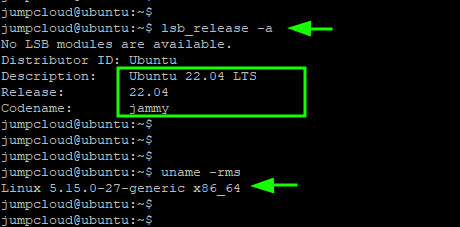
After rebooting, log back in and confirm the upgrade was successful.
The command lsb_release -a checks the version of Linux, while the command uname -mrs checks the kernel version.
From the output below, you can see that we are now currently running Ubuntu 22.04 LTS. Also, note that we are using kernel 5.15 which is the kernel version that comes with Ubuntu 22.04 by default.
Step 6: Delete the firewall rule you created
Now that you are finished with the update and no longer need port 1022 open, run the following command to close the port and prevent it from becoming a security vulnerability.
sudo ufw delete allow 1022/tcp
Step 7: Enable third-party repositories
During the upgrade, all third-party repositories are disabled. You might want to re-enable them now that the upgrade is complete. You can find these repositories in the /etc/apt/sources.list.d directory.
To display these repositories, run the command:
$ ls -l etc/apt/sources.list.d/
To enable them, simply open each file and uncomment the entries by deleting the # sign at the beginning of each line.
Finally, free up the disk space by removing all the unnecessary packages as follows:
$ sudo apt autoremove --purge
Conclusion
As you have seen, upgrading Ubuntu 20.04 to Ubuntu 22.04 is a simple process that requires just a few commands.
If you are an IT admin overseeing the updates of multiple Ubuntu systems, in addition to macOS and Windows device updates, your workflow can become quite complicated very quickly.
With JumpCloud, an OS-agnostic device management solution, in place you can gain complete visibility into all of the update statuses in your heterogeneous fleet and simplify your patching process.
Learn more about what’s possible with automated patch management for Ubuntu.