
Simplify user and access management, gain efficiencies, improve security through automation. This integration allows you to, in real-time, provision new user accounts, continuously synchronize specified user attributes, takeover Identity Management of existing users, and manage security groups in Microsoft 365/Entra ID (M365/Entra ID) from JumpCloud. In addition, optionally import users from M365/Entra ID into JumpCloud.
Prerequisites
- You need to Authorize M365/Entra ID Sync before you can connect users to an M365 directory
Considerations
- Don't authorize the same M365/Entra ID domain in multiple M365/Entra ID directory sync instances. If you do, users that are bound to multiple directory instances with the same domain could be suspended if you unbind them from one of the instances. You can avoid this by deactivating sync for all but one M365/Entra ID directory sync instances for a single domains. Be aware that after you deactivate sync for an M365/Entra ID directory sync instance, that sync integration is permanently deleted and cannot be recovered
- When deactivating the M365/Entra ID Cloud Directory Sync integration, the following is permanently deleted for the M365 directory, and will not be recovered by reactivating sync:
- name
- configuration
- connections to users, groups, and resources
- M365/Entra ID group management is only supported for security groups at this time
Importing M365/Entra ID Users into JumpCloud
After you authorize sync, you can import users from M365/Entra ID into JumpCloud. A modal opens with a list of existing active Microsoft user accounts. If you are not ready to import users, close the modal or click cancel.
![]()
For new accounts, keep in mind that you can import unlimited users for free during the 30-day trial; however, once you pass the 30-day trial, all users become billable. Similarly, accounts managed by an MSP, that have a license limit, are only allowed to import users up to their license limit and will be prompted to contact their provider once that limit is reached.
To import users from M365 into JumpCloud
- Log in to the JumpCloud Admin Portal.
![]()
If your data is stored outside of the US, check which login URL you should be using depending on your region. If your organization uses LDAP, RADIUS, or requires firewall allow list configuration, the Fully Qualified Domain Names (FQDNs) will also be region specific. See JumpCloud Data Centers for the URLs, FQDNs, and IP addresses.
- Go to Identity Management > Cloud Directories.
- Select the integration you authorized in Authorize M365 Sync.
- From the Details tab, confirm your attribute mapping and settings to ensure you are importing and exporting the proper attributes. See Sync User Attributes with Microsoft 365 to learn more.
![]()
Users are created with only the attributes you want JumpCloud to control which are those with import selected in the JumpCloud to export? column.
- Click import users.
- On the Import Users from Microsoft 365 screen, select one or more users to import. If you want to wait until later to import users, click cancel.
- Click import.
![]()
When accounts are imported into JumpCloud, the Username field is populated with the Alias attribute of the account in Microsoft. If an Alias isn’t available, the Username is populated with the username portion of the email address, everything before the @domain.com.
- Review the information in the results modal.
![]()
The results modal will show the import results if 100 or fewer users were imported. Users who were successfully imported have a green check mark. Users who weren’t imported have a red exclamation mark, and the IMPORT MESSAGE explains why a user wasn’t imported. If more than 100 user are imported, the import job id will be shown, and the results can be downloaded by clicking the link in the User Import Complete email.
- Click the go to users page button or close the modal.
![]()
If you close this modal, you return to the M365 Directory Details panel.
- Receive a User Import Complete email with a summary of the import results and a link for downloading a copy of the import results.’
The default user state for imported users will be either active or staged, depending on the value set within Settings > Identity Management > Default User State for User Creation > Application/Directory Integrations. The user state of a user can be seen on the Users page. Imported users must have an active user state and a password set by either you or them before they will have access to their assigned resources. They will continue to have access to M365/Entra ID using their M365 password until the activation process is complete for their JumpCloud account, and they are given access to M365/Entra ID from JumpCloud.
You can also import users from the Users list under Identity Management > Users, clicking ( + ), then selecting M365/Azure AD.
Syncing Users from JumpCloud to M365/Entra ID Directory Instance
After you authorize sync with M365/Entra ID and configure the attributes you want to sync, you can specify users to manage and sync by associating JumpCloud users and groups to the M365/Entra ID directory instance.
Connecting Users to an M365/Entra ID Directory Instance
Users can be given access to an M365/Entra ID directory either directly or through a user group.
![]()
When the initial sync of the user’s password is done, it will cause the user to be logged out of all M365 apps.
To directly connect users to an M365/Entra ID Cloud Directory from the User Details page
- In the JumpCloud Admin Portal, go to Identity Management > Users.
- Select a user to view their details.
- Select the Directories tab.
- Select the M365/Entra ID directory to which you want to connect the user.
- Click Save User. Synchronization is initiated.
To directly connect users to an M365/Entra ID Cloud Directory instance from the M365/Entra ID Cloud Directory Sync configuration page
- In the JumpCloud Admin Portal, go to Identity Management > Cloud Directories.
- Click the M365/Entra ID directory instance.
- Select the Users tab.
- Select the user(s) to whom you want to give access to the M365/Entra ID directory.
- Click Save. Synchronization is initiated.
To connect users to an M365/Entra ID Cloud Directory through a user group from the User Group Details page
- In the JumpCloud Admin Portal, go to Identity Management > User Groups.
- Select a user group to view the details.
- Select the Directories tab
- Select the M365/Entra ID directory to which you want users in the user group to be synced and have access.
- Select the Users tab.
- Check the box next to each user you want added to the group.
- Click Save.
To connect members of a User Group to a M365/Entra ID directory through a user group from the M365/Entra ID Cloud Directory Sync configuration page
- In the JumpCloud Admin Portal, go to Identity Management > Cloud Directories.
- Click the M365/Entra ID directory.
- Select the User Groups tab.
- Select the user group(s) that have the users to whom you want to give access to the M365/Entra ID directory instance.
- Click Save. Synchronization is initiated.
Syncing Behavior for Users
User Principal Name
After you connect a user to an M365 directory, the value sent as the User Principal Name (UPN) is determined by the domains configuration setup in the integration:
- If no domains are configured, the user’s mapped email (company or alternate) is not checked and sent as is. The user syncs as long as their email domain matches one of the verified domains in the M365/Entra ID instance.
- If one or more domains is configured and No default. Only users with matching domains sync is selected, the user’s mapped email default (company or alternate) is checked against the domains listed. Only users with matching email domains are synced.
- If one or more domains is configured and one of the domains is selected to Use as default, the user’s mapped email default (company or alternate) is checked against the domains listed.
- If the domain matches one of the domains in the list, the email address is sent as is.
- If the domain does not match one of the domains in the list, the email value sent as the UPN wll be the username portion of the source email address (Company or Alternate Email) and the default domain.
User provisioning, updating, and deprovisioning
- User provisioning: When connecting a new user to M365, the integration will search for the user in the M365/Entra ID instance using the UPN.
- If no match is found, the user will be created.
- If an existing user is found with a matching UPN, JumpCloud will take over management of that user and update the user.
- Once the user logs in to JumpCloud’s User Portal for the first time, the password will be synced to M365.
- User updates: Once a user is created and managed by JumpCloud, any time there is a change to any of the user attributes that are configured or there is a group change, the changes will replicate in the M365/Entra ID instance in real-time using the users M365/Entra ID assigned unique id rather their UPN.
- User deprovisioning: A user will be deactivated in M365/Entra ID when any of the following actions are taken while the user is still connected to the M365/Entra ID integration either directly, indirectly through a user group, or both.
- A user is suspended.
- A user is removed from all groups that connected them the integration and any direct connection is removed.
- A user is deleted.
- A user group that was the user’s only connection to the integration is disconnected from the integration.
- A user’s password expires and the password configuration for the M365/Entra ID integration is set to suspend on password expiration.
- A user gets locked out and the password configuration for the M365/Entra ID integration is set to suspend on account lockout.
Staged vs Active User Provisioning Flows
Staged User Flow
- User provisioning: When connecting a new Staged user to the M365/Entra ID integration in JumpCloud, the user will be created in the M365/Entra ID instance and the account status will be set to disabled. The user will be able to receive email and calendar events but won’t be able to log in. Once the user receives their activation or welcome and logs in to the JumpCloud User Portal for the first time, the password will be synced to M365/Entra ID.
Active User Flows
- User provisioning: When connecting a new Active user to the M365/Entra ID integration in JumpCloud, the user will be created in the M365/Entra ID instance and the account status will be set to enabled. The user will be able to log in and access all their M365 resources. Once the user logs in to the JumpCloud User Portal for the first time, the password will be synced to M365/Entra ID.
Password Syncing
Passwords sync whenever a user does any of the following:
- When an admin sets an initial password for the user
- When and admin changes the password for the user
- When a new user sets their JumpCloud password
- When a user changes or resets their JumpCloud password
- When a user logs in to the JumpCloud User Portal
![]()
Microsoft treats a password sync as a password change even if the password did not change. This causes existing Microsoft sessions to expire, and the user must log in again.
Connecting User Groups to an M365 Directory
To connect user groups as security groups to an M365/Entra ID Cloud Directory Sync from the User Group Details page
- In the JumpCloud Admin Portal, go to Identity Management > User Groups.
- Select the user group you want to create and manage as a security group in the M365/Entra ID instance
- Select the Directories tab.
- Select the M365/Entra ID directory instance in which you want to create and manage the group(s
- Click Save Group. Synchronization is initiated.
![]()
This will cause users to be logged out of all 365 apps.
To connect user groups as security groups to an M365/Entra ID Cloud Directory Sync from the M365/Entra ID Cloud Directory Sync configuration page
- In the JumpCloud Admin Portal, go to Identity Management > Cloud Directories.
- Click the M365/Entra ID directory instance in which you want to create and manage the group(s)>.
- Select the User Groups tab.
- Select the user group(s) you want to create and manage as security groups
- Click Save. Synchronization is initiated.
![]()
This will cause users to be logged out of all 365 apps.
Syncing behavior for groups
- If a group with the same name exists in M365/Entra ID, JumpCloud takes over the group.
- If a group with the same name does not exist in M365/Entra ID, a group is created in M365/Entra ID.
- If there is more than one group with the same name in M365/Entra ID, a third group is created in M365/Entra ID.
- At this time, M365/Entra ID group management is only supported for security groups.
Monitoring the Integration
Sync Status by User
See the last sync result by user include the last sync attempt timestamp, the Microsoft external id for the attempt, and the error message received from Microsoft in the case of a failed sync.
To view from the M365 / Entra ID Cloud Directory configuration
- Log in to the JumpCloud Admin Portal.
![]()
If your data is stored outside of the US, check which login URL you should be using depending on your region. If your organization uses LDAP, RADIUS, or requires firewall allow list configuration, the Fully Qualified Domain Names (FQDNs) will also be region specific. See JumpCloud Data Centers for the URLs, FQDNs, and IP addresses.
- Go to Identity Management > Cloud Directories.
- Select the integration you are monitoring
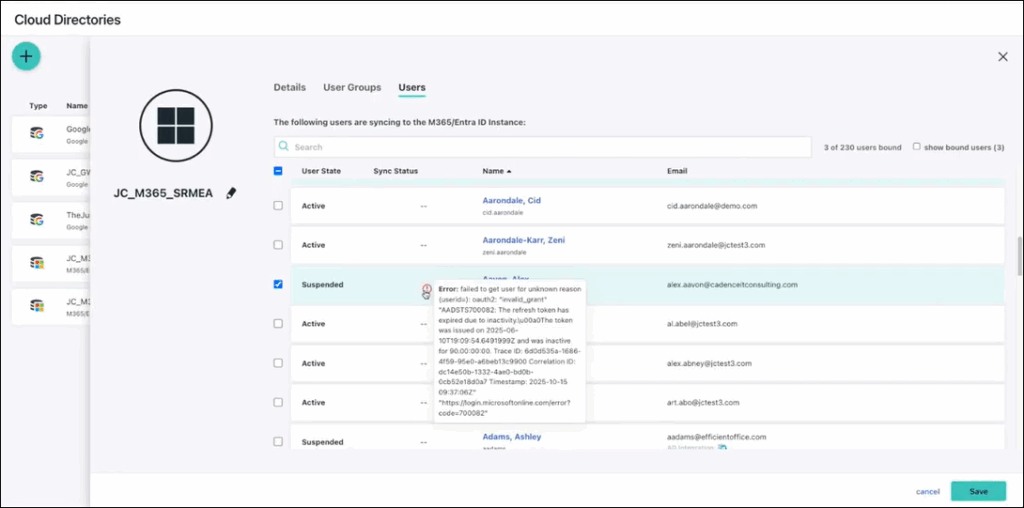
- Select the Users tab
- A status icon is shown in the Sync Status column for every connected (bound) user
- If last sync attempt for that user succeeded, a green circle with a green checkmark icon will show
- If last sync attempt for that user failed, a red circle with a red exclamation mark icon will show
- Hover over the icon to see more details about the status

To view from the user record
- Log in to the JumpCloud Admin Portal.
![]()
If your data is stored outside of the US, check which login URL you should be using depending on your region. If your organization uses LDAP, RADIUS, or requires firewall allow list configuration, the Fully Qualified Domain Names (FQDNs) will also be region specific. See JumpCloud Data Centers for the URLs, FQDNs, and IP addresses.
- Go to Identity Management > Users
- Select the user you are monitoring
- Select the Directories tab
- A status icon is shown in the Sync Status column
- For every M365 / Entra ID Cloud Directory Integration to which the user is connected (bound):
- If last sync attempt for that user succeeded, a green circle with a green checkmark icon will show
- If last sync attempt for that user failed, a red circle with a red exclamation mark icon will show
- For all other directories:
- If the directory integration doesn't yet have the sync results functionality available, a gray circle with a gray icon will show
- If the user is not connected to a directory, a '--' will show
- Hover over the status icon to see more details about the status
User Provisioning Directory Insights
The following success events will take place in Directory Insights:
| DI Event | Description |
|---|---|
| user_create_provision | Logged when a user is created in M365. |
| user_update_provision | Logged when one or more user attributes are updated in M365. |
| user_password_update_provision | Logged when a user’s password is updated in M365. |
| user_deprovision | Logged when user is deactivated in M365 due to the user being suspended or having access to the integration revoked in JumpCloud. |