
Use JumpCloud SAML Single Sign On (SSO) to give your users convenient but secure access to all their web applications with a single set of credentials. Automatically provision, update and deprovision users and groups in Keeper from JumpCloud using the SCIM integration. Leverage this integration to centralize user lifecycle, user identity, and group management in JumpCloud for Keeper. Save time and avoid mistakes, as well as potential security risks, related to manually creating users.
Read this article to learn how to setup the Keeper integration.
Prerequisites
- A JumpCloud administrator account
- JumpCloud SSO Package or higher or SSO add-on feature
- A system running Keeper SSO Connect
- A Keeper administrator account on an Enterprise tier
Important Considerations
- An SSL from a trusted CA is recommended for use with Keeper SSO Connect, else users will be shown a certificate warning in their browser. Keeper SSO Connect will default to a self-signed cert if one is not provided
- The API credentials are only valid after saving the provisioning method in the Keeper Admin Console for the given node
- New users provisioned from JumpCloud will receive an email invitation to set up their Keeper vault
- When de-provisioning users, their Keeper account will not be deleted but automatically locked instead
- Keeper recommends to turn off JIT when using SCIM provisioning
- Keeper SCIM API does not support the Enterprise schema attributes
- New teams created by the SCIM sync are created in the “pending” state and require final approval from either the Keeper Administrator or another team member
Attribute Considerations
- A default set of attributes are managed for users. See the Attribute Mappings section for more details
- At the moment of provisioning the username and email should match
- Keeper API accepts name.givenName and name.familyName attributes from SCIM schema but those values are not presented in the Keeper Admin Console
- Any extra attributes sent to their API are ignored
Creating a new JumpCloud Application Integration
- Log in to the JumpCloud Admin Portal.
![]()
If your data is stored outside of the US, check which login URL you should be using depending on your region. If your organization uses LDAP, RADIUS, or requires firewall allow list configuration, the Fully Qualified Domain Names (FQDNs) will also be region specific. See JumpCloud Data Centers for the URLs, FQDNs, and IP addresses.
- Go to Access > SSO Applications.
- Click + Add New Application.
- You can also enter the name of the application in the Search field and select it.
- You can either select an application from the available list or select Custom Application, and click Next.
- Select the required options from the Select Options page and click Next. The Enter General Info page is displayed.
- On the Enter General Info page, you can customize the display label, description and how the application displays:
- Description - add a description that users will see in their user portal
- User Portal Image - choose Logo or Color Indicator
- Show in User Portal - select to ensure the app is visible in the user portal
- Optionally, expand the Advanced Settings section and customize the IdP URL:
- Enter a custom value to replace the default application name in the SSO IdP URL endpoint ( https://sso.jumpcloud.com/saml2/{custom_value})
![]()
The SSO IdP URL is not editable after the application is created. If you need to change this URL later, you must delete and recreate the connector.
- Click Save Application.
- Next, click:
- Configure Application and go to the next section
- Close to configure your new application at a later time
![]()
Users are implicitly denied access to applications. See Authorize Users to an SSO Application.
Configuring the SSO Integration
![]()
For more information on configuring Keeper for SSO, see Keeper’s documentation.
To configure Keeper 1
- Log in to the Keeper admin portal.
- Select an existing node or create a new one.
- Select the Provisioning tab in the top right, then click Add Method.
- Select Single Sign-On with SSO Connect Cloud.
- Click Next.
- Enter a Configuration Name, then provide your Enterprise Domain.
- Click Save.
- Under User Provisioning, click ( ⋮ ), then select View.
- Click Export Metadata, then click Export SP Cert.
To navigate to your JumpCloud SSO connector
- Log in to the JumpCloud Admin Portal.
![]()
If your data is stored outside of the US, check which login URL you should be using depending on your region. If your organization uses LDAP, RADIUS, or requires firewall allow list configuration, the Fully Qualified Domain Names (FQDNs) will also be region specific. See JumpCloud Data Centers for the URLs, FQDNs, and IP addresses.
- Go to Access > SSO Applications.
- Create a new application or select it from the Configured Applications list.
- Select the SSO tab.
To configure JumpCloud
- Under Service Provider Metadata, click Upload Metadata, then select the metadata file you downloaded from Keeper.
- Under SP Certificate, click Upload SP Certificate and select the certificate you downloaded from Keeper.
- For Login URL, enter https://keepersecurity.com/api/rest/sso/ext_login/<YourSSOIdHere>. You can find your SSO ID at the end of your SP Entity ID: https://keepersecurity.com/api/rest/sso/saml/459561502469
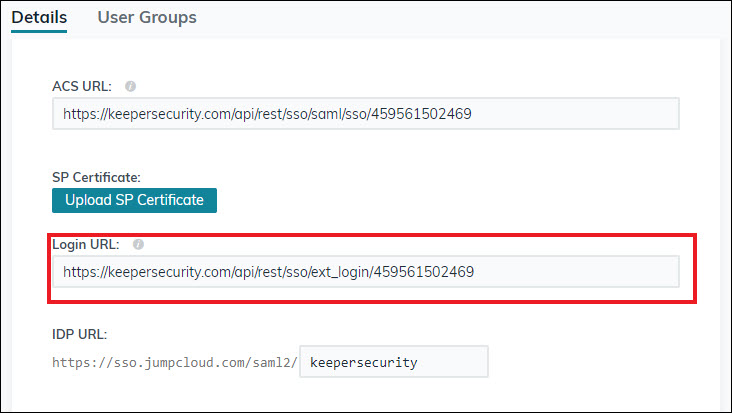
- For IDP URL, customize the value or keep the default.
- Optionally, configure:
![]()
The Authentication Methods References (AMR) is automatically included in the SAML assertion by default. No additional configuration is required to enable this.
Complete the MFA Claim Configuration to define how the authentication context is sent in the SAML assertion.
- Under Auth Context, choose one of the following options based on your SP's requirements:
- Send a single value for all successful MFA factors - select if the Service Provider accepts a generic confirmation for any MFA login. Enter the single URL or URN they accept
- Send specific factors - select this option to map individual JumpCloud MFA methods to distinct values. In the Factor Mapping table, add each MFA factor enabled in your organization and enter the corresponding value required by the Service Provider
- Send single value and specific factors - select to send both a generic identifier and specific factor details in the assertion
![]()
Refer to your Service Provider's documentation to determine the specific URN or URL values required (e.g., Salesforce Session Security Levels). The values entered in this configuration must exactly match what the Service Provider expects.
| MFA Factor | Service Provider | Notes |
|---|---|---|
| Password | Reference your Service Providers's documentation for the values they expect for each factor | |
| TOTP | ||
| WebAuthN | ||
| Push Notification | JumpCloud Protect or other authenticator application | |
| Duo Security | ||
| Device Trust | ||
| Device Trust + User Verification | JumpCloud Go (requires explicit configuration - see the next table) | |
| API Key | ||
| External Identity Provider |
| MFA Method | MFA Value in AMR Claim |
|---|---|
| apikey | swk |
| duo | mfa |
| pwd | pwd |
| totp | otp |
| unk | |
| wan | hwk |
| push | mfa |
| uv | |
| durt | hwk |
| durt_uv | hwk |
| ext_idp |
Learn more about MFA Claims.
Configure User Attributes to be sent to the SP in assertions. User attributes are unique to each user. You can include attributes for standard user detail attributes or for custom attributes. For example, you can include standard attributes for users’ employee ID and department, or you can include a custom attribute for users’ application ID. Standard attributes are configured in the User Panel Details tab's User Information and Employee Information sections.
Unlike user attributes, a Constant Attribute can be sent for every user in a specific group or application profile.
![]()
If required attributes are present, they are not editable.
- Under User Attributes, click add attribute:
- Service Provider Attribute Name - enter the service provider’s name for the attribute
- JumpCloud Attribute Name - select the corresponding attribute from the drop down list
- Repeat these steps for any desired user or custom attributes.
- Under Constant Attributes, click add attribute:
- Service Provider Attribute Name - enter the service provider’s name for the attribute
- Value - enter the corresponding attribute in JumpCloud
- Optionally, if groups are supported, select Include Group Attribute.
- Click Save.
Download the JumpCloud metadata file
- If you've closed the app:
- Find your app in the Configured Applications list and select its checkbox
- Click Export Metadata in the top right corner of the window
- If you are still on the SSO tab of the app:
- Click Export Metadata
- The JumpCloud-<applicationname>-metadata.xml will be exported to your local Downloads folder.
![]()
Metadata can also be downloaded from the Configured Applications list. Search for and select the application in the list and then click Export Metadata in the top right corner of the window.
To configure Keeper 2
- In the Keeper admin portal, go back to the Provisioning tab.
- Click ( ⋮ ), then select Edit.
- If you plan to use SCIM with Keeper, deselect Enable Just-In-Time Provisioning under New User Provisioning.
- For SAML Metadata, click Browse Files, then upload the metadata file you downloaded from JumpCloud.
Configuring Keeper SSO Connect On-prem
To configure Keeper 1
- Complete installation of Keeper SSO Connect.
- Log in to Keeper SSO Connect as an administrator.
- Complete host name and port configuration as needed.
- Under User Provisioning, click ( ⋮ ), then select View.
- Click Export Metadata, then click Export SP Cert.
Have the Keeper admin portal available to complete Configure Keeper 2 .
To navigate to your JumpCloud SSO connector
- Log in to the JumpCloud Admin Portal.
![]()
If your data is stored outside of the US, check which login URL you should be using depending on your region. If your organization uses LDAP, RADIUS, or requires firewall allow list configuration, the Fully Qualified Domain Names (FQDNs) will also be region specific. See JumpCloud Data Centers for the URLs, FQDNs, and IP addresses.
- Go to Access > SSO Applications.
- Create a new application or select it from the Configured Applications list.
- Select the SSO tab.
To configure JumpCloud
- Create a new application.
- Under Service Provider Metadata, click Upload Metadata, then select the metadata file you downloaded from Keeper.
- For SP Certificate, click Upload SP Certificate and select the certificate you downloaded from Keeper.
- Skip the Login URL field.
- For IDP URL, customize the value or keep the default.
- Click Activate.
- Select the checkbox next to Keeper, then click Export Metadata in the top right.
To configure Keeper 2
- In the Keeper admin portal, go back to the Provisioning tab.
- Click ( ⋮ ), then select Edit.
- For SAML Metadata, click Browser Files, then upload the metadata file you downloaded from JumpCloud.
- Don’t change the SAML User Attributes. These values aren’t configurable in the JumpCloud connector.
- Click Save.
Authorizing SSO Application Access
Users are implicitly denied access to SSO Applications. After you connect an application to JumpCloud, you need to authorize user access to that application. You can authorize user access from the Applications, Users List or User Groups page.
To authorize user access from the SSO Application’s page
- Log in to the JumpCloud Admin Portal.
![]()
If your data is stored outside of the US, check which login URL you should be using depending on your region. If your organization uses LDAP, RADIUS, or requires firewall allow list configuration, the Fully Qualified Domain Names (FQDNs) will also be region specific. See JumpCloud Data Centers for the URLs, FQDNs, and IP addresses.
- Go to Access > SSO Applications, then select the application to which you want to authorize user access.
- Select the User Groups tab. If you need to create a new group of users, see Get Started: User Groups.
- Select the check box next to the desired group of users to which you want to give access.
- Click Save.
To learn how to authorize user access from the Users or User Groups pages, see Authorize Users to an SSO Application.
Validating SSO user authentication workflow(s)
Check your SP's documentation to ensure that both workflows are supported.
IdP-initiated user workflow
- Access the JumpCloud User Console
- Go to Applications and click an application tile to launch it
- JumpCloud asserts the user's identity to the SP and is authenticated without the user having to log in to the application
SP-initiated user workflow
- Go to the SP application login - generally, there is either a special link or an adaptive username field that detects the user is authenticated through SSO
![]()
This varies by SP.
- Login redirects the user to JumpCloud where the user enters their JumpCloud credentials
- After the user is logged in successfully, they are redirected back to the SP and automatically logged in
![]()
See Additional User Experience Considerations when setting up JumpCloud SSO.
Using JIT Provisioning
Additional attributes are required to use JIT provisioning. JIT required attributes are prepopulated and are on by default to enable JIT provisioning. You can’t edit the JIT required service provider attributes. You can customize the JumpCloud attribute name and the constant value for JIT required attributes. Toggle off the attributes to opt out of sending the attributes in the SAML assertion.
To complete the provisioning process
- Authorize a user’s access to the application in JumpCloud.
- Have the user log in to the application using SSO. The SAML assertion passes from JumpCloud to the service provider, and gives the service provider the information it needs to create the user account.
Configuring the SCIM Integration
To navigate to your JumpCloud SCIM connector
- Log in to the JumpCloud Admin Portal.
![]()
If your data is stored outside of the US, check which login URL you should be using depending on your region. If your organization uses LDAP, RADIUS, or requires firewall allow list configuration, the Fully Qualified Domain Names (FQDNs) will also be region specific. See JumpCloud Data Centers for the URLs, FQDNs, and IP addresses.
- Go to Access > SSO Applications.
- Create a new application or select it from the Configured Applications list.
- Select the Provisioning tab.
To configure JumpCloud 1
- You're prompted to authorize JumpCloud to access your Keeper organization.
To configure Keeper
- Log in to your Keeper admin console.
- If you configured SSO, edit your SAML 2.0 with Cloud SSO Connect configuration and deselect the Enable Just-in-Time Provisioning option.
- Click on Provisioning.
- Select SCIM (System for Cross-Domain Identity Management) as your Provisioning Method. Leave this window open so you can go back to generate the token.
- Click Next.
- Copy the Base URL.
- Click Generate.
- Copy the token and click Save.
![]()
The Client ID and Secret (token) may only be shown once. Copy them to a secure location, like the JumpCloud Password Manager, for future reference.
To configure JumpCloud 2
- Go back to your JumpCloud administrator portal.
- In the Keeper application window, select the Provisioning tab and click Configure.
- You’re presented with two fields:
- Base URL: Paste the SCIM Endpoint you copied when configuring Keeper
- Token Key: Paste the SCIM token you generated when configuring Keeper
- Select the Enable management of User Groups and Group Membership in this application checkbox if you want to provision, manage, and sync groups in Dashlane from JumpCloud.
- Review and edit any user attribute mappings.
- Click Activate.
To update your JumpCloud SCIM token
- After generating a new token in your SP, log in to the JumpCloud Admin Portal.
![]()
If your data is stored outside of the US, check which login URL you should be using depending on your region. If your organization uses LDAP, RADIUS, or requires firewall allow list configuration, the Fully Qualified Domain Names (FQDNs) will also be region specific. See JumpCloud Data Centers for the URLs, FQDNs, and IP addresses.
- Go to Access > SSO Applications.
- Search for the application and click to open its configuration panel.
- Select the Provisioning tab.
- Expand the Configuration Settings section.
- In the Token Key field, paste your updated token.
![]()
- This may also be called API Key, Client Secret or Bearer Token.
- If present, you do not need to update the Client ID.
- Click Update.
![]()
Clicking Save will not update your token. You must click Update.
- You will get a message saying your SCIM integration has been successfully verified.
Attribute Mappings
The Export Attributes Mapping table lists the Required and Optional Mappings that JumpCloud sends to the Service Provider. See Attribute Considerations for more information regarding attribute mapping considerations.
Learn about JumpCloud Properties and how they work with system users in our API.
Modifying Attributes
To add user attributes
- From your connector’s configuration page, select the Provisioning tab.
- Expand the Export Attribute Mapping section and click Edit. The Optional Mappings table will open.
- Scroll to the bottom of the table and click +Add Attribute.
- Select one of the mapping types:
- Direct Mapping (JSON Path) - send the value from a user attribute in JumpCloud directly to an attribute in the service provider
- From the JumpCloud Attribute dropdown, select the desired attribute
- If you choose “Custom User Attribute” you must type the name of the attribute exactly as it on the user details page. To see the dropdown again, you must delete the attribute and add a new attribute
- From the SCIM Attribute dropdown, select the corresponding (destination) attribute
- From the JumpCloud Attribute dropdown, select the desired attribute
- Expression - transform or combine multiple user attributes into a single, custom value before sending it to the service provider
- Enter the expression in the JumpCloud Attribute field
- From the SCIM Attribute dropdown, select the corresponding (destination) attribute
- Constant - send a fixed, predefined value—like a specific company name —for every user to the service provider
- This is a free text field with no validation, e.g., the attribute must match exactly, including case, to the corresponding attribute in the user record. Once the custom attribute is added, you must delete it and readd a new custom attribute to see the dropdown again.
- Direct Mapping (JSON Path) - send the value from a user attribute in JumpCloud directly to an attribute in the service provider
- Repeat these steps for additional attributes.
- Click Preview Mappings to review the User Schema.
- If you do not select a specific user from the Preview Filter dropdown, the schema will default to the first user.
- Click:
- Save and Sync to initiate an immediate full sync of the updated attributes
- Update to initiate the update during the next modification of the user group's record, like adding a space to the Description field
To add group attributes
- From your connector’s configuration page, select the Provisioning tab.
- Expand the Export Attribute Mapping section and click Edit. The Optional Mappings table will open.
- Scroll to the bottom of the table and click +Add Attribute.
- Select one of the mapping types:
- Direct Mapping (JSON Path) - send the value from a group attribute in JumpCloud directly to an attribute in the service provider
- From the JumpCloud Attribute dropdown, select Custom Group Attribute and edit the attribute to be a role or license
- From the SCIM Attribute dropdown, select Custom User Attribute and enter the corresponding role or license destination attribute
- Expression - enter the expression that uses group membership to define the roles attribute
- Enter the expression in the JumpCloud Attribute field
- From the SCIM Attribute dropdown, select the corresponding (destination) attribute
- Direct Mapping (JSON Path) - send the value from a group attribute in JumpCloud directly to an attribute in the service provider
- Click Preview Mappings to review the Group Schema.
- Click:
- Save and Sync to initiate an immediate full sync of the updated attributes
- Update to initiate the update during the next modification of the user group's record, like adding a space to the Description field
To modify existing attributes
This enhancement gives you complete control over the user attributes sent from JumpCloud to this application. You can:
- Fully control mappings - define which JumpCloud attribute or source data corresponds to an attribute in the SP's SCIM schema
- Use a variety of source values - map data from the user's standard attributes, Manager field, custom attributes, or other data sources
- Manipulate data with expressions - transform data, such as preferred first names and date format, using expressions before transmission to the SP. Learn more
- Preview changes - review your new mappings to ensure accuracy before you save
- From your connector’s configuration page, select the Identity Management tab.
- Expand the Export Attribute Mapping section and click Edit.
- For the type of attribute you would like to modify:
- Direct - select the new attribute from the dropdown(s)
- Expression - click in the Expression field and make the desired edits. If necessary, select the new attribute from the SCIM Attribute dropdown
- Custom - delete the existing values in either or both of the attribute fields and enter the new values
- Click Preview Mappings to review the updated User Schema.
- Click:
- Save and Sync and then Continue to initiate an immediate full sync of the updated attributes
- Update to initiate the update during the next modification of the user group's record, like adding a space to the Description field
Deleting attributes
![]()
It's highly recommended you use all optional mappings. This creates a more complete user profile, enabling better automation and more accurate access management within the application.
- From your connector’s configuration page, select the Identity Management tab.
- In the Export Attribute Mapping section, click Edit. The Optional Mappings table will open.
- Click Delete (
 ) to remove any optional attributes.
- Click:
- Save and Sync and then Continue to initiate an immediate full sync of the updated attributes
- Update to initiate the update during the next modification of the user group's record, like adding a space to the Description field
![]()
Attributes that were initially included and populated in the user record and then deleted at a later time will not be modified or removed from the user record.
Restoring the default attribute table
- From your connector’s configuration page, select the Identity Management tab.
- In the Export Attribute Mapping section, click Edit. The Optional Mappings table will open.
- Scroll to the bottom of the table and select Restore Defaults.
- Click:
- Save and Sync and then Continue to initiate an immediate full sync of the updated attributes
- Update to initiate the update during the next modification of the user group's record, like adding a space to the Description field
JumpCloud EXPR Functions
| Syntax | Description | Parameters | Examples |
|---|---|---|---|
| nullOrEmpty(value) |
Checks if a piece of information is completely missing (null) or if it's just empty text (a blank space). If the information is a number or a list, it is considered not empty. |
value: The piece of user information you want to check (e.g., an ID or email address). |
|
| notNullOrEmpty(value) |
Checks if the information actually exists and has content. For text, it must have at least one character. For a list, it must have at least one item. |
value: The user data you are checking to ensure it exists before you use it. |
notNullOrEmpty(jcUser.email) ? jcUser.email : providerUser.userName |
| toScimPhoneNumbers(phoneNumber) |
Turns a single JumpCloud phone number (like the digits and type) into the list format that SCIM needs. It sets the type as "work" and "primary." If there is no phone data, it returns an empty list. |
phoneNumber: A block of data that holds the phone number digits and, optionally, the type (e.g., "work" or "mobile"). |
toScimPhoneNumbers(find(jcUser.phoneNumbers, .type == 'work') ?? first(jcUser.phoneNumbers)) |
| toScimAddresses(address) |
Turns a single JumpCloud address (like street, city, state) into the list format that SCIM needs. It combines street lines and sets the address type as "work" and "primary." If there is no address data, it returns an empty list. |
address: A block of data containing all the parts of the address (street, city, state/region, zip/postal code, etc.). |
toScimAddresses(find(jcUser.addresses, .type == 'work') ?? first(jcUser.addresses)) |
| toScimEmails(email) |
Takes a single email address and puts it into the list format that SCIM requires. This is useful when the destination system expects a list. The email is marked as "work" and "primary." |
email: The actual email address, provided as text. |
toScimEmails(jcUser.email) |
| toScimEntitlements(entitlement) |
Creates one entitlement record to be included in the SCIM list of entitlements. It uses the value, type, and display name you provide and marks it as primary. If you don't provide input, it returns an empty list. |
email: The actual email address, provided as text. |
toScimEntitlements(jcUser.entitlements) |
| setDefaults(m, defaults) |
Fills in any missing data in your main data block (m) using backup values from a separate data block (defaults). Important: If the same piece of information is in both blocks, the value from the defaults block is used. If your main data block (m) is missing, the function returns nothing. |
|
setDefaults({ "region": "CA", "country": "US" }, { "region": "" }) |
| isMemberOfAny(groups, nameOrIDs) |
Checks if a user is a member of any of the groups you list. It can check by group name or unique ID, ignoring upper/lower case in names. The result is always true or false. |
|
|
| isMemberOfAll(groups, nameOrIDs) |
Checks if a user is a member of every single group you list. If the user is missing even one group, the answer is false. Matching works like isMemberOfAny. |
|
|
|
Gathers a user's group information in different ways: you can get all details (name, ID, attributes), a list of just one specific detail from each group (e.g., only the name), or a list of several specific details. Adding the text "string" as the third parameter makes sure the final output is simple text. |
groups: The user's list of groups (jcGroups). field or fields (optional): The specific piece(s) of information you want to extract from each group (e.g., the group's name or a custom attribute like costCenter). "string" (optional third): Include this text if you need the result to be simple text strings. |
|
|
Looks up a specific piece of information (an "attribute") from a single group (which you find by its name or ID). If the group or the information is missing, it returns a backup value (default) if you provided one; otherwise, it returns blank text. |
groups: The user's list of groups (jcGroups). nameOrID: The name or unique ID of the group you want to search. attrPath: The "path" (using dots) to the exact information you want (e.g., role). default (optional): The backup value to use if the group or the information you asked for cannot be found. |
|
| filterGroups(groups, attrPath, matchValue) |
Narrows down the list of groups to keep only the ones where a specific piece of information matches one of the values you provide. The check ignores upper/lower case. The result is a list of the matching groups and all their details. |
groups: The user's list of groups (jcGroups). attrPath: The specific piece of information (attribute) you want to check in each group (e.g., role). matchValue: A text value or a list of text values that the attribute must equal to be included in the result. |
|
|
Checks a list of groups, in the order you specify, and returns the first piece of non-empty information (an "attribute") it finds. This lets you prioritize data from certain groups. If the information is not found in any group, it returns the backup value (default) if you provided one; otherwise, it returns blank. |
groups: The user's list of groups (jcGroups). attrPath: The specific piece of information (attribute) you are trying to find. priorityList: A list of group names or IDs, listed in the exact order you want them checked. default (optional): The backup value to use if the required information cannot be found in any of the groups. |
|
| toID("...") toID('...') |
This function is a special shortcut. Before your expression runs, JumpCloud automatically swaps the group name you put inside the parentheses for that group's permanent, unique ID (a sequence of numbers and letters). It is best to use this when you need to refer to a specific group in a way that won't break if someone renames the group later. For example: getGroupAttr(jcGroups, toID("Engineering"), "costCenter"). |
"..." or '...': Group name between single or double quotes. The match is case sensitive. | getGroupAttr(jcGroups, toID("Engineering"), "costCenter") |
Keeper User Attributes
| JumpCloud Attribute | SCIM Attribute | Notes |
|---|---|---|
| Required Mappings | ||
| userName | ||
| Optional Mappings | ||
| company | $enterpriseUser.organization | |
| costCenter | $enterpriseUser.costCenter | |
| department | $enterpriseUser.department | |
| employeeIdentifier | $enterpriseUser.employeeNumber | |
| employeeType | userType | |
| firstname | name.givenName | |
| isAssignedToApp && !(jcUser.suspended == true) | active | |
| jobTitle | title | |
| lastname | name.familyName | |
| notNullOrEmpty(jcUser.displayname) ? jcUser.displayname : (notNullOrEmpty(jcUser.lastname) ? jcUser.firstname + ' ' + jcUser.lastname : jcUser.firstname) | displayName | |
| notNullOrEmpty(providerUser.externalId) ? providerUser.externalId : jcUser.id | externalId | |
| notNullOrEmpty(providerUser.locale) ? providerUser.locale : 'en-US' | locale | |
| notNullOrEmpty(providerUser.preferredLanguage) ? providerUser.preferredLanguage : 'en-US' | preferredLanguage | |
| toScimAddresses(find(jcUser.addresses, .type == 'work') ?? first(jcUser.addresses)) | addresses | |
| toScimEmails(jcUser.email) | emails | |
| toScimPhoneNumbers(find(jcUser.phoneNumbers, .type == 'work') ?? first(jcUser.phoneNumbers)) | phoneNumbers |
Group Attributes
| JumpCloud Property | JumpCloud UI Field Name | SCIM v2 Mapping | Application Value |
|---|---|---|---|
| name | Name | displayName | Name |
Enabling Group Management
You must select the Enable management of User Groups and Group Membership in this application option to manage groups and group membership in the application from JumpCloud.
Group Provisioning and Syncing
- Empty groups are not created
- JumpCloud takes over management of existing groups in the application when the user group name in JumpCloud matches the name of the group in the application
- All user groups associated with the application in JumpCloud are synced. Syncing occurs whenever there is a membership or group change event
- Group renaming is supported
- If a user group is disassociated from the application in JumpCloud, syncing immediately stops and the group is left as-is in the application. All members of that user group are deactivated in the application unless they are associated with another active application group that is managed from JumpCloud
Group Deletion
- Managed groups deleted in JumpCloud are deleted in the application
- All members of the deleted group are deactivated in the application, unless they are associated with another active application group that is managed from JumpCloud
Disabling Group Management
- You can disable group and group membership management by unchecking the Enable management of User Groups and Group Membership in this application option
- The managed groups and group membership are left as-is in the application
- JumpCloud stops sending group membership information for the user, but the user’s identity will continue to be managed from JumpCloud
SCIM Directory Insights Events
The following Directory Insights (DI) events provide visibility into failures and detailed information about the user and group data and attributes being added or updated from HR or other external solutions to JumpCloud.
![]()
Customers with no package or the Device Management Package will need to add the Directory Insights à la carte option. Directory Insights is included in all other packages.
SCIM DI Integration Events
| Event Name | Event Description |
|---|---|
| idm_integration_activate | Logged when an IT admin attempts to activated new SCIM integration. |
| idm_integration_update | Logged when an IT admin attempts to update a configured and activated SCIM integration. |
| idm_integration_reauth | Logged when an IT admin attempts to change the credentials for an activated SCIM integration. |
| idm_integration_delete | Logged when an IT admin attempts to deactivate an activated SCIM integration. |
SCIM DI User Events
| Event Name | Event Description |
|---|---|
| user_create_provision | Logged when JumpCloud tries to create a new user in service provider application. |
| user_update_provision | Logged when JumpCloud tries to update an existing user in service provider application. |
| user_deprovision | Logged when JumpCloud tries to change an existing user to inactive in the service provider application. |
| user_delete_provision | Logged when JumpCloud tries to delete an existing user in service provider application. |
| user_lookup_provision | Logged when JumpCloud encounters an issue when trying to lookup a user to determine if the user needs to be created or updated. |
SCIM DI Attribute Events
| Event Name | Event Description |
|---|---|
| attributemappings_add | Logged when the attribute mappings of an application are added. |
| attributemappings_delete | Logged when the attribute mappings of an application are deleted. |
| attributemappings_update | Logged when the attribute mappings of an application are updated. |
SCIM DI Group Events
![]()
These DI events will only be present if SCIM Groups are supported.
| Event Name | Event Description |
|---|---|
| group_create_provision | Logged when JumpCloud tries to create a new group in service provider application. |
| group_update_provision | Logged when JumpCloud tries to update an existing group in service provider application. |
| group_delete_provision | Logged when JumpCloud tries to delete an existing group in service provider application. |
Removing the Integration
![]()
These are steps for removing the integration in JumpCloud. Consult your SP's documentation for any additional steps needed (like disabling "mandatory SSO login" settings) to remove the integration in the SP. Failure to remove the integration successfully for both the SP and JumpCloud may result in users, including admins, losing access to the application.
![]()
If your data is stored outside of the US, check which login URL you should be using depending on your region. If your organization uses LDAP, RADIUS, or requires firewall allow list configuration, the Fully Qualified Domain Names (FQDNs) will also be region specific. See JumpCloud Data Centers for the URLs, FQDNs, and IP addresses.
To deactivate the SCIM Integration
- Log in to the JumpCloud Admin Portal.
- Go to Access > SSO Applications.
- Search for the application that you’d like to deactivate and click to open the configuration window.
- Click Actions > Deactivate IdM and then click confirm.
To deactivate the SSO Integration
- Log in to the JumpCloud Admin Portal.
- Go to Access > SSO Applications.
- Search for the application that you’d like to deactivate and click to open its details panel.
- Select the SSO tab.
- Scroll to the bottom of the configuration.
- Click Deactivate SSO.
- Click Save.
- If successful, you will receive a confirmation message.
To delete the application
- Log in to the JumpCloud Admin Portal.
- Go to Access > SSO Applications.
- Search for the application that you’d like to delete.
- Check the box next to the application to select it.
- Click Delete.
- Enter the number of the applications you are deleting
- Click Delete Application.
- If successful, you will see an application deletion confirmation notification.