
This policy helps you configure Apple’s Content Caching Service on user devices. Content caching saves content that local Apple devices need for software updates, which speeds up software downloads and data that users store in iCloud. The saved content is stored in a content cache on a Mac, and is available for other devices to retrieve without using the internet. The iCloud data that is stored as part of caching is stored encrypted at rest, and not accessible to the local device.
Adding this policy to a device lets Apple devices on the network automatically use content caching for software updates and iCloud if it’s available. This policy works on devices enrolled in Mobile Device Management (MDM) that are running macOS 10.13.4 and later.
To create a macOS Content Caching Service policy:
- Log in to the JumpCloud Admin Portal: https://console.jumpcloud.com/login.
![]()
If your data is stored outside of the US, check which login URL you should be using depending on your region. If your organization uses LDAP, RADIUS, or requires firewall allow list configuration, the Fully Qualified Domain Names (FQDNs) will also be region specific. See JumpCloud Data Centers for the URLs, FQDNs, and IP addresses.
- Go to Device Management > Policy Management.
- In the All tab, click (+).
- On the New Policy panel, select the Mac tab.
- Select the Mac Content Caching Service policy from the list, then click configure.
- (Optional) Enter a new name for the policy or keep the default. Policy names must be unique.
- For Policy Notes, enter details like when you created the policy, where you tested it, and where you deployed it.
- Under Caching Service Settings, configure these fields:
- Select Shared Caching to save non-iCloud content, such as apps and software updates. This content is not immediately available to be shared.
- Select Personal Caching to Save iCloud data. This content is not available on disk to you, but it is meant for use by devices on the same network. All personal data is encrypted at rest and stored for use only by the Apple ID to which it is tied. Personal Caching will cache iCloud data for all users on the network segment.
- Select Alerts to display caching notifications in the upper right corner of the screen.
- Select Stay Awake to prevent the user’s computer from sleeping when content caching is enabled.
- For Cache Limit, choose the maximum amount of disk space that will be used for the content cache:
- Unlimited (Default)
- 100 GB
- 250 GB
- 500 GB
- 850 GB
- 1 TB
- For Path, enter the location where the content is stored. The default is /Library/Application Support/Apple/AssetCache/Data.

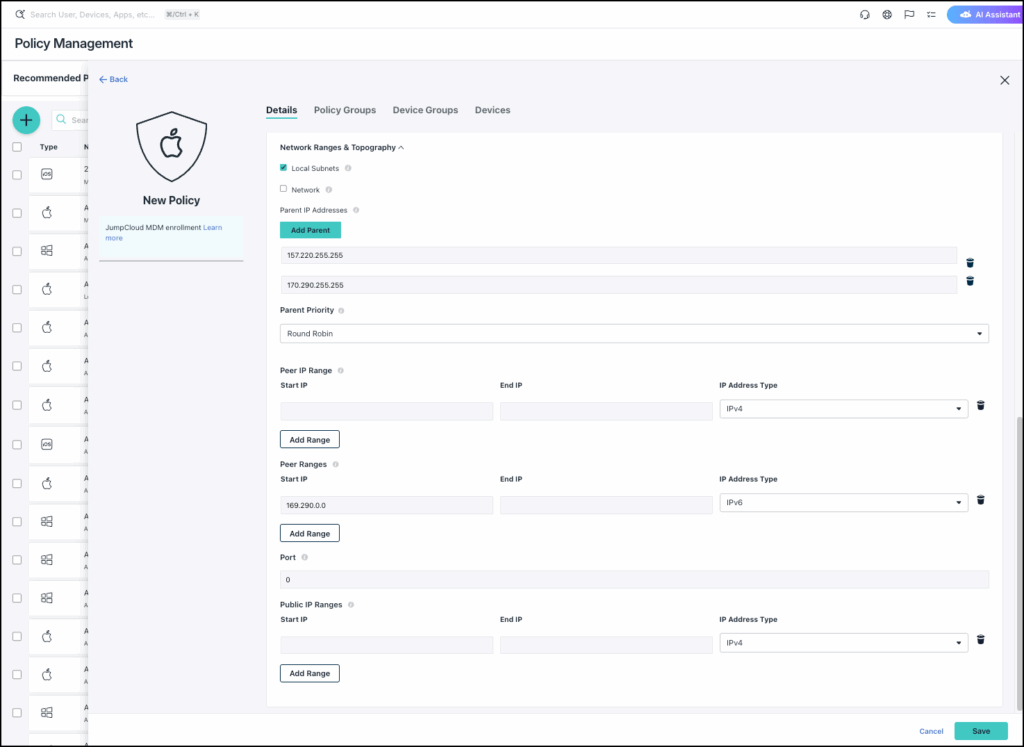
- Under Network Ranges & Topography, configure these fields:
- Select Local Subnets to share content only to user devices on the same immediate local network segment. No content is offered to clients on other networks reachable by the content cache. If this box is selected, the Network IP Range field is ignored.
- Select Network to respond to download requests only from the specified ranges of IP addresses for user devices for content caching. If this checkbox is not selected, the content cache will serve content to all devices that contact it.
- If you selected Network in Step 9b, under Network IP Range enter the starting and ending IP addresses of user devices to use to share content. For example, 169.254.0.0 - 169.254.255.255. Select IP Address Type and choose IPv4 or IPv6. To add another Peer IP Range, click Add Range.
- Under Parent IP Addresses, click Add Parent to enter the IP addresses of other preferred content caches where the device can retrieve cached content on request. If a parent cache is unreachable, the device will attempt to retrieve updates directly from Apple.
- Under Parent Priority, choose an alternate parent cache if you have more than one configured parent content cache:
- Round Robin - Rotate through the parents in order. Use this for load balancing. This choice is the default.
- Sticky Available - Use the first parent that is available in the Parents list. When it becomes unavailable, advance to the next one. Use this to designate floating primary, secondary, and subsequent parents.
- First Available - Use the first available parent in the Parents list. You can designate permanent primary, secondary, and subsequent parents.
- URL Path Hash - Hash the path part of the requested URL so that the same parent is always used for the same URL. This is useful for maximizing the size of the combined caches of the parents.
- Random - Choose a parent at random. Use this for load balancing.
- Under Peer IP Range, enter the starting and ending peer IP addresses on the same network that the content cache uses to filter its list of peers to query for content. If you leave this empty, the content cache doesn’t query any peers. Select IP Address Type and choose IPv4 or IPv6. To add another Peer IP Range, click Add Range.
- Under Peer Ranges, enter the starting and ending peer IP addresses on the same network to use to share content. For example, 169.290.0.0 - 169.290.255.255. If this field is empty, the content cache returns an error to all cache queries. Select IP Address Type and choose IPv4 or IPv6. To add another Peer Range, click Add Range.
- For Port, enter the TCP port number where the content cache accepts requests for uploads or downloads. The default is 0, which indicates a random, locally available port.
- Under Public IP Ranges, choose a range of public IP addresses that the cloud servers should use for matching clients to content caches. Select IP Address Type and choose IPv4 or IPv6. To add another Public IP Range, click Add Range.
- (Optional) Select the Device Groups tab. Select one or more device groups where you'll apply this policy. For device groups with multiple OS member types, the policy is applied only to the supported OS.
- (Optional) Select the Devices tab. Select one or more devices where you'll apply this policy.
![]()
For this policy to take effect, you must specify a device or a device group in Step 10 or Step 11.
- Click save.