
Connect


Contents
Whether you are a developer, system administrator, or just a regular user, Ubuntu 24.04 has something for everyone. It’s known for its stability, security, and ease of use, making it an excellent choice for both beginners and experienced users.
To get the most out of your system, there are certain tasks you should do post-installation. These steps will help you customize your system, increase security, and install any necessary software so that you can be effective at maintaining your Ubuntu installation.
Step 1: Update Your System
The first thing you should do after installing Ubuntu is to update your system. This ensures that you have the latest security patches and software updates.
First, update the package list:
sudo apt update

This command fetches the latest package information from repositories that are configured on your system so that the package manager has the most current information about available software and updates. This command will not install or upgrade packages: it only updates the local package index.
Next, upgrade the installed packages:
sudo apt upgrade -y

This command updates all installed packages on your system to their latest versions, using superuser privileges. It will automatically confirm any generated prompts that may appear during the update process.
Step 2: Check for Automatic Security Updates
Ubuntu provides regular security updates. Check whether automatic security updates are configured to ensure your server remains secure without additional manual action.
First, check if the unattended-upgrades package is already installed on your system:
sudo apt install unattended-upgrades -y
In our case, it’s already installed:

Check if the upgrades are properly configured.
cat /etc/apt/apt.conf.d/20auto-upgrades

Based on the output, the system is set up automatically to update the package lists and perform unattended upgrades daily, ensuring that the server is up to date with the latest security updates.
Step 3: Configure SSH for Increased Security
![]()
Consider setting up a bastion server to avoid exposing your server to the open web.
Secure Shell (SSH) is essential for the remote management of your Ubuntu server, and its default configuration can be additionally secured by changing the configuration. This way you can help to prevent events such as root logins, unlimited attempts, any brute-force attacks.
First, copy the original configuration file to reduce the risk of corrupting the configuration and lower the chance of locking yourself out of the system.
sudo cp /etc/ssh/sshd_config /etc/ssh/sshd_config.bak
You can now use nano or any other text editor and edit the directives inside the file:
sudo nano /etc/ssh/sshd_config
Uncomment the line under the PermitRootLogin directive to explicitly forbid SSH login attempts as root:

You can also change directives related to the number of attempts, login grace period, or password authentication.
MaxAuthTries 3
LoginGraceTime 15
PasswordAuthentication no
- MaxAuthTries – Defines the maximum number of authentication attempts permitted per connection, and if the user fails to authenticate within these attempts, the SSH connection will be closed. This helps prevent brute-force attacks by limiting the number of attempts that can be made to guess the password.
- LoginGraceTime – This setting defines the amount of time that the server will wait for a user to provide input and successfully log in to the server. The timer is set at 15 seconds, but you can increase it if needed. This control prevents unnecessary resource usage by ensuring that inactive or unsuccessful attempts are terminated quickly.
- PasswordAuthentication – This disables password-based authentication and users will not be able to log in using a password and must use a more secure method such as public key authentication. Be sure that you have set up the SSH key properly before changing this directive as you will not be able to subsequently log in to the server via SSH. Using this method, you will reduce the attack surface and be less susceptible to brute-force attacks and other forms of compromise, such as leaked passwords and password spray attacks.
After changing the configuration file, and if you are using nano, you can save the document by pressing Ctrl + O and then Ctrl + X to exit the editor.
Now, it’s a good practice to check for any syntax errors in your SSH configuration that could potentially break your settings. You can do so, by running the following command:
sudo sshd -t
If you do not get any output after this command, your file has a valid syntax. Any errors will be described in the output.
Finally, reload the SSH service by running this command:
sudo systemctl reload ssh
Step 4: Configure UFW on Your Ubuntu System
UFW stands for Uncomplicated Firewall, and it’s designed to simplify the process of configuring a firewall in Linux. It’s user-friendly for users who are not familiar with iptables and want a straightforward way of managing a firewall on their system.
UFW is the standard firewall for Ubuntu and other Debian-based distributions; it’s inactive by default on new Ubuntu installations.
Check the current status of your UFW by running this command:
sudo ufw status verbose

It’s very important to allow SSH connections before enabling the firewall to prevent locking yourself out. Run this command without any additional configuration:
sudo ufw allow ssh

Alternatively, you can specify the exact port number (the default is 2). If you are changing the default SSH port to something like 2222, this is critical to evade any lockouts from the system.
sudo ufw allow 22
Depending on the services running on your server, you might need to allow other connections:
sudo ufw allow 80/tcp
This will allow HTTP traffic on port 80.
sudo ufw allow 443/tcp
Allow HTTPS traffic on your system.
If you need to deny a specific IP address, use the following command:
sudo ufw deny from 192.168.1.100
Do the following if you want to deny a certain IP address for a specific port (in this case to SSH):
sudo ufw deny from 192.168.1.100 to any port 22
This step will delete a rule:
sudo ufw delete allow 80/tcp

Enable UFW by running the following command once you’ve verified your firewall rules:
sudo ufw enable

You can check the status of the firewall’s active rules:
sudo ufw status verbose
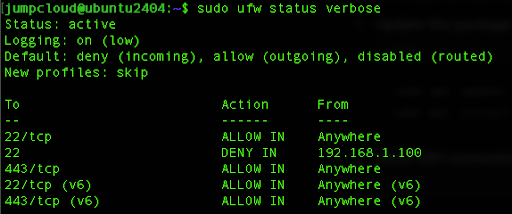
This output will show any active rules, simply and descriptively.
Step 5: Install Docker (Optional)
Docker is an open-source platform that automates the deployment, scaling, and management of various applications while using containerization. With this platform, it’s easy to build, develop, and run applications. It’s also helpful to install on your Ubuntu system in order to take advantage of this containerization model and practice modern types of deployment and running applications.
First, install the required dependencies to allow apt to use a repository over HTTPS:
sudo apt install apt-transport-https ca-certificates curl software-properties-common -y
Next, add Docker’s official GPG key:
curl -fsSL https://download.docker.com/linux/ubuntu/gpg | sudo gpg –dearmor -o /usr/share/keyrings/docker-archive-keyring.gpg
Then, add Docker’s APT repository:
echo “deb [arch=amd64 signed-by=/usr/share/keyrings/docker-archive-keyring.gpg] https://download.docker.com/linux/ubuntu $(lsb_release -cs) stable” | sudo tee /etc/apt/sources.list.d/docker.list > /dev/null
Update local packages again, and then install Docker:
sudo apt update
sudo apt install docker-ce docker-ce-cli containerd.io -y
Start and enable Docker to run at startup, once the installation is complete:

Verify that Docker is installed correctly by running a hello-world container:
sudo docker run hello-world

This confirms that Docker was successfully installed. You can now explore Docker and create any custom container in your development workflow.
Conclusion
Securing and optimizing your Ubuntu 24.04 server after installation is crucial for maintaining a reliable operating system. By following these steps, you’ll keep your system up to date with the latest security updates and feature enhancements. This tutorial covered securing your SSH configuration and configured a firewall with common rules. It also demonstrated how to install Docker as a platform for developers to securely and quickly deploy and run code with containers.