Unattended macOS devices that are active with a user that is still logged in can create opportunities for unauthorized access to information and misuse of accounts. As an IT Admin, you can remotely apply a policy to lock one inactive device or your entire fleet of devices in your organization.
JumpCloud’s Lock Screen (Screen Saver) Policy automatically locks the screen and turns on the screen saver if a managed device is inactive for a specified period of time. The policy requires the user to enter the device password to unlock the screen. This policy can lock an inactive device only after mandatory OS processes have completed. There are other settings the user can specify to activate the screensaver with an interval of time that differs from your policy.
![]()
In macOS Tahoe 26, Apple changed the screen saver framework to use .appex extensions instead of .saver modules. This change limits the functionality of the Mac Lock Screen (Screen Saver) policy on macOS Tahoe 26 to the Ask for Password Delay and Timeout settings only.
Prerequisites
- Devices must be enrolled in Apple MDM (Mobile Device Management).
- Target devices must be running macOS 13 or later.
- Supported enrollment types are:
- Device-Enrolled Devices
- Auto-Enrolled Devices
Considerations
- If you’re experiencing delays with this policy, request all users to log out and back in to all devices.
- When you apply the Lock Screen (Screen Saver) Policy to devices for the first time, all users are required to log out and log back in before the policy takes effect.
- When you modify the values under the Settings section, all users are required to log out and back in before the policy changes take effect.
- When you uninstall the Lock Screen (Screen Saver) policy, it immediately stops being enforced.
- If you uninstall and then reinstall the Lock Screen (Screen Saver) Policy, it’s immediately enforced. However, the Timeout value in the uninstalled policy is the one JumpCloud uses. To reset the old value to the value in the newly reinstalled policy, all users are required to log out and log back in.
- Many settings affect screen locking, including the following:
- JumpCloud Lock Screen (Screen Saver) Policy Timeout
- Screen Saver Settings
- Power and Sleep Settings
![]()
The shortest setting is the one that takes effect first.
When you apply the Lock Screen (Screen Saver) Policy to a macOS device, the policy applies to all users on a device, regardless of whether JumpCloud manages the user account. You also have the option to enforce the policy only for JumpCloud managed users.
After you apply a Lock Screen (Screen Saver) Policy to a device, the policy is in effect. However, due to the other ways that a screensaver can be activated for a macOS device, the exact time that the screen locks can vary. A timeout can be set in a macOS device in Apple's System Settings by selecting Lock Screen and then configuring the appropriate Lock Screen settings. This setting only turns off the display. Other hardware components remain on and processes continue to run.
![]()
If a video playback is currently in progress in a desktop app, such as QuickTime Player, both the Turn Display Off setting and the JumpCloud Lock Screen policy are overridden and the display doesn't go to sleep.
Although there are other ways to lock a macOS screen, such as Sleep Mode and Lock Screen, these events aren’t triggered by a timeout setting. In these cases, a user can lock a screen immediately by pressing the Touch Bar, selecting a command in Apple Menu, or closing the device.
When a user logs in to a device where you applied a JumpCloud Lock Screen (Screen Saver) Policy, the screen locks when the shortest screen timeout setting expires. If the Turn Display Off setting is shorter than the JumpCloud Lock Screen (Screen Saver) Policy, this setting locks the screen.
To create a macOS Lock Screen (Screen Saver) Policy:
- Log in to the JumpCloud Admin Portal.
![]()
If your data is stored outside of the US, check which login URL you should be using depending on your region. If your organization uses LDAP, RADIUS, or requires firewall allow list configuration, the Fully Qualified Domain Names (FQDNs) will also be region specific. See JumpCloud Data Centers for the URLs, FQDNs, and IP addresses.
- Go to Device Management > Policy Management.
- In the All tab, click (+).
- On the New Policy panel, select the Mac tab.
- Search and select Lock Screen (Screen Saver) policy and click configure.
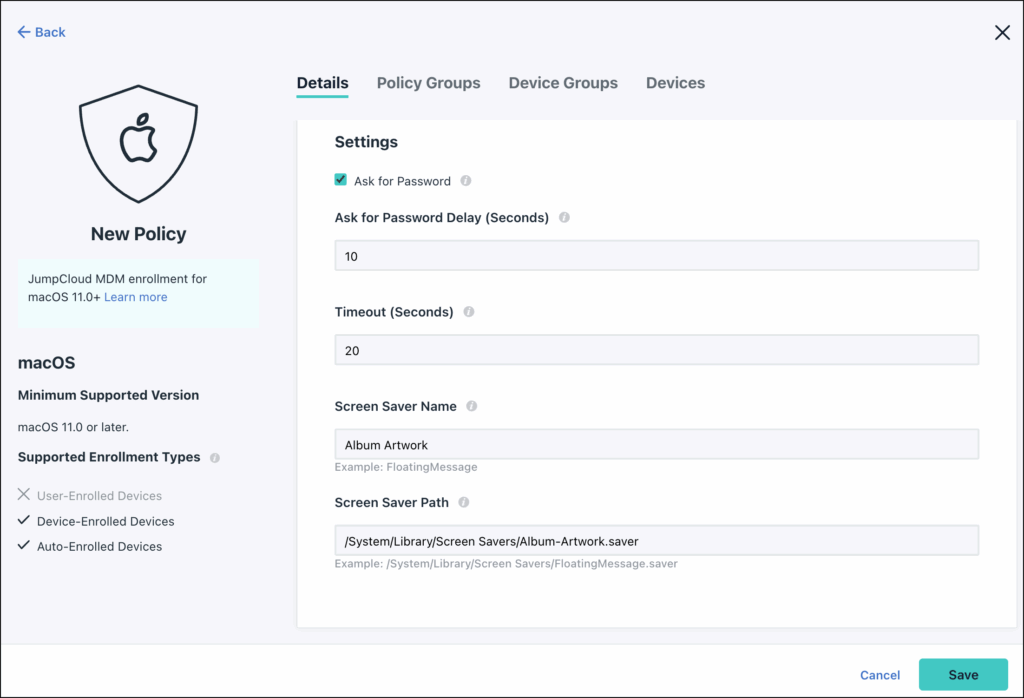
- Under Settings, configure the following:
- Ask for Password - Enable this option to prompt the user for a password when the screen saver is unlocked or stopped. This is disabled by default.
- Note: This setting isn't supported on macOS Tahoe 26.
- Ask for Password Delay - Enter the number of seconds to delay before the password will be required to unlock or stop the screen saver (the grace period). To use this option, you must enable the Ask for Password option.
- Timeout (Seconds) - Enter the number in seconds in Timeout before a screensaver is launched and a password is required.
- Screen Saver Path - The file path for the screen saver on your device. For example:
/System/Library/Screen Savers/Album-Artwork.saver- Note: This setting isn't supported on macOS Tahoe 26.
- Screen Saver Name - Name of the screen saver module. For example: Album Artwork
- Note: This setting isn't supported on macOS Tahoe 26.
- Ask for Password - Enable this option to prompt the user for a password when the screen saver is unlocked or stopped. This is disabled by default.
- (Optional) In the Policy Name field, enter a new name for the policy or keep the default. Policy names must be unique.
- (Optional) In the Policy Notes field, enter details like when you created the policy, where you tested it, and where you deployed it.
- (Optional) Select the Device Groups tab and select one or more device groups that will use this policy. For device groups with multiple OS member types, the policy is applied only to the supported OS.
- (Optional) Select the Devices tab and select one or more devices that will use this policy.
- Click save.