Connect


Contents
Configuring remote access to network appliances that are popular among small and medium-sized enterprises (SMEs) often means using a prescribed configuration. IT admins will find that support articles and how-tos about how to configure SonicWall’s NSv are centered around Active Directory and Windows Server. Multi-factor authentication (MFA) is out of band, requiring a separate system solely for SonicWall. Thankfully, there’s an alternative available by using JumpCloud’s smart groups, remote dial-in user service (RADIUS), and integrated time-based one-time password (TOTP) MFA services.
This article is part of a series of how-tos that demonstrate how to use JumpCloud’s capabilities to achieve added security, with minimal costs. JumpCloud’s centralized platform provides single sign-on (SSO), delivering identity and access management (IAM) for every service your organization may use. That eliminates managing passwords everywhere, even your firewall.
SonicWall firewalls are widely used by managed service providers (MSPs) to provide affordable and effective perimeter security. The NSv is a next-generation firewall that runs in the cloud, or as a virtualized device in your data center, thereby reducing the costs of buying an appliance. JumpCloud reduces the management overhead for your IT department.
Here are the prerequisites for this setup:
- JumpCloud’s RADIUS services
- JumpCloud’s RADIUS certificate for EAP-TLS client deployments
- JumpCloud’s MFA services and an authenticator app
- JumpCloud’s cloud directory groups
The JumpCloud Configuration
This configuration leverages directory group memberships to grant access to your SonicWall instance. The group that you’ll be creating will be binded to a RADIUS configuration that mandates MFA, using TOTP tokens. Users access the firewall with their JumpCloud username and password. The only difference is that passwords are amended to include a token every time a user logs into the appliance. Every login is then protected by a unique one-time password.
SonicWall Configuration Overview
SonicWall will require you to have RADIUS server settings (including a few advanced options), import JumpCloud’s RADIUS certificate, and ensure that remote management is permitted.You’ll be able to decide which permissions group members will inherit on the firewall by default.
Let’s start by setting up a RADIUS profile for your SonicWall device.
Setting Up JumpCloud RADIUS, MFA
Every JumpCloud account includes RADIUS services, which are configured using the following steps.
To configure RADIUS, MFA for a new server:
- Log in to the JumpCloud Admin Portal.
- Go to User Authentication > RADIUS.
- Click ( + ). The new RADIUS server panel appears.
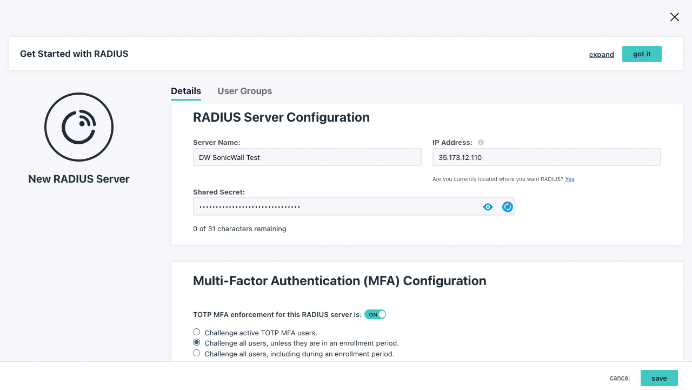
- Configure the RADIUS server:
- Enter a name for the server. This value is arbitrary.
- Enter a public IP address from which your organization’s traffic will originate.
- You must use the external IP for SonicWall.
- Provide a shared secret. This value is shared with the device or service endpoint you’re pairing with the RADIUS server.
- Configure TOTP multi-factor authentication for the RADIUS server:
- Toggle the TOTP MFA Enforcement for this RADIUS server option to “On” to enable MFA for this server. This option is “Off” by default.
- Select “Challenge active TOTP users” to require all JumpCloud users with MFA active for their account to provide a TOTP code when they connect to this server.
- Select “Challenge all users,” unless they are in an active enrollment period, to require all JumpCloud users that aren’t in an MFA enrollment period to provide a TOTP code when they connect to this server.
- Select “Challenge all users, including during an enrollment period” to require all JumpCloud users, even those in MFA enrollment periods, to provide a TOTP code when they connect to this server.
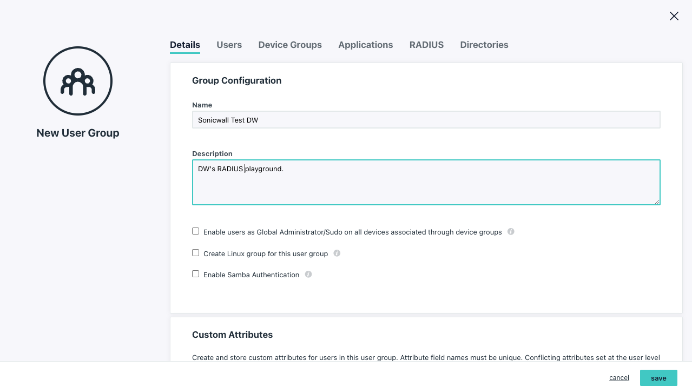
- To grant access to the RADIUS server, click the User Groups tab, then select the appropriate groups of users you want to connect to the server.
This is where you will enforce MFA access. Make certain that it’s switched “On” in this dialog. You have several options to work around new user enrollment periods.
This Getting Started article details how to manage users and groups within JumpCloud. The RADIUS configuration will be bound to a dedicated group that you’re creating for this configuration.
Configuring SonicWall
You’ll use the information contained in JumpCloud’s RADIUS interface to create a new RADIUS server entry on your firewall. Navigate to Device / Settings / Users /Settings. You’ll notice a button to “Configure RADIUS,” which is where you’ll set up your JumpCloud RADIUS server.
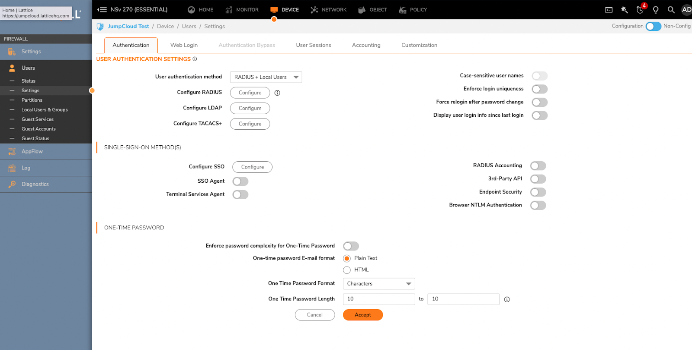
You have several options for JumpCloud IP addresses, but they will always communicate exclusively over port 1812. Port 1813 “accounting” is not a part of this configuration. Your shared secret is entered here; be certain that you keep it private and confidential.

Select “Use vendor-specific attributes on RADIUS server” on the “RADIUS Users” tab after you’ve saved your configuration. That will ensure that your group membership is processed.
Important: “RADIUS Users” is where you’ll specify the appropriate user role on the firewall.
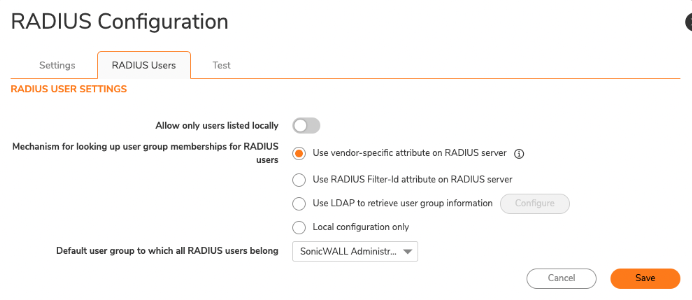
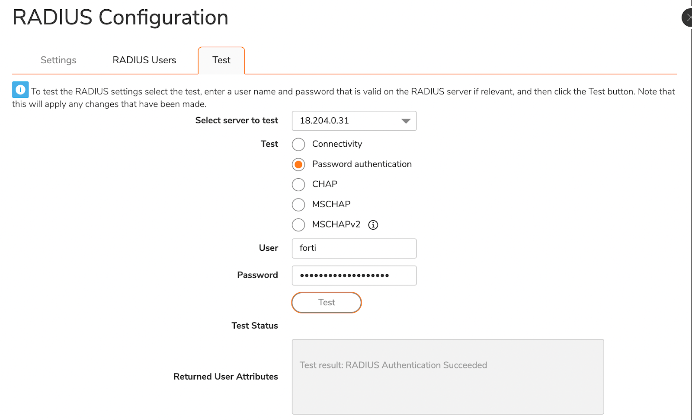
The “Test” tab will verify whether your configuration is working. Test “Password authentication” only: The EAP/TLS password challenge configuration that we’re going for won’t work with CHAP. Use the username (UID), but use the email that’s associated with your JumpCloud account.
A TOTP token from JumpCloud MFA, which you can add as an account in an authentication app, is the “response” to the challenge that will validate your users after you complete the next few steps.
Note that SonicWall doesn’t specify EAP/TLS anywhere in its RADIUS setup.
EAP/TLS Setup
EAP/TLS will not work until you take the additional step of importing a RADIUS certificate from JumpCloud. It’s available here as a .crt file, and SonicWall will import it. You’ll then be prompted to restart your virtual appliance to install the certificate.
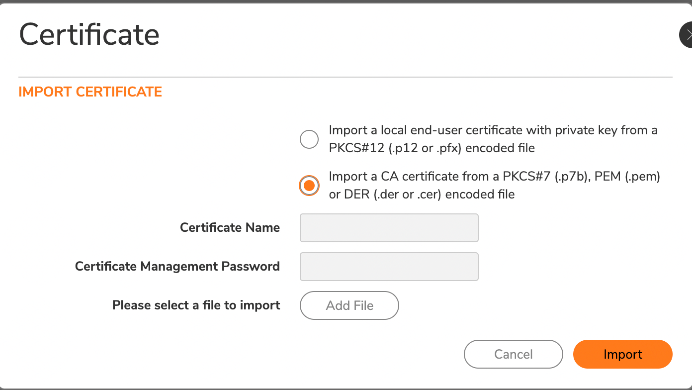
Now, expand “System,” find “Certificates,” and filter by “imported certificates and requests.” You can verify that the installation was successful here.

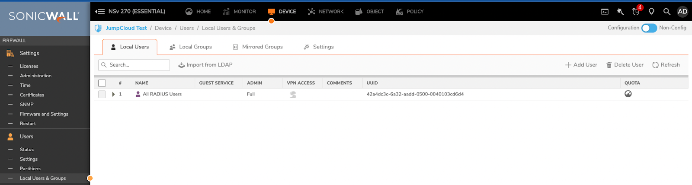
You may also create a local group for RADIUS users, but users will automatically be provisioned within default groups based upon their assigned roles. A local user will be created for all RADIUS users during setup.
Allow Remote Management
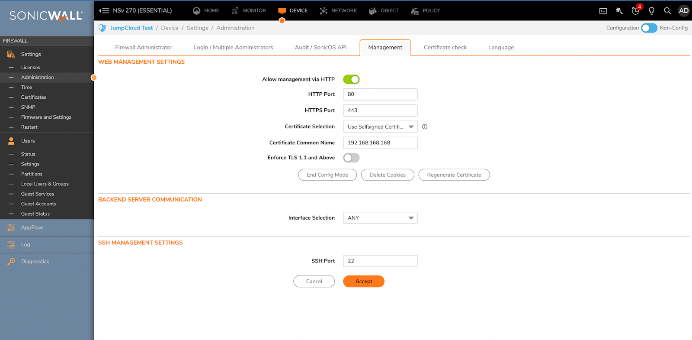
You won’t be able to log in as a remote RADIUS user until specifying the option to permit remote management under Device / Administration / Management. Otherwise, you’ll receive an “unknown” error message on login. This is only applicable if you’re not using a VPN or you’re on the same network. Please see the additional security steps outlined below for more information.
You’re now finished and should be able to log in using your RADIUS credentials. Your firewall’s access control is now centralized from the JumpCloud platform.
Use your JumpCloud password in this syntax: PASSWORD,TOTP
Recommended Security Steps
EAP/TLS transmits passwords in cleartext. Adding MFA to the authentication process increases security, but we strongly recommend the following steps:
- Connect through a VPN using a secure tunnel (SSL or IPSEC).
- Consider isolating this traffic through its own VLAN and segment your network away from end-user traffic.
- Use the strong shared secret that JumpCloud generates for RADIUS and treat it as you would any password.
- JumpCloud Conditional Access can further secure your MFA setup by restricting access to specific geographic regions.
Try JumpCloud
The JumpCloud platform connects you to more things and is free to try for 30 days.