Work from anywhere isn’t restricted to employees at small to medium-sized enterprises (SMEs). Many IT teams and managed service providers (MSPs) work in distributed teams, which necessitates securing access to network infrastructure and closely managing user identities. However, these foundational security controls are too often disregarded when internal budgets, or asking a client to spend more for remote access, fail to address the potential security risks.
This article is part of a series of how-tos that demonstrate how to use JumpCloud’s capabilities to achieve better security with minimal costs using a centralized platform that includes everything required to secure access to your network. It has the added bonus of providing single sign-on (SSO) beyond this scenario, delivering identity and access management (IAM) for every service your organization may use, and eliminating managing passwords everywhere.
pfSense is a popular open source firewall and router that provides multiple interfaces for external authentication, even multi-factor authentication (MFA) through RADIUS. The prerequisites to secure access to pfSense using MFA through JumpCloud’s services are:
- JumpCloud’s RADIUS services
- JumpCloud’s MFA services
- An authenticator app that supports Time-based One-time Password (TOTP)
- JumpCloud’s cloud directory groups, with specific settings outlined below
Using MFA and RADIUS for Access Control
Use LDAP if you want to run pfSense in HA mode and CARP for IP address redundancy (without NAT).
JumpCloud makes it possible for a RADIUS challenge to incorporate TOTP tokens, using the the JumpCloud Protect™ multi-factor authentication app. User passwords are amended to include a token every time a user logs into the appliance. Users are managed from within JumpCloud’s directory groups, which are bound with a RADIUS configuration that’s specific to pfSense. Our directory determines that every group within that group must be enrolled with MFA services to log into any service that JumpCloud connects them to, including pfSense. A user group account within pfSense determines what level of admin rights are assigned.
Setting Up JumpCloud RADIUS, MFA
Every JumpCloud account includes RADIUS services, which are configured using the following steps.
To configure RADIUS, MFA for a new server:
- Log in to the JumpCloud Admin Portal.
- Go to User Authentication > RADIUS.
- Click ( + ). The new RADIUS server panel appears.
- Configure the RADIUS server:
- Enter a name for the server. This value is arbitrary.
- Enter a public IP address from which your organization’s traffic will originate.
- You must use the external IP for pfSense.
- Provide a shared secret. This value is shared with the device or service endpoint you’re pairing with the RADIUS server.
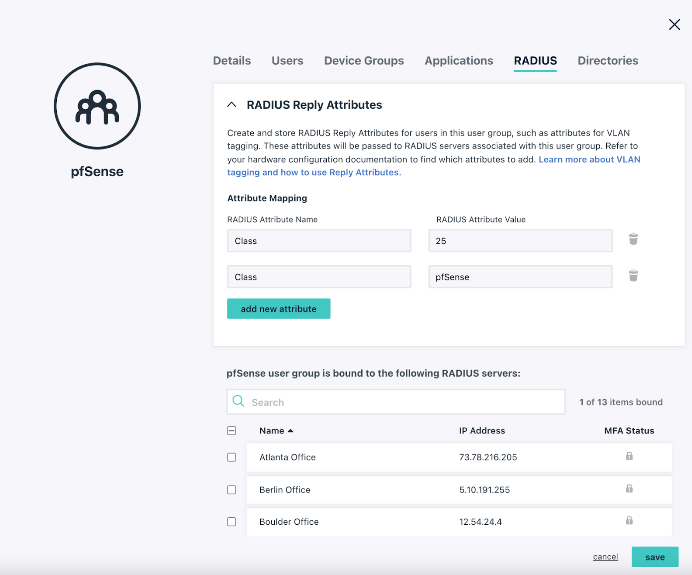
- Next, add RADIUS to the appropriate response values within the “RADIUS Reply Attributes” tab of your user group (or the “group” information won’t populate within pfSense). Your group name may be different than the one below:

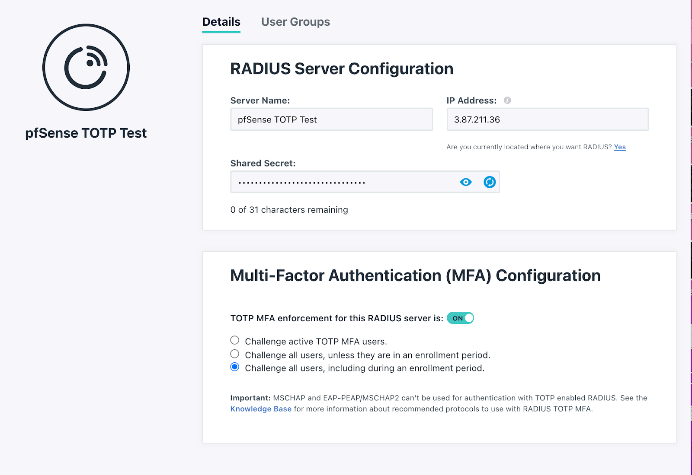
- Configure TOTP multi-factor authentication for the RADIUS server:
- Toggle the TOTP MFA Enforcement for this RADIUS server option to “On” to enable MFA for this server. This option is “Off” by default.
- Select “Challenge active TOTP users” to require all JumpCloud users with MFA active for their account to provide a TOTP code when they connect to this server.
- Select “Challenge all users,” unless they are in active an enrollment period, to require all JumpCloud users that aren’t in an MFA enrollment period to provide a TOTP code when they connect to this server.
- Select “Challenge all users, including during an enrollment period” to require all JumpCloud users, even those in MFA enrollment periods, to provide a TOTP code when they connect to this server.
- To grant access to the RADIUS server, click the User Groups tab, then select the appropriate groups of users you want to connect to the server. Remember that the groups management interface is where the “RADIUS Reply Attributes” must go.

This article details how to manage users and groups within JumpCloud.
Configuring pfSense
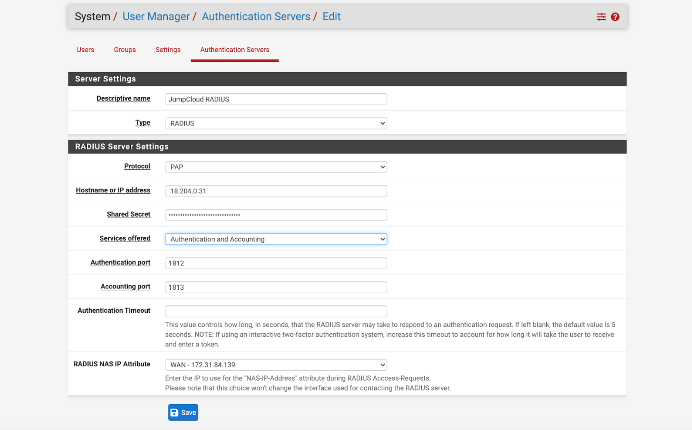
You’ll use the information contained in JumpCloud’s RADIUS interface to create a new RADIUS server entry within pfSense, here:

Note that JumpCloud only uses port 1812.
You’ll then enter an arbitrary name for the RADIUS server, one of JumpCloud’s RADIUS IPs, and paste the shared secret where it’s indicated. Importantly, ensure that the password authentication protocol (PAP) is selected as the Authentication Method in order to engage the RADIUS challenge. A TOTP token from JumpCloud MFA, which you can add as an account in an authentication app, is the “response” to the challenge that will validate your users.
You will then proceed to create a user group for your remote admins within pfSense, following these steps:
- It should have the exact “group name” as the administrative group you’re using within JumpCloud.
- Determine which access rights are appropriate for each user group. You can learn more about pfSense privileges here.
- Select “Remote” under “Scope.”

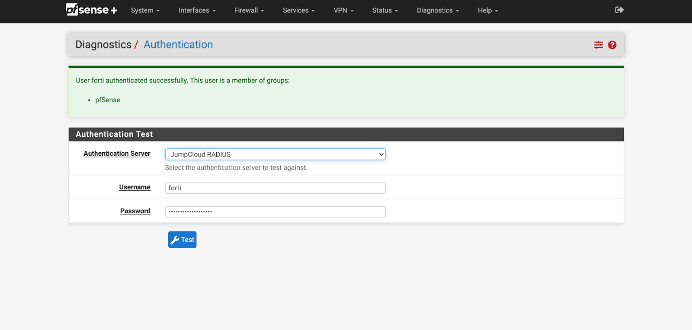
You may test connectivity with JumpCloud RADIUS services in the “Authentication Servers” tab. The name of your group will flow through from JumpCloud if all settings are input correctly.

Note: This approach will only work when you add a TOTP token, following a comma, to your password. For example, “password123” becomes “password123,tokenstring”. Your logins are now MFA enabled, and pfSense admin users will now be centrally managed from within JumpCloud’s cloud directory.
Recommended Security Steps
PAP transmits passwords in cleartext. Adding MFA to the authentication process increases security, but we strongly recommend the following steps:
- Connect through a VPN using a secure tunnel (SSL or IPSEC).
- Consider isolating this traffic through its own VLAN and segment your network away from end-user traffic.
- Use the strong shared secret that JumpCloud generates for RADIUS and treat it as you would a password.
Try JumpCloud
To connect to pfSense securely with JumpCloud, sign up for a trial of the JumpCloud platform today.


