Connect


Contents
Editor’s Note: JumpCloud provides extensive support to access, protect, and secure Linux endpoints; you can see a comprehensive list of supported distros and versions here. Ubuntu 24.04 LTS support will become available soon.
Ubuntu 24.04 Key Features and Improvements
Ubuntu 24.04 LTS, codenamed “Noble Numbat,” introduces several enhancements compared to previous versions like Ubuntu 22.04 LTS. Here’s a breakdown of the key features and improvements:
User Interface and System Improvements
Ubuntu 24.04 LTS is set to feature the GNOME 46 desktop environment, which includes a more responsive interface with various graphical improvements, contributing to a modern computing experience.
Performance and Hardware Compatibility
This release will include the latest Linux Kernel 6.8, with enhanced hardware support, especially covering newer CPUs and GPUs, and better laptop power management. These enhancements are crucial for maintaining compatibility with various devices and optimizing system performance.
Security Enhancements
Ubuntu 24.04 LTS emphasizes security with extended support for Secure Boot and disk encryption, alongside updated firewall management tools. These features are meant to protect the user and the system itself from various digital threats.
Development Tools and Cloud Integration
The good news for developers is that Ubuntu 24.04 LTS updates software stacks for popular programming languages and critical development tools, ensuring they have access to the latest resources. Additionally, the release enhances integration with Kubernetes and microservices, supporting modern cloud infrastructure demands.
Snap and Software Management
The team and community behind the Ubuntu distro continue to integrate the snap package system, including optional snap-based desktop versions. This version is designed to offer enhanced security and sandboxing for applications.
Toolchain Upgrades in Ubuntu 24.04 LTS
There are various upgrades related to Ubuntu’s toolchain:
- GCC is updated to version 14.
- This LTS version includes the new 6.x Linux kernel that brings many new features.
- Python has a default version of 3.12.
- OpenJDK now defaults to LTS version 21.
- LLVM now defaults to version 18.
- Rust toolchain defaults to version 1.76.
- Golang is updated to 1.22.
- .NET 8 is now the default.
- The Apache2 package has been updated to version 2.4.58.
- The docker.io 11 package was updated to version 24.0.7.
- The PHP package was updated to version 8.3.3.
Important Notes Before Upgrade
Here are some important notes to consider before upgrading to this latest version:
- You can directly upgrade to Ubuntu 24.04 LTS (“Noble Numbat”) from either Ubuntu 22.04 LTS (“Jammy Jellyfish”) or Ubuntu 23.10 (“Mantic Minotaur”). In our case, we will use the 22.04 LTS and we prefer LTS versions since they provide support and updates for five years from the release date. This extended time frame is crucial for businesses and organizations that require a stable operating system without the need for frequent upgrades. It is worth noting that it is not possible to directly upgrade from two major LTS versions, for example from 20.04 LTS to 24.04 LTS, so we recommend that you upgrade first to 22.04 LTS and then to 24.04 LTS version.
- You must have all updates applied to your current version of Ubuntu before you upgrade. This can also prevent various errors including critical ones and incompatibility with the newest packages.
- Before upgrading it is recommended that you read the release notes for Ubuntu 24.04 LTS, which document caveats and workarounds for known issues in this version.
- Make sure that you have enough space in your storage to upgrade to the latest LTS version, it is recommended that you have at least 20 GB of space on your system before upgrading.
- Permissions with sudo privileges with access to SSH are required so you can run various upgrade commands.
- It is important to not interrupt the upgrade process because during an upgrade, many system files, user data, and configurations are altered. If the process is interrupted, files may be left in a partially updated state, which can lead to data corruption.
Step 1: Back Up Your Important Data
Decide where you will store your backup. Common options include:
- An external hard drive
- A USB flash drive
- A cloud storage service
- Network-attached storage (NAS)
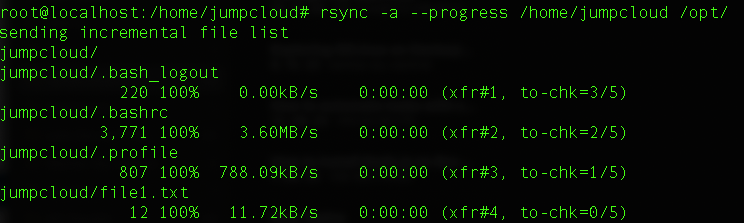
Next, copy the home directory for your users. The home directory contains user data and personal settings. You can use this command to back up your data:
rsync -a –progress /home/your_username /path_to_backup_location/home_backup
Next, back up your system configuration files:
sudo rsync -a –progress /etc /path_to_backup_location/etc_backup
To re-create your software environment, you can generate a list of all installed packages:
dpkg –get-selections > /path_to_backup_location/package_list.txt
This way we can have information about all packages that are installed and we can reinstall them later if needed:
sudo dpkg –set-selections < package_list.txt
sudo apt-get dselect-upgrade
Step 2: Upgrade All the System Packages
Upgrading all packages ensures that all software on your system is compatible with newer versions. This compatibility is crucial during a system upgrade because new versions of the operating system may depend on newer versions of libraries and other software packages. If older versions remain, they might not work properly with the new OS version, potentially leading to errors or even failure. Regular updates can often include various security patches and fixes that will close any vulnerabilities in the system.
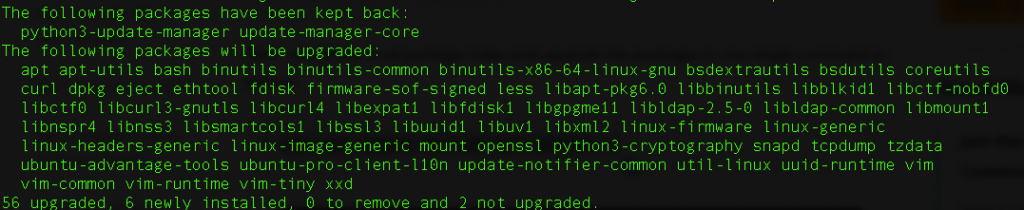
Next, we can refresh and update the local package index and upgrade the packages:
sudo apt update && sudo apt upgrade -y
Now it’s a good idea to reboot your system to start using the latest kernel version. You can do so by running the following command:
sudo reboot
Step 3: Prepare TCP Port 1022
![]()
Note: It’s a security best practice to use a bastion host whenever possible to avoid expanding your attack surface.
The default port for SSH connections is port 22. In scenarios where the SSH configuration is altered or incorrectly set during an upgrade, the default SSH service might become inaccessible. Having port 1022 set up as a secondary SSH port ensures that you can still access your system remotely to troubleshoot and fix issues that may have occurred on the default port.
During the upgrade process, various services and configurations may be restarted or reloaded, including the SSH daemon. If something goes wrong during these operations, having an additional port configured can help to avoid losing remote access to the server.
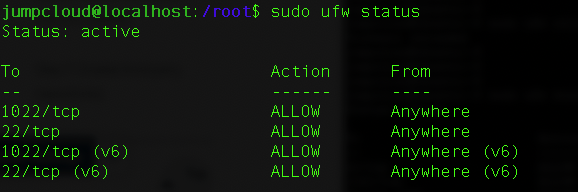
We can start by allowing this specific port in our Ubuntu firewall:
sudo ufw allow 1022/tcp
To apply the rule run the following command:
sudo ufw reload
Finally, we can check whether ports are listed properly:
sudo ufw status
Step 4: Upgrade from Ubuntu 22.04 LTS to Ubuntu 24.04 LTS Version
We are now ready to upgrade to the latest Ubuntu LTS version. We can update either via GUI or through the command line.
In this tutorial, we will use the do-release-upgrade tool through the command line.
If the tool is not installed already, we can install it by running the following command:
sudo apt-get install ubuntu-release-upgrader-core
In our case, it was already installed:

Next, we can launch the upgrade tool:
sudo do-release-upgrade -d
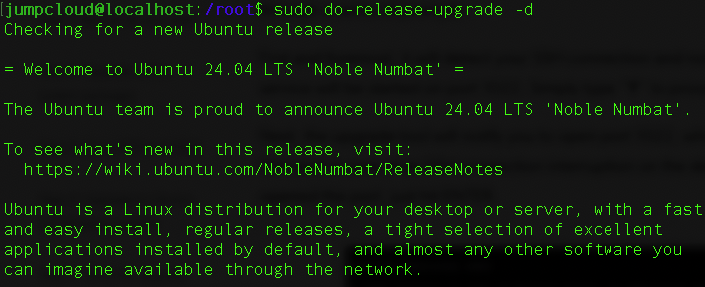
Simply respond with ‘y’ on the first prompt to continue.
Now we will receive another prompt that an additional ssh daemon will be started at port 1022, which we configured previously.
So here, just enter ‘y’ again and continue with the process.

Next, we will get a prompt where we will be asked to update the ‘sources.list‘ file for the newest version, so we can continue with the ‘y’ option here and press Enter.
Now we will get the prompt where we get the following information:
- The number of packages that are no longer supported by Canonical.
- The number of packages that will be removed, installed, or upgraded.
- Download size, estimated duration, and the information on how long it will take for the full upgrade.
So here we can again type ‘y’ and then press Enter.
In the upgrade process, there might be a couple of prompts that will ask about changing potential versions:
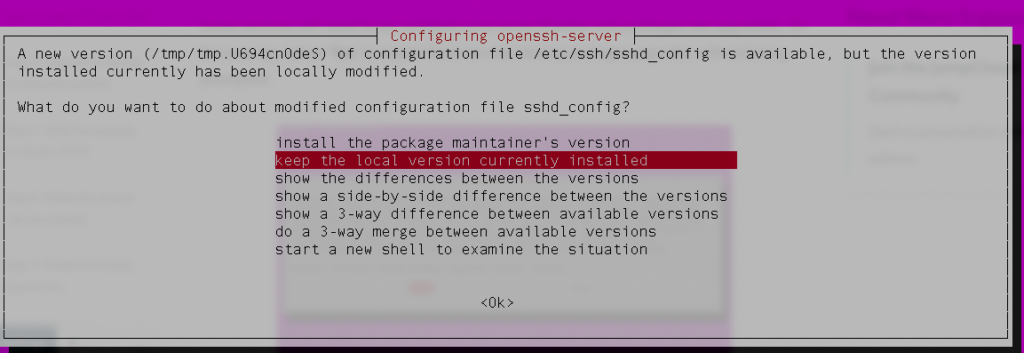
Choosing “keep the local version currently installed” means that your existing configuration file (sshd_config in this case) will be preserved. This is often the preferred option if you’ve made custom configurations that you do not want to overwrite, such as specific SSH settings, port numbers, or security settings.
Selecting “install the package maintainer’s version” would replace your sshd_config with the default version from the new package. This could be useful if you want to start fresh with the new default settings or if you’re not concerned about maintaining custom settings.
If you’re unsure, it’s usually safe to keep the current version, especially if the system is functioning as expected.
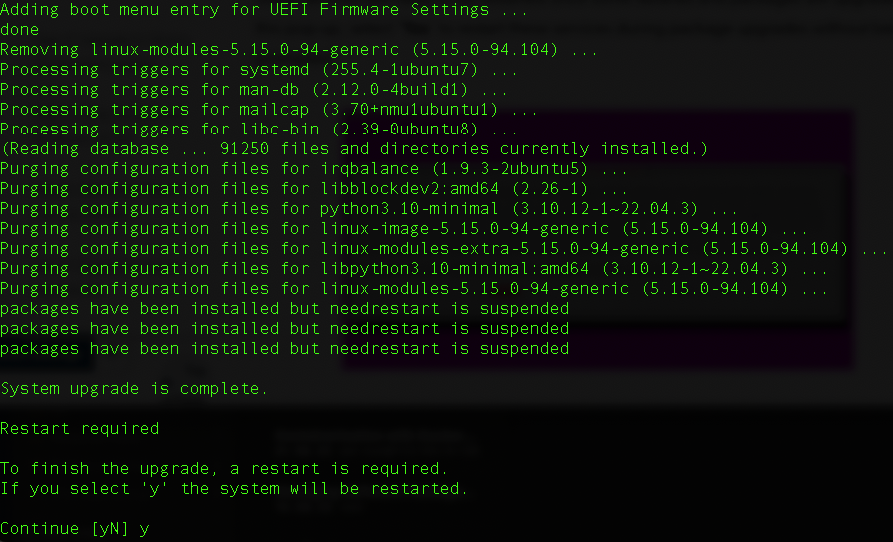
Last, we will get a prompt that states our system upgrade is complete and a restart is required. So we will once again type ‘y’ and press Enter to finish the upgrade.
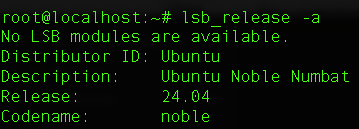
Step 5: Verify Proper Upgrade to Ubuntu 24.04 LTS
Once we log back into the system, we can confirm whether the upgrade was successful if we run the following command:
lsb_release -a
We can also check the kernel version:

Step 6: Remove the Firewall Rule
Since we have completed the upgrade to the latest version, we can remove the firewall rule for port 1022. We are mainly doing this because we want to keep our system secure, as leaving unattended ports can lead to various vulnerabilities.
sudo ufw delete allow 1022/tcp
Step 7: Enable Third-Party Repositories
Once we have upgraded our system to the latest version we can enable the third-party repositories that were disabled during the upgrade process.
We can see these repositories by running the following command:
ls -l /etc/apt/sources.list.d/
We can enable it again if we uncomment and remove the # sign at the beginning of each line for each repository, and for that purpose we can use any text editor such as Vim or Nano.
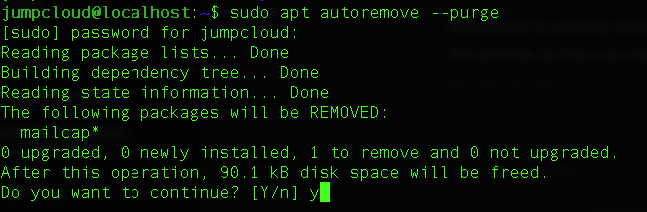
At the end of our post-upgrade process, we can remove the unnecessary packages with the following command:
sudo apt autoremove ––purge
Conclusion
Ubuntu 24.04 LTS, nicknamed “Noble Numbat,” is a significant leap that combines the latest technological advancements with the stability and reliability that long-term support releases are known for. This new version provides users with a system that’s both secure and equipped with features fit for a wide array of applications — from personal computing to enterprise environments.
If you’re an IT admin managing updates for various Ubuntu systems, as well as macOS and Windows devices, your workflow can rapidly grow complex. Implement JumpCloud, a device management solution compatible with any operating system, to streamline the patching process and gain complete visibility into the update status across your entire fleet.