
Connect


Contents
Advanced Package Tool (APT) is the backbone of package management on Debian and Ubuntu systems. It simplifies the process of installing, updating, and removing software. APT works with repositories — designated locations that host packages and update information.
Mastering APT repository management ensures you have access to the software you need and that your system remains secure and up to date. This tutorial will guide you through how to manage APT repositories on Debian and Ubuntu systems.

Step 1: Log In to Your Debian or Ubuntu Operating System
In our example, we will use Debian 12 but you are free to use any Debian or Ubuntu version.
We can log in to our server via a terminal or some SSH client installed on your local machine. If you’re using Linux or macOS, you can use the built-in terminal application or command line for this purpose. In case you are using the Windows operating system, you can use popular solutions such as PuTTY or Windows PowerShell with SSH.
Open the terminal or SSH client on your local machine and enter the username and IP address or hostname for your Debian or Ubuntu server.
In the terminal or SSH client, you can initiate the SSH connection by using the following command:
ssh username@server_ip_address
If you are connecting to the server for the first time, you will see a security warning about the authenticity of the host. Here you can verify that the displayed fingerprint matches the expected fingerprint by typing “yes” in the prompt.
The next prompt will ask you for the password, and after entering it, you will be logged into your system.
![]()
Note: It’s a security best practice to access a protected server through a SSH jumpbox, often called a “bastion host.”
Step 2: Explore the APT Structure
APT gets its packages from repositories defined in the /etc/apt/sources.list file and in the /etc/apt/sources.list.d/ directory. The sources.list file contains a list of “sources” or locations from which APT fetches packages. Each line in the file specifies a different source, starting with the type of archive (deb for binary packages and deb-src for source packages), followed by the URL of the repository, the distribution codename, and the repository sections.
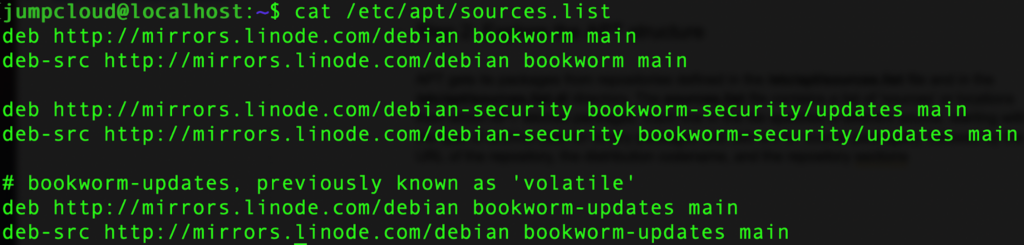
In the screenshot above, we can see deb and deb-src packages belong to the bookworm distribution which is Debian 12, and the repository section main contains free and open source software officially supported by Debian. In the case we see the repository section called restricted, that is related to proprietary drivers.
Step 3: Add New Repositories
The first step when adding custom repositories to our repository list is to make a backup of our current sources.list file.
sudo cp /etc/apt/sources.list /etc/apt/sources.list.backup
Next, we can open the sources.list file in our preferred text editor:
sudo nano /etc/apt/sources.list
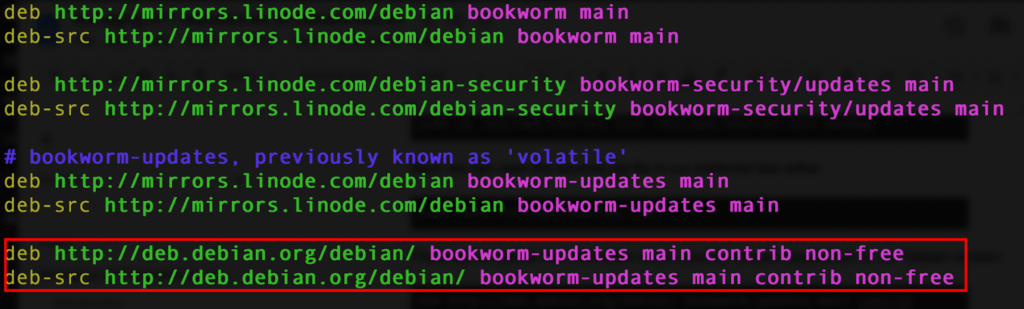
There we can paste the information about security-related repositories for our Debian version:
deb http://deb.debian.org/debian/ bookworm-updates main contrib non-free
deb-src http://deb.debian.org/debian/ bookworm-updates main contrib non-free
We can see that there are already repositories that are defined but we will add official ones for redundancy.
Press Ctrl + W for writing changes and Ctrl + X to exit the file.
Now we can run the following command:
sudo apt update
This command will refresh the list of available updates and also include the repositories that we placed in our sources.list file.
As we can see in this example, the update command added a few packages that have pending updates.

We can check them by running the command:
apt list –upgradable

Next, we can add a new PPA or Personal Package Archives which are repositories designed for individual developers to deliver updates directly to users. This allows additional flexibility as you can often find some custom packages that are not available in official repositories.
You should research these archives and repositories thoroughly before installing them on your system since some of them could create errors and broken dependencies.
We can add the latest PHP version as part of ppa:ondrej/php for Debian. The first step is to import the GPG signing key.
sudo wget -O /etc/apt/trusted.gpg.d/php.gpg https://packages.sury.org/php/apt.gpg

Importing GPG keys for APT repositories is crucial because it allows your package manager to verify the integrity and authenticity of the packages you download and install. It ensures that the packages have not been tampered with and are from a trusted source.
This command downloads the GPG key from the provided URL and saves it directly into the trusted.gpg.d directory, which is where APT looks for additional GPG keys beyond the default keyring.
Next, we can add the repository:
echo “deb https://packages.sury.org/php/ $(lsb_release -sc) main” | sudo tee /etc/apt/sources.list.d/php.list
This command adds a new source to the APT sources list for PHP packages provided by the “packages.sury.org” repository.
Now we can sync the PPA with our local list, so we will run the update command again:
sudo apt update
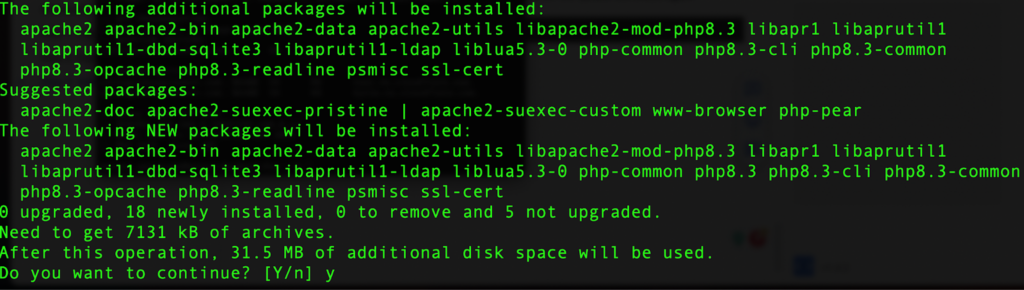
Now we can install the latest PHP 8.3 version:
sudo apt install php8.3
We can verify that our PHP version is installed by running the following command:
php -v

Step 4: Remove or Disable Repositories
Removing a repository might be necessary if the source is no longer maintained, if it conflicts with other software sources, or if you no longer require the software provided by that repository. Disabling, on the other hand, does not remove the repository but temporarily turns it off, which can be useful for troubleshooting issues or testing the system without certain updates.
Understanding how to effectively remove or disable repositories ensures that your system’s software sources remain reliable, up to date, and secure. This segment of the tutorial will delve into the practical steps and considerations for removing and disabling repositories on Debian and Ubuntu systems, ensuring that you are comfortable with this important segment of APT management.
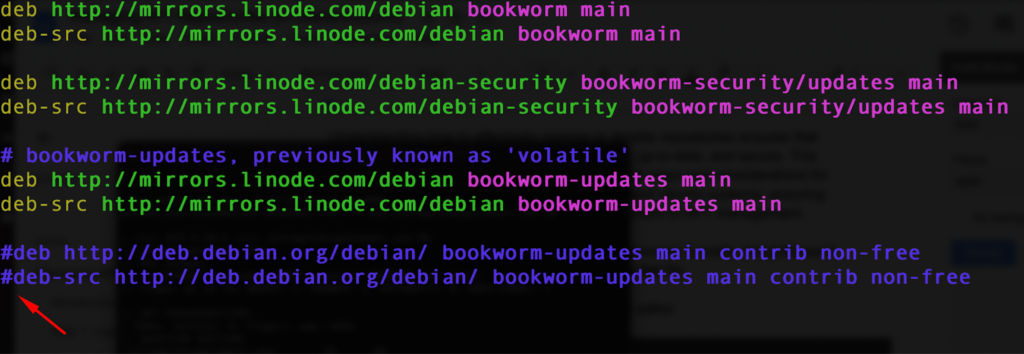
We will look into disabling a repository first; this process is pretty straightforward. We need to comment on the line in our sources.list file.
First, open sources.list file in your preferred text editor:
sudo nano /etc/apt/sources.list
Here, we need to comment out lines for repositories we want to exclude:
To remove the repository, the solution is to delete the line or lines completely from the sources.list file.
If we have custom PPAs that we want to remove, we can do so by first checking the sources.list.d directory where custom PPAs are stored.
In this example, we have our php.list that we installed previously, and there is one opencpn repository that is broken so we will remove it.

We can do so by removing the file directly:
sudo rm /etc/apt/sources.list.d/opencpn-ubuntu-opencpn-bookworm.list
The process is the same for any other custom PPA that is stored in the sources.list.d directory.
After each repository is deleted, it is a good idea to run the update command again:
sudo apt update
Final Thoughts
As we conclude our journey through managing APT repositories on Debian and Ubuntu systems, it’s imperative to recognize the balance between utilizing a rich ecosystem of software and maintaining the integrity and performance of your system.
Mastering the art of repository management — knowing how to add, remove, enable, and disable software sources — empowers you to customize your system to your needs while safeguarding against potential issues arising from incompatible or untrusted sources.
Through this tutorial, you’ve gained valuable insights into APT’s fundamental operations, learned to choose your sources carefully, and understood the significance of maintaining a clean and secure repository list. The repositories you choose to trust must be as crucial as the software you opt to install.
By applying the practices outlined here, you’re equipped to keep your system’s software management efficient and secure. As you move forward, continue to explore, validate sources, and keep your system’s health a top priority.
If you’d like to practice additional Debian or Ubuntu management skills, check out the following tutorials: