
Connect


Contents
Short for High Availability Proxy, HAProxy is an open source and high-performance HTTP load balancer and proxying solution. It enhances website and application performance by distributing workloads across multiple backend web servers. This results in reduced response times, increased throughput, and high availability.
Although HAProxy is free and open source, there is also a commercial option called HAProxy Enterprise. It includes a suite of add-ons, professional services, and 24/7 support.
Regardless of which version makes the most sense for your organization, HAProxy provides the following load balancing algorithms:
- Round robin. Web traffic is sequentially distributed across each backend server, with each server assigned a unique number.
- Least connections. Incoming requests are sent to the server with the least number of active connections. This comes in handy when you have a set of servers with varying processing capabilities.
- Least time. Incoming requests are channeled to the server with the fastest response time.
- Source IP hash. The algorithm uses a hash function to map incoming requests from client IPs to a backend server. For instance, requests from the same IP are routed to the same backend server.
- Random with two choices. Two backend servers are selected randomly and requests are sent to either of them by employing the least connections algorithm.
In this guide, we will demonstrate how to install and configure HAProxy on RHEL 9.
Lab Setup
To demonstrate how HAProxy works, we have our lab environment setup as shown:
| Node | Hostname | IP address |
| HAProxy | ha-proxy-rhel9 | 10.128.0.6 |
| Web Server 1 | web-server-01 | 10.128.0.7 |
| Web Server 2 | web-server-02 | 10.128.0.8 |
Step 1: Configure Hostnames (All Nodes)
The first step is to configure the hostnames for all the nodes. Therefore, log into each of the nodes and run the following commands:
HAProxy Load Balancer
$ sudo hostnamectl set-hostname ha-proxy-rhel9
$ exec bash
Web Server 1
$ sudo hostnamectl set-hostname web-server-01
$ exec bash
Web Server 2
$ sudo hostnamectl set-hostname web-server-02
$ exec bash
Step 2: Configure /etc/hosts file (All Nodes)
Once the hostnames have been configured, the next step is to set up hostname resolution so that the three nodes can communicate seamlessly in the environment.
To do so, you need to configure the /etc/hosts file in each node.
$ sudo vim /etc/hosts
Next, add the following entries to the file:
10.128.0.6 ha-proxy-rhel9
10.128.0.7 web-server-01
10.128.0.8 web-server-02
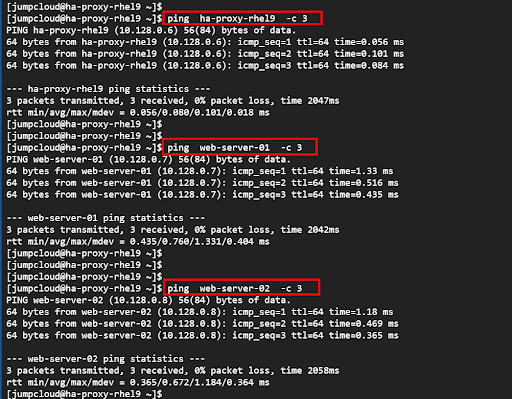
Save the changes and exit the file. Ensure you can ping nodes from each node using the defined hostnames.
From the output, you can see that we’re able to ping the web servers from the HAProxy load balancer. You should get the same feedback when trying to ping the rest of the nodes from either of the web servers.
Step 3: Install HAProxy on RHEL 9 Load Balancer
Having configured the hostnames and hostname resolution for all the nodes, the next step is to install the HAProxy package on the load balancer node.
First, update the system packages to their latest versions.
$ sudo dnf update
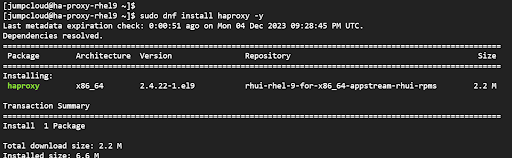
HAProxy is available from the default RHEL 9 repositories. To install it, run the following command:
$ sudo dnf install haproxy -y
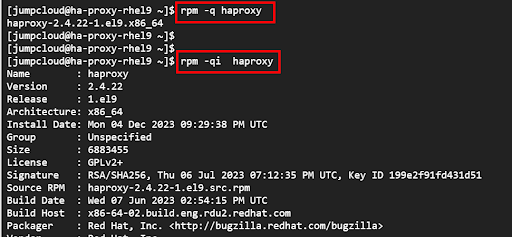
Once installed, confirm the version installed as shown.
$ rpm -q
Alternatively, you can pass the -i option to provide more in-depth information about the package installed.
$ rpm -qi
The output provides a wealth of information including the name, version, release, architecture, and installation date among other details. From the output, you can see that we have installed HAProxy version 2.4.22.
Step 4: Configure HAProxy
![]()
Note: Consult with a cybersecurity professional to configure multilayer security for HAProxy. Topics should include API and web application security such as a Web Application Firewall (WAF), bot protection, or distributed denial of service protections. Access control, data protection, and system visibility are important considerations when deploying HAProxy. Other options are to pair HAProxy with pfSense and a content delivery network (CDN).
The next step is to configure HAProxy to serve requests to the backend web servers as expected. But first, make a backup copy of the HAProxy configuration file.
$ sudo cp /etc/haproxy/haproxy.cfg{,.orig}
We need to configure the following key sections:
- Front-end settings to specify the sockets coming from client connections.
- Back-end settings to specify the HAProxy server IP address and the load balancer algorithm.
Front-End Settings
For the front-end settings, navigate to the ‘# Front load balancer’ section and ensure you have the following lines of code. For the ‘bind’ directive, specify the HAProxy IP address.
# Front load balancer
frontend load_balancer
bind 10.128.0.6:80
option http-server-close
option forwardfor
stats uri /haproxy?stats
default_backend webservers
![]()
Review settings to redirect non HTTPS traffic to HTTPS to protect privacy and for safety and security.
Back-End Settings
For back-end settings, we will specify ‘roundrobin’ as the load balancing algorithm. Be sure to also specify the back-end servers as shown alongside their hostnames and IP addresses.
backend webservers
mode http
balance roundrobin
option httpchk HEAD / HTTP/1.1\r\nHost:\ localhost
server web-server-01 10.128.0.7:80 check
server web-server-02 10.128.0.8:80 check
Statistics Settings (Optional)
If you wish to display the load balancer statistics on a web browser, consider adding the following block of code in the configuration below.
listen stats
bind 10.128.0.6:80 # Bind stats to port 80
log global # Enable Logging
stats enable # enable statistics reports
stats hide-version # Hide the version of HAProxy
stats refresh 30s # HAProxy refresh time
stats show-node # Shows the hostname of the node
stats auth admin:P@ss!# # Authentication for Stats page
stats uri /stats # Statistics URL
Save the changes and exit the configuration file.
Step 5: Configure SELinux
Next up, you need to set SELinux to permissive mode to allow access to HTTP traffic. To do so, follow the commands shown.
$ sudo setenforce 0
$ sudo sed -i ‘s/SELINUX=enforcing/SELINUX=permissive/g’ /etc/selinux/config
Step 6: Configure Rsyslog
On modern Linux distributions, Rsyslog is a utility that provides support for logging. It’s a new and modern way of collecting and centralizing logs generated by various services.
To keep tabs on HAProxy’s performance, it’s recommended that you configure log files that will store logs generated by HAProxy.
So, access the Rsyslog configuration file.
$ sudo vim /etc/rsyslog.conf
Add the following lines:
local2.=info /var/log/haproxy-access.log
local2.notice /var/log/haproxy-info.log
Save the changes and exit the configuration file.
Step 7: Start and Enable HAProxy
Once all the changes are done, start and enable the HAProxy daemon.
$ sudo systemctl start haproxy
$ sudo systemctl enable haproxy
Step 8: Install Apache HTTP Web Server on Web Servers
The next step is to configure the backend web servers. To do so, log into each of the servers and install the Apache HTTP web server.
$ sudo dnf update
$ sudo dnf install httpd -y
Once installed, create a test website for each web server which will help simulate the round robin load balancing algorithm.
To do so, edit the ‘index.html’ file.
$ sudo vim /var/www/html/index.html
Insert the following lines of code:
For Web-server-01
<!DOCTYPE html>
<body>
<h1>Web Server 01 Serving your requests 😊</h1>
</body>
</html>
For Web-server-02
<!DOCTYPE html>
<body>
<h1>Web Server 01 Serving your requests 😊</h1>
</body>
</html>
Save the changes and exit.
Step 9: Test the HAProxy Load Balancer
With all configurations in place, let’s now put the HAProxy load balancer to test and see if the round robin algorithm is properly configured. You should be able to receive traffic from both backend web servers.
So, access the HAProxy web address:
On the first attempt, you should see the webpage from either of the web servers. In our case, we received web traffic from the first web server.

When you reload or refresh the webpage, you should get a response from the second web server.

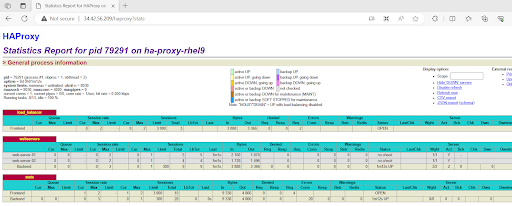
In addition, you can view statistics using the following URL:
http://HAProxy-IP_Address/stats
An authentication pop-up will appear. Provide the username and password specified in the ‘Statistics’ section in Step 4 and click ‘Sign in’.
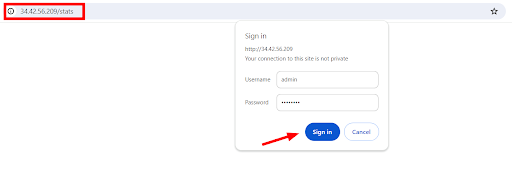
You will see the HAProxy statistics report page on your browser.
Final Thoughts
In this guide, we have demonstrated how to install HAProxy on RHEL 9. The HAProxy load balancer plays a crucial role in managing network traffic. It helps minimize downtime by intelligently channeling web traffic to the available nodes until the fault nodes are rectified and become available to serve requests.
If you’d like to develop more RHEL 9 skills, check out the following tutorials: