Connect


Contents
LUKS (Linux Unified Key Setup) is the de facto standard for enabling disk encryption on Linux. It facilitates compatibility among distributions, and provides secure management of multiple user passwords. LUKS encrypts data at a disk-block level, thus allowing users to deploy any filesystem on top of the encrypted block device.
LUKS encryption uses a header to store a device’s metadata. The header is usually placed at the beginning of the encrypted partition or raw block device and contains valuable information such as the cipher name and mode, key slots, SALT, and additional data that is used to encrypt and decrypt the device.
Forgetting a passphrase or a password to a LUKS2 encrypted device results in data loss. A fully encrypted volume may lead to boot failure since decryption is not possible without the passphrase. There is no present way to recover a forgotten passphrase from a LUKS2 encrypted device. The key is encrypted and stored at the volume header.
It’s prudent to create a backup of your LUKS header in case something goes wrong, such as a corrupted header or hardware failure.
In this tutorial, we’ll install LUKS and encrypt a removable USB volume. We will then demonstrate how to back up and restore the LUKS volume header.
1. Install LUKS
For demonstration, we will install LUKS on Ubuntu 22.04. We will then encrypt a removable USB drive, and backup and restore the header.
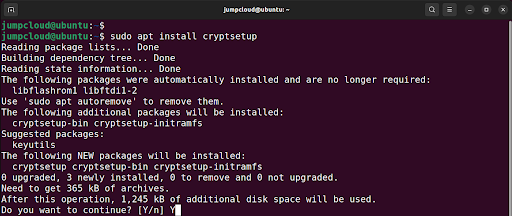
Open terminal and update the packages lists and install the cryptsetup package as follows:
$ sudo apt update
$ sudo apt install cryptsetup
2. Encrypt USB Volume with LUKS
We already have an external USB volume connected to the Linux system. Your system will discover and mount the device by running the command:
$ df -Th
For our case, the device’s file system is identified as /dev/sdb
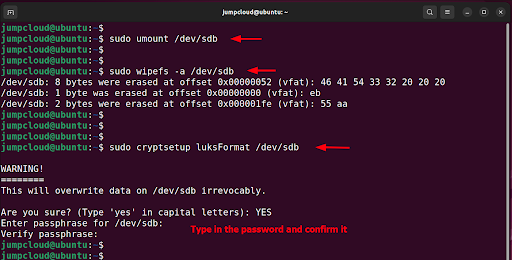
Next, unmount the device. The unmount command syntax is $ sudo unmount <device|directory>
In this example, type:
$ sudo unmount /dev/sdb
Next, wipe the filesystem from your device using the wipefs command as shown:
$ sudo wipefs -a /dev/sdb
NOTE: Extreme caution should be taken when running this command. Be sure to verify the drive name/path twice before pressing ENTER. An error can destroy your primary drive, leading to irrecoverable data.
Once the file system has been wiped clean, proceed and encrypt the removable volume as shown:
$ sudo cryptsetup luksFormat /dev/sdb
This command will overwrite all the data on your volume. To carry on with the operation, type ‘YES’ in uppercase and hit ENTER. When prompted, provide the passphrase and confirm it.
To confirm that the device has been encrypted, access it as shown. The my-drive parameter is simply a label which can be any arbitrary value.
$ sudo cryptsetup luksOpen /dev/sdb my-drive

The above command creates the following mapper:
/dev/mapper/my-drive.
You can confirm this by running the command:
$ ls -l /dev/mapper/my-drive

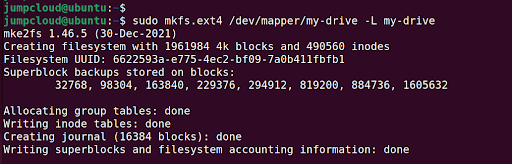
Next, you can create a filesystem on the volume. We selected the EXT4 filesystem on the drive; feel free to specify a different filesystem.
$ sudo mkfs.ext4 /dev/mapper/my-drive -L my-drive
Create a mount point and mount the drive as follows to access and store data on the drive.
$ sudo mkdir /mnt/data
$ sudo mount /dev/mapper/my-drive /mnt/data

3. Dump LUKS Header
Use the following syntax to view all the contents of the header and dump the LUKS header information:
$ sudo cryptsetup luksDump DEVICE
In the following command, /dev/sdb is the encrypted device.
$ sudo cryptsetup luksDump /dev/sdb
This populates the following information about the encrypted volume:
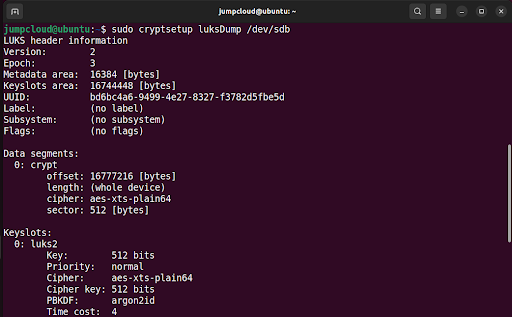
Only key slot 0 is in use, because we only added a single passphrase when encrypting the device. Encrypted LUKS volumes allow a total of eight key slots or passphrases for encrypted disks. This allows users to add passphrases or backup keys.
We will add a backup key, which will result in the creation of an additional key slot.
4. Add a Backup Key
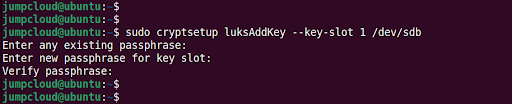
Next, add a backup key using the luksAddKey parameter as shown to create an additional key slot:
$ sudo cryptsetup luksAddKey --key-slot 1 /dev/sdb
Be advised that you will be prompted for the passphrase of key slot 0 before adding the new one.
Dump the LUKS header once again. You will see an additional key slot as shown below.
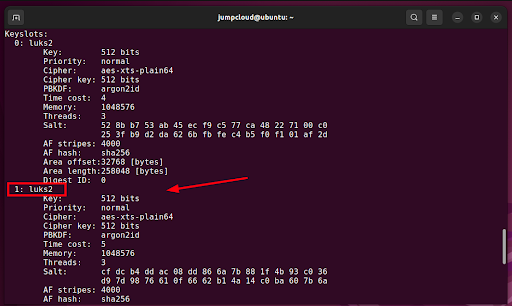
There are now two passphrases (in case you forget the first one). You can always use the second one for encryption.
5. Backup and Restore LUKS Header Key
All data will be permanently lost if the header of a LUKS volume gets damaged, unless you have a header backup in place. Also, if the key slot is damaged, it can only be restored from a header backup.
It’s strongly advisable to create a backup of the header file. You can do this using the following syntax where DEVICE is the block volume and /path/of/file is the path of the file where the header will be backed up:
$ sudo cryptsetup luksHeaderBackup DEVICE --header-backup-file /path/of/file
The command has the following format:
$ sudo cryptsetup luksHeaderBackup /dev/sdb --header-backup-file /root/sdb-header.backup

You can restore a corrupted header using the luksHeaderRestore parameter as shown in the command below:
$ sudo cryptsetup luksHeaderRestore /dev/sdb --header-backup-file /root/sdb-header.backup
Note that the restoration procedure replaces all the key slots. This implies that only the passphrases from the backup will work thereafter.

Conclusion
Creating a device header is always recommended as a contingency measure in the event the current header is damaged. Ensure that you store the backup of the header securely on an offline location. The file must be stored outside the encrypted device, otherwise, you will not be able to restore it. For additional information, check out the cryptsetup project.