Connect


Contents
Automation is a critical component of modern IT administration. Cron jobs, a time-based job scheduler in Unix-like operating systems, are very important tools for automating repetitive tasks on your Rocky Linux server. Whether it’s periodic backups, or running scripts at specific intervals, Cron jobs can save you time and ensure tasks are executed consistently.
These are some of the key benefits:
- Task automation: Cron jobs allow you to automate repetitive tasks, reducing the need for manual intervention and saving time.
- Consistency: Cron jobs ensure that tasks are executed at specified intervals or times, maintaining consistency in system operations.
- Scheduled maintenance: They enable you to schedule maintenance tasks, such as backups, updates, and log rotations, during off-peak hours to minimize disruption.
- Error reduction: Manual tasks are prone to human errors, whereas Cron jobs minimize the risk of mistakes by running predefined commands or scripts.
- Resource management: Cron jobs can be used to manage system resources, such as cleaning temporary files or restarting services periodically.
- Reliability: Cron is a robust and reliable tool, ensuring tasks are executed even after system reboots or downtime.
- Security: Automation through Cron jobs can enhance security by regularly updating software, rotating encryption keys, and performing security scans.
In this tutorial, you will learn how to set up and manage Cron jobs on Rocky Linux. We will cover the basics of Cron, how to create and manage Cron jobs, and provide some useful examples to get you started.
Step 1: Log in to your Rocky Linux system
In order to log in to your system, make sure that you have a terminal or some SSH client installed on your local machine. If you’re using Linux or macOS, you can use the built-in terminal application or command line for the purpose. If you are using Windows, you will probably need a PuTTy client installed on your Windows system or if you prefer PowerShell terminal, that is fine as well.
![]()
Note: Accessing SSH through a jumpbox, or “bastion host,” to a protected server is the most secure approach to reaching internal servers on a private subnet versus exposing servers to the web.
Open the terminal or SSH client on your local machine and enter the username and IP address or hostname for your Rocky Linux server.
In the terminal or SSH client, initiate the SSH connection by using the following command:
ssh username@server_ip_address
If this is your first time connecting to the server, you will see a notification about the authenticity of the host. You can proceed by typing “yes.”

Next, you will need to enter your password, and if both the provided username and password are correct, you will be logged in to your Rocky Linux system.
![]()
Note: Associating a forced command with an SSH key can limit the capabilities of your script and improve security by restricting Cron privilege escalation. It’s always important to define a non-root to establish the appropriate privileges for each task. Contact a security professional if you’re unsure about security best practices for Cron.
Step 2: Understanding Cron and its Syntax
Cron is a daemon that runs in the background and allows users to schedule tasks at specific intervals. The key components of a Cron job are:
- Minute (0 – 59): Specifies when the job will run within the hour.
- Hour (0 – 23): Specifies the hour when the job will run.
- Day of the month (1 – 31): Specifies the day of the month when the job will run.
- Month (1 – 12): Specifies the month when the job will run.
- Day of the week (0 – 7): Specifies the day of the week when the job will run (both 0 and 7 represent Sunday).
Cron syntax follows this pattern:
* * * * * command_to_execute
Each asterisk (*) represents a field in the order of minute, hour, day of the month, month, and day of the week.
In addition to system-wide Cron jobs that affect all users, each user can have their own set of Cron jobs. This enables personalized automation for different users on the same system.
System-wide Cron jobs are usually stored in directories like /etc/cron.d/ and /etc/cron.daily/, while user-specific Cron jobs are managed using the Crontab command.
Step 3: Cron configuration
To manage Cron jobs, we use the Crontab command. Each user can have their own Cron jobs, so you need to specify the user when creating or editing a Cron job. To access your user’s Cron configuration, run the following command:
crontab -e
When you run this command, you open the user-specific Crontab file for editing. This file contains the scheduled Cron jobs for the current user and launches a text editor, typically the default system editor, allowing you to add, modify, or delete Cron jobs using a predefined syntax.
Once you make changes and save the file, the Cron daemon automatically reloads the user’s Crontab and the newly defined jobs will be scheduled according to the specified times and intervals.
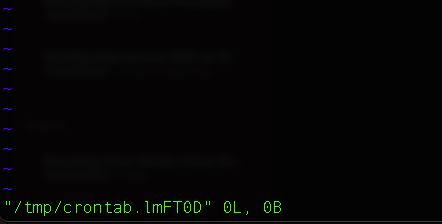
As you can see, the path to this temporary file, such as ‘/tmp/crontab.lmFT0D‘ in this case, is where the contents of your Crontab are temporarily stored while you make changes.
If you exit the file by using commands :q!, which means no changes should be saved, you will get the output in the terminal that no changes are made to Crontab.

Step 4: Create a Cron job for your system user
![]()
Avoid security misconfigurations by always using absolute path, preventing unprivileged users from editing script files, and you should also avoid using SUID Binaries for jobs. Don’t put passwords into your Crontab. You can also restrict Cron usage to authorized uses only by configuring cron.allow.
Now, let’s create a script that will create a backup of a certain directory at a specified time. We will also make sure that we create the backup destination directory.
First, change the directory so you are in your system user’s home directory:
cd ~

We will create a new directory in our user’s home directory called content and change the directory at the same time.
mkdir content && cd content
Create a new file inside your content directory called our_backup_file.txt, we will use Vi editor here:
vi our_backup_file.txt
Press “i” for the edit mode and feel free to add any text for the test purposes.
After you are done, you can press “Esc” and then :wq in order to save the changes.
Next, we will make a new directory called backup under /opt/ directory.
sudo mkdir /opt/backup
We need sudo privileges here since the /opt/ directory owner is root and it’s much more secure to store backup files outside home directories. It’s also important to limit a sudo user to selective commands in the sudoers file.
Now, we need to create a script that will run backups for us.
First, you need to create a new file:
sudo vi /opt/backup/backup_script.sh
Next, enter the edit mode and copy the entire code:
#!/bin/bash
# Directory to be backed up
backup_dir=”/home/jumpcloud/content”
# Backup destination directory
backup_dest=”/opt/backup”
# Create a timestamp for the backup file
timestamp=$(date +%Y%m%d%H%M%S)
# Name of the backup file
backup_file=”backup_$timestamp.tar.gz”
# Create the backup
tar -czf “$backup_dest/$backup_file” “$backup_dir”
# Log the backup process
echo “Backup of $backup_dir created on $(date)” >> “$backup_dest/backup.log”
This script does the following:
- It defines the source directory (backup_dir) that you want to back up and the destination directory (backup_dest) where the backups will be stored.
- It generates a timestamp using the date command, ensuring each backup has a unique name.
- It creates a compressed backup of the source directory using tar.
- It logs the backup process in a log file (backup.log) located in the destination directory.
![]()
It’s advisable to have full disk encryption enabled for your backup file’s destination media.
Next, we will add execute permissions to this backup script by running the following command:
sudo chmod +x /opt/backup/backup_script.sh
We also need to install tar package since it is not available out of the box on Rocky Linux.
In order to do so you can run the following command:
sudo dnf install tar
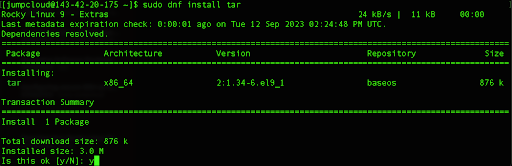
Type “y” and press Enter, and that will install the tar package.
Next, we need to open our Crontab again with sudo permissions:
sudo crontab -e
This will again open our text editor and we will make the schedule so that the backup script is executed each day at 3 AM UTC. You can change the time period based on your needs.
Add the following line to your Crontab file:
0 3 * * * /opt/backup/backup_script.sh
Save the file and exit. This will give the confirmation that the new Cron job has been added.

Once the script is executed based on our Cron job we can see the archive and also the backup.log for the events.

Step 5: Generate daily system report
Cron can be also useful if we want to track system health. We can set up a Cron job that will create a system report every day at 3:30 PM UTC time.
First, create a directory daily-report in our /var/log/ path:
sudo mkdir /var/log/daily-report
Next, we will create the daily report script in our /opt/ directory:
sudo vi /opt/daily_report.sh
In the file that you are editing, be sure to use the following code below:
#!/bin/bash
# Output file for the system report
report_file=”/var/log/daily-report/system-report-$(date +%Y%m%d).log”
# Generate the system report and append it to the report file
echo “System Report – $(date)” >> “$report_file”
echo “—————————————-” >> “$report_file”
echo “Hostname: $(hostname)” >> “$report_file”
echo “System Uptime: $(uptime)” >> “$report_file”
echo “Disk Usage:” >> “$report_file”
df -h >> “$report_file”
echo “Memory Usage:” >> “$report_file”
free -m >> “$report_file”
echo “—————————————-” >> “$report_file”
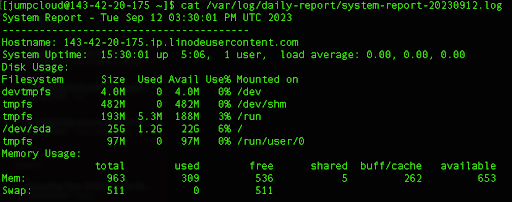
- The report is appended to a log file with a timestamp in its filename.
- The script generates the system report, including hostname, system uptime, disk usage, and memory usage, and appends it to the log file.
Again, make the file executable:
sudo chmod +x /opt/daily_report.sh
Next, we need to add a new line to our Crontab file:
sudo crontab -e
Here we can add a new line:
30 15 * * * /opt/daily_report.sh
If we run the ls command, we can see that the Cron job has been performed and saved in our log directory.

We can view the contents of that file by using the cat command:
cat /var/log/daily-report/daily_report.sh
We can always check our current Cron jobs, in this case, the ones that have root privileges:
sudo crontab -l

Cron jobs are a powerful tool for automating tasks on your Rocky Linux server. They allow you to schedule scripts and commands to run at specific times or intervals, saving you time and ensuring that critical tasks are executed consistently.
This tutorial presented the basics of Cron, how to create and manage Cron jobs, and saw some practical examples. With this knowledge, you can automate a wide range of tasks to streamline your server administration.
![]()
Note: Always test your scripts before deploying new Cron jobs as well to make sure that they run in the right specified time, to evade possible issues in your system.