Device security is one of the primary concerns that security professionals, developers, and other IT professionals have in the face of a growing number of cyber threats. Criminal hackers are increasingly more sophisticated in their attack vectors and constantly inventing new ways of bypassing even the most secure systems. Though some may argue that Linux is the most secure and stable operating system, it can still fall prey to the same misconfigurations and user errors that plague users of Mac and Windows devices.
No device is foolproof, and like many things in your environment, your Linux system is as secure as its weakest point. The default configurations chosen during the first installation are not enough to harden your device, and unpatched Linux systems and the use of outdated software can significantly increase the chances of a breach. In a worst-case scenario you may find your hard drive completely wiped, with critical files inaccessible and possibly stolen without much evidence left behind. Source code stored on a Linux laptop could fall prey to malicious individuals or perhaps there is PII stored on the laptop in a local file or database; regardless of the individual use case, ensuring that your data is secure is critical.
There are various steps you can take to safeguard Linux devices from potential breaches. One of them is enabling full disk encryption on their drive.
What is (Full) Disk Encryption?
Encryption is the process of converting plain text data into ciphertext, which is an unreadable format using a special mathematical algorithm. The only parties that can access encrypted data are those with the specified decryption key or a password (which acts as the key).
The concept of hard drive encryption, or simply disk encryption, follows the same principle. A special algorithm is used to encrypt a single disk partition, multiple partitions, or the entire physical drive. The disk cannot be unlocked or accessed without a password or the secret key that was used for encryption.
Full disk encryption (FDE) guarantees data privacy by preventing unauthorized access to your hard drive by hackers and other nefarious parties when at rest. As employees continue to work from home, either permanently or in a hybrid workplace scenario, this becomes an essential security configuration in case an employees device gets lost or stolen, or when someone may try to access a device using a bootable live medium.
Disk Encryption on Ubuntu 20.04 using LUKS
LUKS, short for Linux Unified Key Setup, is a standard hard drive encryption technology for major Linux systems including Ubuntu. It is used for encrypting entire block devices and is therefore ideal for encrypting hard disk drives, SSDs, and even removable storage drives.
It’s free, supports the management of multiple keys and passwords, and secures all the data stored on your hard drive from unauthorized access.
LUKS provides a platform-agnostic standard of encryption that not only guarantees compatibility among various Linux distributions but also ensures that they implement password management in a well-documented and secure manner.
With LUKS, disk encryption is enabled during the installation of the operating system or post-installation. Note that full disk encryption is only achieved during the installation of the Ubuntu Desktop operating system. It encrypts all the partitions including swap space, system partitions and every bit of data stored on the block volume.
Thankfully, Ubuntu 20.04 offers an option that allows you to fully encrypt your hard disk or SSD during the installation process, which this guide will walk you through.
How to Fully Encrypt Data on Ubuntu 20.04
As mentioned earlier, you can only fully encrypt your hard drive or SSD during the installation process. Therefore, if you already have an instance of Ubuntu running and you want to fully encrypt it, you would need to reinstall Ubuntu; otherwise you would need to encrypt on a partition-by-partition basis. Any time you are considering an OS reinstall, backup all your files to a secure location beforehand.
A few points to note about LUKS disk encryption on Ubuntu 20.04:
- This method of encryption does not apply in a dual-boot setup with Windows 10. LUKS encryption will remove all data from the partition, so we are encrypting on a new installation, which is the preferred method.
- If you select manual partitioning, you will not be able to encrypt every disk partition.
Getting started
Once you have plugged in the bootable medium and gone through the preliminary stages of the installation which includes selecting the installation language, keyboard layout, and Software Updates to be installed, you will be required to select the mode of installation. Two options will be presented: ‘Erase disk and install Ubuntu’ which wipes out all the existing data and automatically partitions the drive and ‘Something else’ which is used when you want to manually configure the disk partitions yourself.
So, select the ‘Erase disk and install Ubuntu’ option and click on the ‘Advanced Features’ button as indicated.
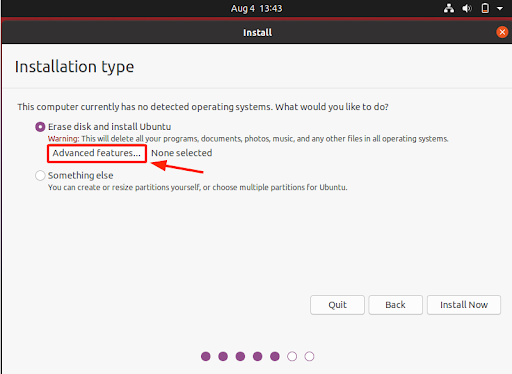
Select LVM with New Installation
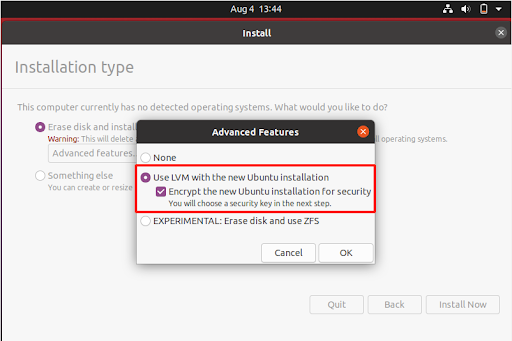
In the next step, be sure to select the ‘Use LVM with the new Ubuntu installation’ and check the Encryption option below (Encrypt the new Ubuntu installation for Security) to secure your system with LUKS encryption.
Then click the ‘OK’ to save the changes
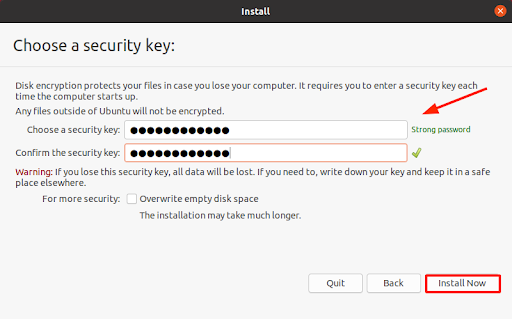
This prompts you to provide a security key, or simply put, a password. Choose a strong password, to steer clear from being a target of dictionary or bruteforce attacks. This is the password that will be used to decrypt the system right after the system reboots.
Note the password carefully and don’t forget it, else you won’t have access to your Linux system. A password manager or other program that securely saves critical data is an excellent place to store this.
Enter Security Key
Then finally click on the ‘Install Now’ button to get along with the installation.
On the pop-up that appears, press ‘Continue’ to save the effect of the changes.

From this point onwards, the installation will proceed normally with the configuration of the timezone, creation of a new user account and installation of all the files and software packages.
Complete Installation Process
When the installation is complete, click the ‘Restart Now’ button to reboot your system. Be sure to remove the installation medium and press ENTER.

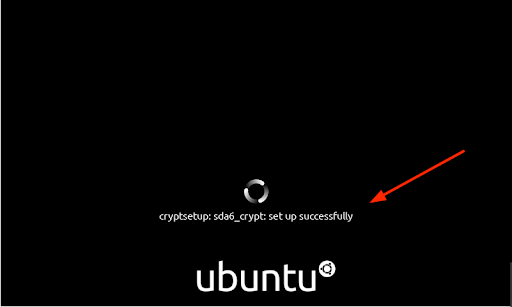
At this point the Disk is fully encrypted. Upon booting , you will be prompted to provide the decryption key which is the password you provided earlier.
Type in the password or passphrase and hit ENTER.
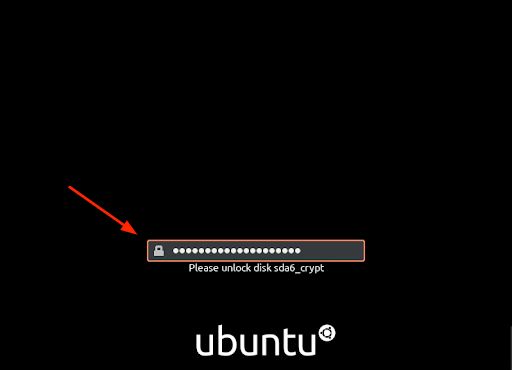
You will get the output similar to what we have.
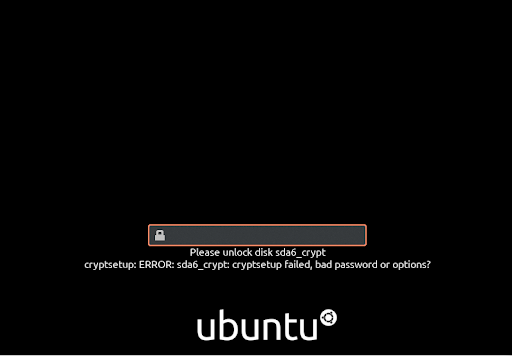
If a wrong password is provided, you will run into an error message as shown.
Conclusion
This was a walkthrough of how you can fully encrypt Ubuntu 20.04. It’s a convenient way of securing your data and keeping it private. However, this is just one of the ways of protecting yourself from malicious users and not a free ticket to lower your guard in implementing other security measures. That being said, Full Disk encryption safeguards your drive from physical access and protects your data and access to applications and systems from malicious actors should you lose your device (either by accident or due to theft).
Through the JumpCloud Directory Platform, you can easily implement full disk encryption throughout your entire fleet. Through its remote device management capabilities, both Windows and macOS devices can achieve full disk encryption through standard, out-of-the-box policies, while Linux devices can be managed and monitored for encryption status. To see how this works, along with a number of other device security and management features, sign up for your free trial today.


