
Overview
The Vault API allows you to programmatically retrieve credentials and manage access to resources. This is ideal for integrating Vault with external systems like CI/CD pipelines, security tools, or automation platforms that need to consume credentials stored in your vault.
Common use cases:
- Fetch credentials from Vault to seed external systems (Ansible, Terraform, Jenkins)
- Integrate with SIEM or other security tools for credential distribution and monitoring
- Automate credential retrieval for CI/CD pipelines
- Build internal tools that need programmatic access to vault resources
Prerequisites
Before you start, you need:
- A JumpCloud Vault account with admin access
- An API User created in your Vault (see "Creating an API User" below)
- The API user's credentials (email and password)
- Your Vault environment URL (e.g.,
https://acmecompany.vault.jumpcloud.com) - Basic familiarity with HTTP requests and JSON
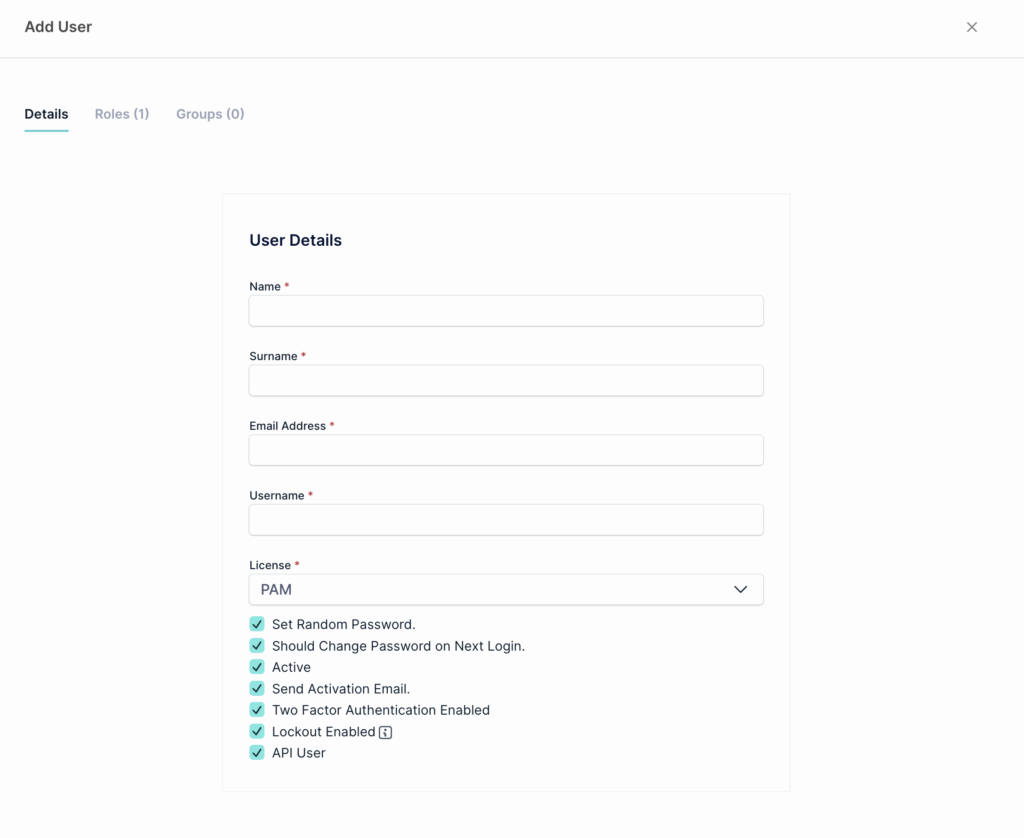
Step 1: Create an API User
An API User is a special service account that can only authenticate via API, not through the web console.
Instructions
- In Vault, navigate to Administration > Users
- Click Create User
- Fill in user details (e.g.,
api-integration-user) - Check the "API User" option (if available)
- Confirm the user creation
- An activation email will be sent to the specified email address
- Click the confirmation link to activate the API user
- Note the email address and set/confirm the password (you'll need both for authentication)
![]()
API Users cannot log into the Vault web console. They can only authenticate via API.
Step 1.5: Access the Swagger API Documentation
Before you start making requests from your code, it's helpful to explore and test the API endpoints using the Swagger UI. This is an interactive tool that lets you understand what each endpoint does, what parameters it accepts, and what it returns.
What is Swagger?
Swagger (also called OpenAPI) is an interactive documentation interface for APIs. It shows you:
- All available endpoints organized by category (Credentials, Connectors, etc)
- What each endpoint does (retrieve, create, update, delete)
- What parameters each endpoint accepts (required fields, optional filters)
- What the response looks like (response schema with example data)
- A "Try it out" button to test requests live without writing code
How to Access Swagger
- Take your Vault environment URL and add
.apito it- Example:
https://acmecompany.api.vault.jumpcloud.com
- Example:
- Open your browser and navigate to:
https://acmecompany.api.vault.jumpcloud.com
- You'll see a login screen. Use your API user credentials:
- Vault Name: Your organization/company name (from your Vault URL)
- Username/Email: Your API user email
- Password: Your API user password
- After login, you'll see the Swagger UI with all endpoints listed
Using Swagger to Test an Endpoint
Once logged in, you can test any endpoint:
- Find the endpoint you want (e.g.,
GET /api/services/app/Credentials/GetAll) - Click on it to expand the details
- Click the "Try it out" button
- Fill in any required parameters (like credential ID)
- Click "Execute" to make the request
- See the response with real data from your Vault
Why Use Swagger Before Writing Code?
- Understand the API without guessing
- See real response examples from your actual Vault instance
- Test parameters to filter/sort data the way you want
- Get the exact field names you need in your code
- Catch errors early before building integration
This way, when you move to writing Python or cURL, you already know exactly what the endpoint expects and returns.
Step 2: Understanding the Authentication Flow
Every API request to Vault requires a Bearer token. To get this token, you must authenticate using your API user credentials:
- You send: username + password → Vault API
- Vault responds with: accessToken
- You include: Authorization: Bearer {accessToken} in all subsequent requests
- When token expires, you refresh it or re-authenticate
Step 3: Make Your First Request (Authentication)
![]()
The following cURL and Python examples are templates to get you started. You can adapt them to your specific needs, use different programming languages, or integrate them into your existing automation tools. The important concepts are the endpoint URL, the request structure, and the authentication token handling.
Using cURL
curl -X POST "https://acmecompany.api.vault.jumpcloud.com/api/TokenAuth/Authenticate" \
-H "Content-Type: application/json" \
-d '{
"userNameOrEmailAddress": "apiuser@company.com",
"password": "your-api-user-password"
}'
Expected response (200 OK):
{
"accessToken": "eyJhbGciOiJIUzI1NiIsInR5cCI6IkpXVCJ9...",
"encryptedAccessToken": "...",
"expireInSeconds": 11111,
"shouldResetPassword": false,
"userId": 12345,
"requiresTwoFactorVerification": false
}
![]()
Save the accessToken value. You'll use it for all subsequent requests.
Using Python
import requests
import json
# Your Vault environment
vault_url = "https://acmecompany.api.vault.jumpcloud.com"
api_user_email = "apiuser@company.com"
api_user_password = "your-api-user-password"
# Step 1: Authenticate
auth_endpoint = f"{vault_url}/api/TokenAuth/Authenticate"
auth_payload = {
"userNameOrEmailAddress": api_user_email,
"password": api_user_password
}
response = requests.post(auth_endpoint, json=auth_payload) response.raise_for_status() # Raise error if auth fails
auth_result = response.json()
access_token = auth_result['accessToken']
print(f"✓ Authentication successful")
print(f"Token expires in {auth_result['expireInSeconds']} seconds")
Step 4: Use Your Token to Fetch Credentials
Now that you have a token, you can make authenticated requests. All requests must include:
Authorization: Bearer {accessToken}
![]()
The examples below show common patterns using cURL. You can implement these same requests in any programming language (Go, JavaScript, Java, PowerShell, etc) or integrate them directly into your existing tools (Terraform, Ansible, custom applications, etc). The core concepts remain the same regardless of implementation.
Workflow: Retrieve a Credential and its Secret Value
Most real-world integrations follow this pattern:
- List all credentials to find the one you need (by name, tag, etc)
- Get the credential details (ID, metadata)
- Fetch the actual secret (username, password, API key, etc)
- Use the secret in your external system
Step 4a: List All Credentials (cURL)
TOKEN="eyJhbGciOiJIUzI1NiIsInR5cCI6IkpXVCJ9..." # Your access token
curl -X GET "https://acmecompany.api.vault.jumpcloud.com/api/services/app/Credentials/GetAll?MaxResultCount=10" \
-H "Authorization: Bearer $TOKEN" \
-H "Content-Type: application/json"
Expected response (200 OK):
{
"items": [
{
"id": "cred_abc123",
"name": "application-credentials",
"username": "app_user", "domain": null,
"credentialType": 1, "expirationDate": null,
"tags": "shared, example",
"folderId": "folder_01",
"folderName": "General",
"permissions": ["read", "use"],
"needsRotationValidation": false,
"rotationEnabled": false,
"mfaRegistered": false,
"lastTimeUsed": "2024-12-10T14:30:00Z",
"isFavorite": false,
"archived": false
},
{
"id": "cred_abc123",
"name": "application-credentials",
"username": "app_user", "domain": null,
"credentialType": 1, "expirationDate": null,
"tags": "shared, example",
"folderId": "folder_01",
"folderName": "General",
"permissions": ["read", "use"],
"needsRotationValidation": false,
"rotationEnabled": false,
"mfaRegistered": false,
"lastTimeUsed": "2024-12-10T14:30:00Z",
"isFavorite": false,
"archived": false
}
],
"totalCount": 2
}
Step 4b: Get Credential Details (cURL)
TOKEN="eyJhbGciOiJIUzI1NiIsInR5cCI6IkpXVCJ9..."
CREDENTIAL_ID="cred_abc123"
curl -X GET "https://acmecompany.api.vault.jumpcloud.com/api/services/app/Credentials/GetCredentialForView?Id=$CREDENTIAL_ID" \
-H "Authorization: Bearer $TOKEN" \
-H "Content-Type: application/json"
Expected response:
{
"credential": {
"id": "cred_abc123",
"name": "application-credentials",
"username": "app_user",
"domain": null,
"credentialType": 1,
"expirationDate": null,
"tags": ["shared", "example"],
"folderId": "folder_01",
"folderName": "General",
"notes": "Used by automation service",
"archived": false,
"mfaRegistered": false,
"credentialRotationId": null,
"last4Digits": null,
"permissions": ["read", "use"],
"resourceId": "res_01",
"policies": {
"restrictedByApprovalPolicy": false,
"restrictedByAccessPolicy": false,
"policies": []
},
"viewSecretCount": 3,
"lastTimeUsed": "2024-12-10T14:30:00Z"
}
}
Step 4c: Fetch the Actual Secret (Username, Password, etc) (cURL)
This is the critical step: You now have the credential ID. Use it to get the actual secret value.
TOKEN="eyJhbGciOiJIUzI1NiIsInR5cCI6IkpXVCJ9..."
CREDENTIAL_ID="cred_abc123"
curl -X GET "https://acmecompany.api.vault.jumpcloud.com/api/services/app/Credentials/GetCredentialSecret?CredentialId=$CREDENTIAL_ID" \
-H "Authorization: Bearer $TOKEN" \
-H "Content-Type: application/json"
Expected response:
{
"username": "app_user",
"pass": "YourSecurePassword123!",
"passwordLastUpdateDays": 30,
"sessionId": "sess_xyz789"
}
Step 5: Building Your Integration
Now that you understand the API flow, here's how to build your integration in any language:
The Pattern
- Store credentials securely: Save your API user email and password in environment variables or a secrets manager, not in code
- Authenticate once: Call the
/TokenAuth/Authenticateendpoint to get youraccessToken - Make authenticated requests: Include
Authorization: Bearer {accessToken}in every API call - Handle token expiration: When your token expires, re-authenticate to get a new one
Example Workflow
- Load API user email and password from environment variables
- POST to /api/TokenAuth/Authenticate with credentials -> Get accessToken from response
- GET /api/services/app/Credentials/GetAll with Bearer token -> Search results for credential you need
- GET /api/services/app/Credentials/GetCredentialForView with credential ID -> Get credential metadata (permissions, tags, etc)
- GET /api/services/app/Credentials/GetCredentialSecret with credential ID -> Get the actual secret (username, password, keys, etc)
- Use the secret in your external system (SIEM, Ansible, Terraform, etc)
- When token expires, repeat from step 2
Implementation Tips
- Use HTTP libraries: Python (
requests), JavaScript (fetch/axios), Go (http), Java (HttpClient), etc, all work the same way - Implement retries: If a request fails, retry with exponential backoff (don't hammer the API)
- Log access: Track which credentials are retrieved and when for audit purposes
- Test first: Use Swagger UI (Step 1.5) to test these exact endpoints before building your code
- Don't hardcode credentials: Always use environment variables or secret management tools
Common Error Scenarios
401 Unauthorized
Problem: "accessToken expired" or "Invalid credentials"
Solutions:
- Verify your API user email and password are correct
- Ensure the API user has been activated (check email confirmation link)
- If token expired, re-authenticate to get a new one
403 Forbidden
Problem: "Access denied to this resource"
Solutions:
- Ensure your API user has permission to access this credential
- Check if the credential is protected by access policies that require approval
404 Not Found
Problem: "Credential not found"
Solutions:
- Verify the credential ID is correct
- Check if the credential has been archived or deleted
- Ensure you're using the correct Vault environment URL
Rate Limiting
Problem: Too many requests in short period
Solutions:
- Implement exponential backoff in your integration
- Cache credential data when possible
- Space out API calls if fetching many credentials
Best Practices
- Store credentials securely: Never hardcode API user password in source code. Use environment variables, secrets management tools, or credential stores.
- Handle token expiration: Implement logic to refresh tokens before they expire (typically 24 hours)
- Use pagination: When listing credentials, always set
MaxResultCountand handleContinuationTokenfor large datasets - Filter wisely: Use
NameFilter,Tags, or other query parameters to reduce data transfer - Cache strategically: If credentials don't change frequently, cache them locally (but keep cache expiration short)
- Log and monitor: Track which credentials are accessed and when for audit purposes
- Error handling: Implement proper retry logic and error handling for production integrations
Next Steps
- Test the examples above with your own credentials
- Explore other endpoints in the full Swagger documentation
- Build your integration with your external system (SIEM, Ansible, automation platform, etc)
- Contact support if you run into issues