
Integrate JumpCloud and Workday to unify user identities and automate user lifecycle management. Fully automate Joiner, Mover, and Leaver (JML) lifecycle management, including real-time user updates and deprovisioning based on Workday data. Combine this with SSO for a single, unified identity and seamless access to all work resources.
This article guides you through configuring the SAML SSO integration, creating the custom report in Workday to use the Workday Reports-as-a-Service (RaaS) functionality, and setting up the Custom API import integration.
Prerequisites:
- A JumpCloud administrator account
- JumpCloud SSO Package or higher
- A Workday user account with Security Administrator and Report Administrator permissions
- Your Workday tenant name and domain
Considerations:
- Enabling SAML affects all users for this application; they won't be able to sign in through their regular login page
- Importing users from Workday to JumpCloud with the new SCIM integration requires a custom report in Workday and the custom API import integration in JumpCloud. It supports full user lifecycle management.
- JumpCloud imports only JSON formatted data
- Importing data from Workday into custom attributes in JumpCloud is not currently supported
Important Considerations:
The legacy Workday integration will be deprecated in May 2026
Creating a new JumpCloud Application Integration
- Log in to the JumpCloud Admin Portal.
![]()
If your data is stored outside of the US, check which login URL you should be using depending on your region. If your organization uses LDAP, RADIUS, or requires firewall allow list configuration, the Fully Qualified Domain Names (FQDNs) will also be region specific. See JumpCloud Data Centers for the URLs, FQDNs, and IP addresses.
- Go to Access > SSO Applications.
- Click + Add New Application.
- You can also enter the name of the application in the Search field and select it.
- You can either select an application from the available list or select Custom Application, and click Next.
- Select the required options from the Select Options page and click Next. The Enter General Info page is displayed.
- On the Enter General Info page, you can customize the display label, description and how the application displays:
- Description - add a description that users will see in their user portal
- User Portal Image - choose Logo or Color Indicator
- Show in User Portal - select to ensure the app is visible in the user portal
- Optionally, expand the Advanced Settings section and customize the IdP URL:
- Enter a custom value to replace the default application name in the SSO IdP URL endpoint ( https://sso.jumpcloud.com/saml2/{custom_value})
![]()
The SSO IdP URL is not editable after the application is created. If you need to change this URL later, you must delete and recreate the connector.
- Click Save Application.
- Next, click:
- Configure Application and go to the next section
- Close to configure your new application at a later time
![]()
Users are implicitly denied access to applications. See Authorize Users to an SSO Application.
Configuring the SSO Integration
![]()
JumpCloud sends a value, the NameID, in the SAML Assertion that Workday uses to identify which user is attempting SSO. This value must match a user's Workday username. If your users' Workday usernames already exist within JumpCloud (as their emails or JumpCloud usernames), you may choose which of these attributes to send as the NameID for each user. If your users' Workday usernames do not match any pre-existing attributes in JumpCloud, you will need to add a WorkdayID custom attribute for every user that will be using SSO to Workday.
To add the WorkdayID custom attribute for SSO users:
- In the JumpCloud Admin Portal, navigate to Identity Management > Users.
- Select the user for whom you will add a custom attribute.
- Select the Details tab and then scroll down to the Custom Attributes section.
- Select add new custom attribute.
- In the Attribute Name field, enter WorkdayID.
- In the Attribute Value field, enter the user's Workday username.
- Select Save User.
To navigate to your JumpCloud SSO connector
- Log in to the JumpCloud Admin Portal.
![]()
If your data is stored outside of the US, check which login URL you should be using depending on your region. If your organization uses LDAP, RADIUS, or requires firewall allow list configuration, the Fully Qualified Domain Names (FQDNs) will also be region specific. See JumpCloud Data Centers for the URLs, FQDNs, and IP addresses.
- Go to Access > SSO Applications.
- Create a new application or select it from the Configured Applications list.
- Select the SSO tab.
To configure JumpCloud
- Optionally, configure:
![]()
The Authentication Methods References (AMR) is automatically included in the SAML assertion by default. No additional configuration is required to enable this.
Complete the MFA Claim Configuration to define how the authentication context is sent in the SAML assertion.
- Under Auth Context, choose one of the following options based on your SP's requirements:
- Send a single value for all successful MFA factors - select if the Service Provider accepts a generic confirmation for any MFA login. Enter the single URL or URN they accept
- Send specific factors - select this option to map individual JumpCloud MFA methods to distinct values. In the Factor Mapping table, add each MFA factor enabled in your organization and enter the corresponding value required by the Service Provider
- Send single value and specific factors - select to send both a generic identifier and specific factor details in the assertion
![]()
Refer to your Service Provider's documentation to determine the specific URN or URL values required (e.g., Salesforce Session Security Levels). The values entered in this configuration must exactly match what the Service Provider expects.
| MFA Factor | Service Provider | Notes |
|---|---|---|
| Password | Reference your Service Providers's documentation for the values they expect for each factor | |
| TOTP | ||
| WebAuthN | ||
| Push Notification | JumpCloud Protect or other authenticator application | |
| Duo Security | ||
| Device Trust | ||
| Device Trust + User Verification | JumpCloud Go (requires explicit configuration - see the next table) | |
| API Key | ||
| External Identity Provider |
| MFA Method | MFA Value in AMR Claim |
|---|---|
| apikey | swk |
| duo | mfa |
| pwd | pwd |
| totp | otp |
| unk | |
| wan | hwk |
| push | mfa |
| uv | |
| durt | hwk |
| durt_uv | hwk |
| ext_idp |
Learn more about MFA Claims.
Configure User Attributes to be sent to the SP in assertions. User attributes are unique to each user. You can include attributes for standard user detail attributes or for custom attributes. For example, you can include standard attributes for users’ employee ID and department, or you can include a custom attribute for users’ application ID. Standard attributes are configured in the User Panel Details tab's User Information and Employee Information sections.
Unlike user attributes, a Constant Attribute can be sent for every user in a specific group or application profile.
![]()
If required attributes are present, they are not editable.
- Under User Attributes, click add attribute:
- Service Provider Attribute Name - enter the service provider’s name for the attribute
- JumpCloud Attribute Name - select the corresponding attribute from the drop down list
- Repeat these steps for any desired user or custom attributes.
- Under Constant Attributes, click add attribute:
- Service Provider Attribute Name - enter the service provider’s name for the attribute
- Value - enter the corresponding attribute in JumpCloud
- Optionally, if groups are supported, select Include Group Attribute.
- Click Save.
Download the certificate
- If you closed the application, find it in the Configured Applications list and click anywhere in the row to reopen its configuration window.
- Click Actions > Download Certificate.
![]()
The certificate.pem will download to your local Downloads folder.
To configure Workday
- Log in to Workday as an administrator.
- Select on the user menu in the upper left corner (your Workday avatar).
- Select Workbench from the drop-down menu.
- Select Account Administration.
- Select Edit Tenant Setup - Security.
- In the Single Sign-on section under Redirection URLs, click the '+' icon.
- Under Redirect Type, select Single URL and enter the following information:
- Login Redirect URL - copy and paste the JumpCloud IDP URL
- Logout Redirect URL - enter https://console.jumpcloud.com/userconsole/
- Environment - click inside the field and select Implementation from the drop-down menu
- In the SAML Setup section, check the box next to Enable SAML Authentication and SAML Identity Providers and select the '+' icon. Enter the following information:
- Identity Provider Name - enter JumpCloud
- Issuer - enter https://YOURDOMAIN.com (replace YOURDOMAIN with your company’s unique domain)
- x509 Certificate - select inside the field and select Create x509 Public Key
- On the Create x509 Public Key page, enter a Name for your certificate
- Certificate - copy and paste the contents of the certificate downloaded in the previous section
- Select OK.
- Back on the Edit Tenant Setup - Security page, leave the Service Provider ID as the default value or, if it is blank, enter http://www.workday.com.
- Check the box next to Enable SP Initiated SAML Authentication.
- In the IdP SSO Service URL field, enter the same JumpCloud IDP URL.
- Select inside the Authentication Request Signature Method field and select SHA-256 from the drop-down menu.
- Ensure that all other values and checkboxes in both the Single Sign-on and SAML Setup sections of this page (that are not explicitly mentioned above) are blank and unchecked, respectively.
- Select OK and then Done.
Authorizing SSO Application Access
Users are implicitly denied access to SSO Applications. After you connect an application to JumpCloud, you need to authorize user access to that application. You can authorize user access from the Applications, Users List or User Groups page.
To authorize user access from the SSO Application’s page
- Log in to the JumpCloud Admin Portal.
![]()
If your data is stored outside of the US, check which login URL you should be using depending on your region. If your organization uses LDAP, RADIUS, or requires firewall allow list configuration, the Fully Qualified Domain Names (FQDNs) will also be region specific. See JumpCloud Data Centers for the URLs, FQDNs, and IP addresses.
- Go to Access > SSO Applications, then select the application to which you want to authorize user access.
- Select the User Groups tab. If you need to create a new group of users, see Get Started: User Groups.
- Select the check box next to the desired group of users to which you want to give access.
- Click Save.
To learn how to authorize user access from the Users or User Groups pages, see Authorize Users to an SSO Application.
Validating SSO user authentication workflow(s)
Check your SP's documentation to ensure that both workflows are supported.
IdP-initiated user workflow
- Access the JumpCloud User Console
- Go to Applications and click an application tile to launch it
- JumpCloud asserts the user's identity to the SP and is authenticated without the user having to log in to the application
SP-initiated user workflow
- Go to the SP application login - generally, there is either a special link or an adaptive username field that detects the user is authenticated through SSO
![]()
This varies by SP.
- Login redirects the user to JumpCloud where the user enters their JumpCloud credentials
- After the user is logged in successfully, they are redirected back to the SP and automatically logged in
![]()
See Additional User Experience Considerations when setting up JumpCloud SSO.
Configuring SCIM via Custom API and Workday RaaS
![]()
This integration option replaces the legacy pre-built connector that has limited functionality
Leverage the Workday Custom API Import connector for HR-driven provisioning to ensure more complete and accurate user data is pulled reliably from Workday. Automated updates ensure that changes in Workday are reflected in JumpCloud, driving improved access control and compliance.
To configure Workday
Create an Integration System User (ISU)
- In your Workday portal, log into the Workday tenant.
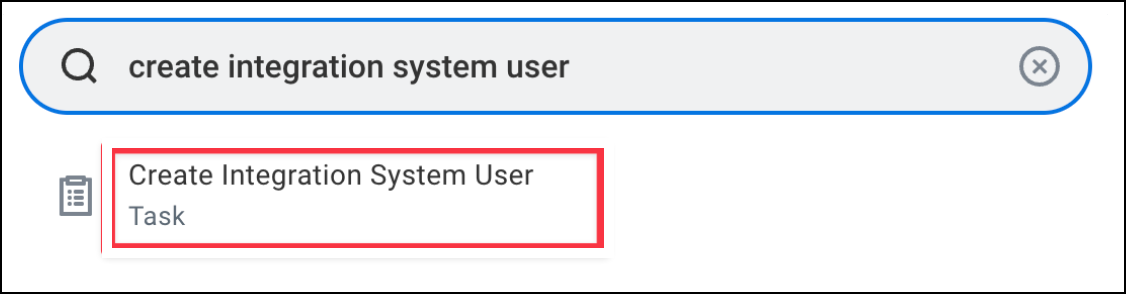
- In the Search field, type "Create Integration System User" and select the Create Integration System User task.

- Enter a User Name and Password, uncheck Require New Password at Next Sign In, and select the Do Not Allow UI Sessions checkbox.
![]()
Due to XML encoding, "&", "<", and ">" cannot be included in the password.
![]()
Add this user to the System Users list to ensure the password doesn't expire.
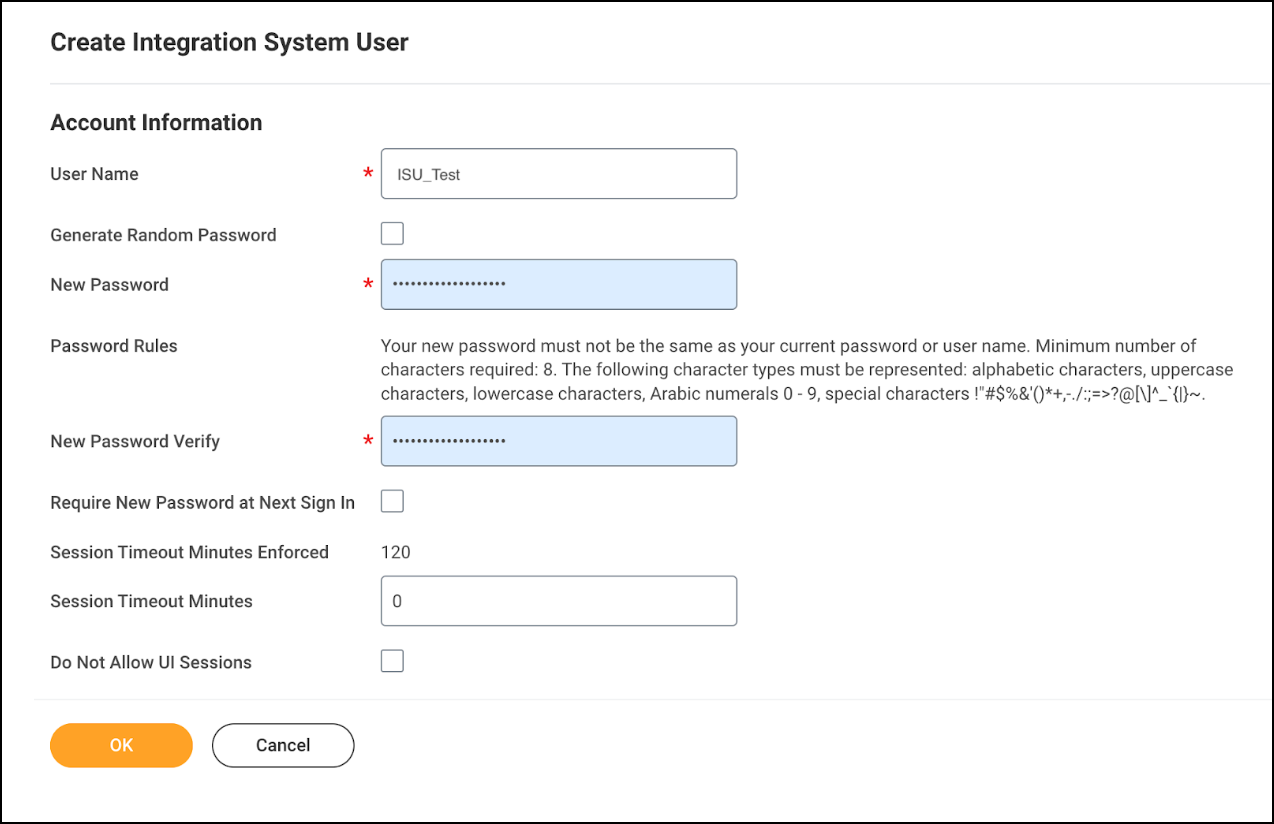
- Click OK.
Create a Security Group and Assign an Integration System User
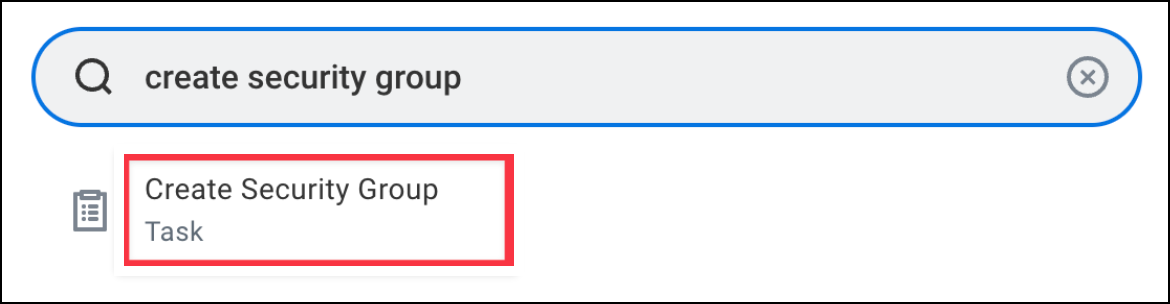
- In the Search field, type "Create Security Group" and select the Create Security Group task.

- Click OK.
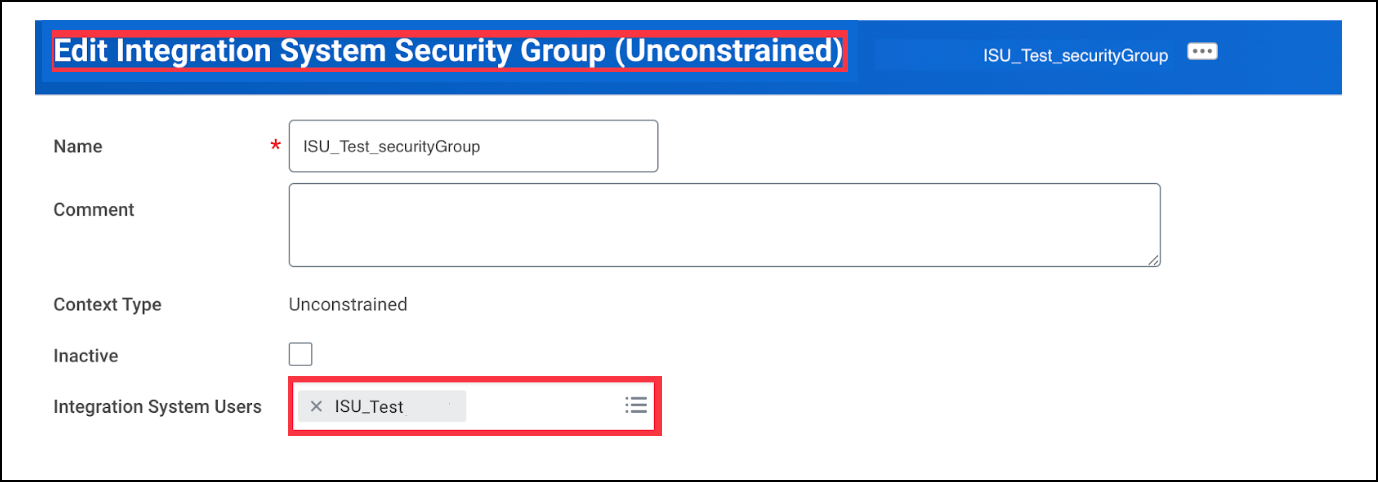
- From the Type of Tenanted Security Group dropdown menu, select Integration System Security Group (Unconstrained).
- Enter a Name, click OK.
- Add the ISU you just created to the Integration System Users list and click OK.

Configure Domain Security Policy Permissions
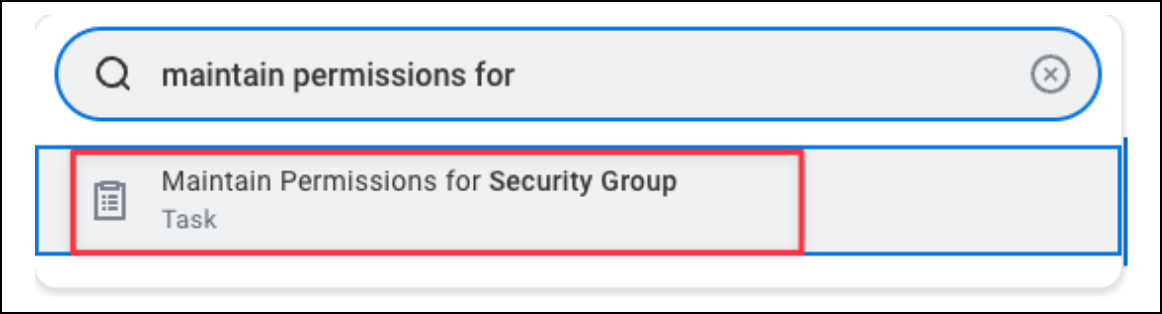
- In the Search field, type "Maintain Permissions for Security Group" and select the task.

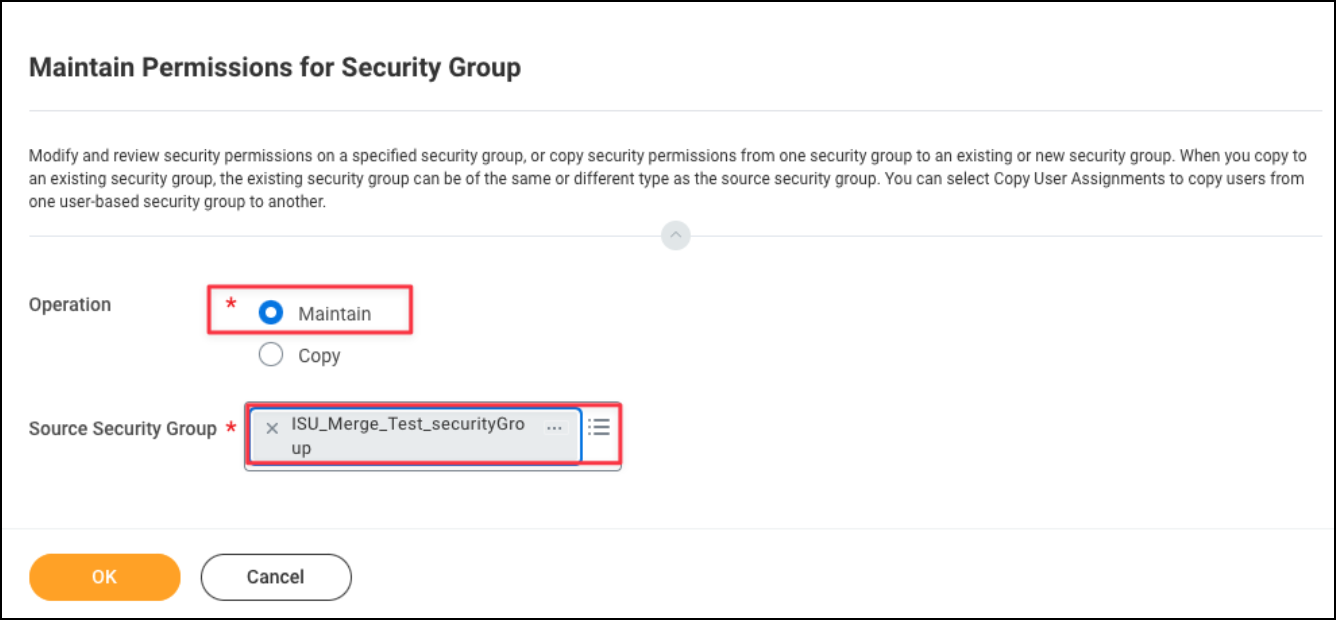
- Ensure the Operation is Maintain, choose the security group you just created as the Source Security Group, then click OK.

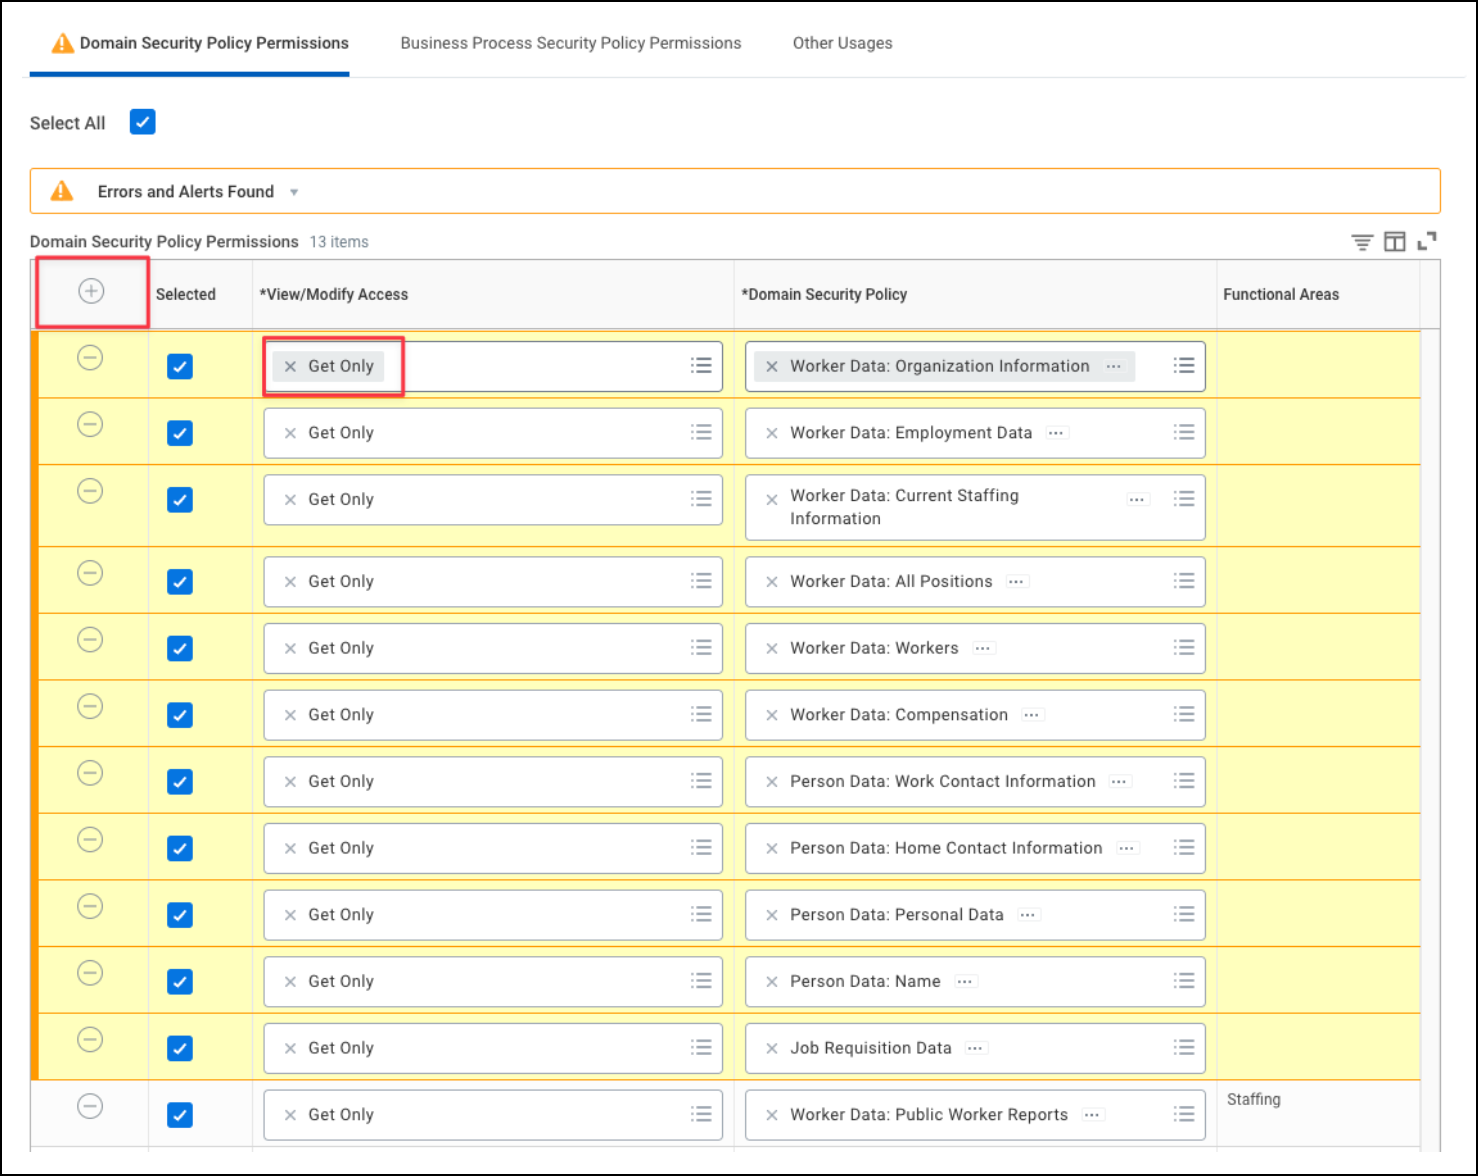
- Under Domain Security Policy Permissions, add Get Only access for the following domains:
- Job Requisition Data
- Person Data: Name
- Person Data: Personal Data
- Person Data: Home Contact Information
- Person Data: Work Contact Information
- Worker Data: Workers
- Worker Data: All Positions
- Worker Data: Current Staffing Information
- Worker Data: Public Worker Reports
- Worker Data: Employment Data
- Worker Data: Organization Information
- Candidate Data: Job Application
- Candidate Data: Personal Information
- Candidate Data: Other Information
- Pre-Hire Process Data: Name and Contact Information
- Job Requisition Data
- Manage: Location
- If you want to include time off and compensation information also add the following:
- Worker Data: Compensation
- Reports: Pay Calculation Results for Worker (Results) [Optional]
- Worker Data: Time Off** [Optional]
For a complete list of required domains for HRIS or ATS, jump to Attribute Mappings and Configuring Identity Management via Custom API and Workday RaaS.
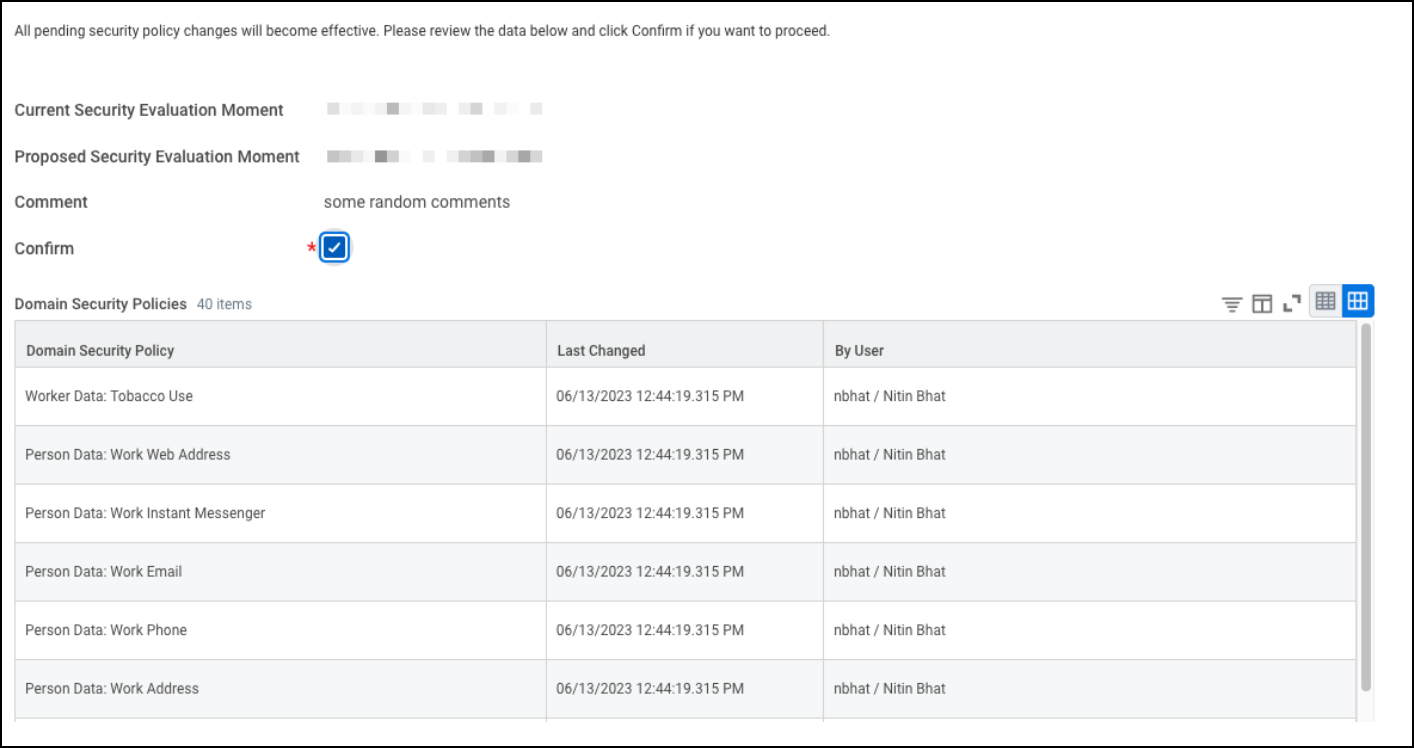
Activate Security Policy Changes
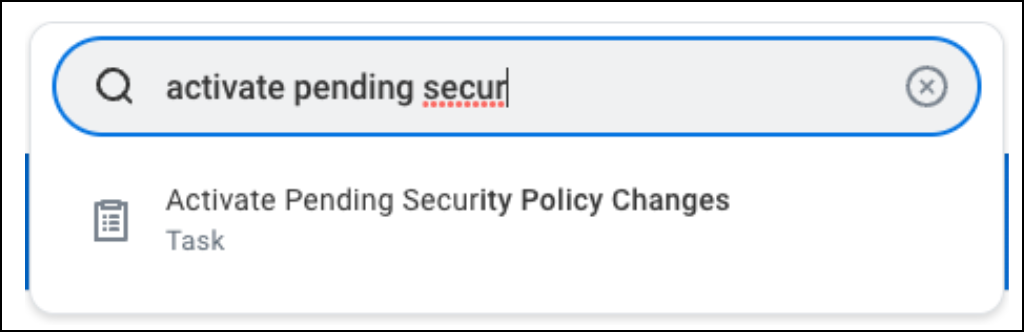
- In the Search field, type "Activate Pending Security Policy Changes" and select the task.

- Add a comment, select the Confirm checkbox, and click OK to make the permissions effective.

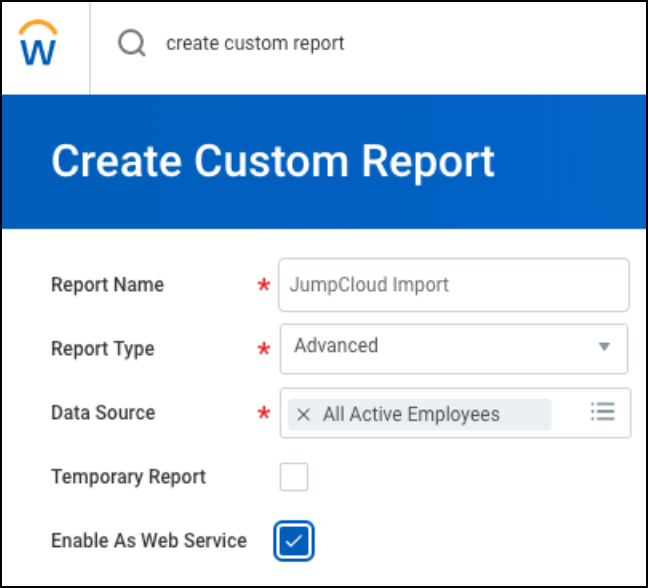
Create a Custom Report
- Search for and select the Create Custom Report task.
- Set the Report Name, choose the Advanced report type, select the appropriate Data Source, and select the Enable as Web Service checkbox.

- Define the fields you want to sync in the Columns tab.
- Optionally, set filters. If you need to filter the data, add filters to the report, specifying the criteria for selecting specific data.
- Check the "Optimized for performance" box If performance is critical (though this may limit some functionalities).
- In the Share tab, select Share with specific authorized groups and users and add your ISU.
- Click OK.
Get the Web Service URL
- Select Actions > Web Service > View URLs for the report you just created.
- Right-click JSON and select Copy URL to save your report endpoint. This URL will be needed for the configuration in JumpCloud.
To navigate to your JumpCloud SCIM connector
- Log in to the JumpCloud Admin Portal.
![]()
If your data is stored outside of the US, check which login URL you should be using depending on your region. If your organization uses LDAP, RADIUS, or requires firewall allow list configuration, the Fully Qualified Domain Names (FQDNs) will also be region specific. See JumpCloud Data Centers for the URLs, FQDNs, and IP addresses.
- Go to Access > SSO Applications.
- Create a new application or select it from the Configured Applications list.
- Select the Provisioning tab.
To configure JumpCloud
- Click Configure.
- For API Type, select Custom API.
- Leave Use mTLS unchecked.
- Set Authentication Method to API Key
- Paste your Workday JSON Web Service URL into the Base URL field.
- In Header name, enter Authorization.
- In Header value, enter Basic followed by your base64-encoded ISU credentials (username:password). There must be a space between the word Basic and the encoded credentials.
- Under Endpoint Configuration, enter Report_Entry for the Resource Location.
- In Endpoint Path, enter /<reportName>?format=json.
- For Pagination Type, select the method that matches your Workday report configuration (Page-based, Cursor-based, or No Pagination).
- Click Test Connection.
User Schema Mapping
- For Unique id, enter id (the Alias from your Workday report).
- For User Status, enter Active_Status.
- For Inactive Status Values, enter 0.
Mapping Table
- Select the attribute you want to populate in the JumpCloud Attribute column and then enter the corresponding field name (XML Alias) from your Workday custom report.
![]()
Map the email and username first, then click Preview Mapping to see what the names of the Workday report fields. You can copy and paste the JSON into an editor for easier copying and pasting when populating the rest of the mappings.
- See the table below for some suggested attribute mappings. Your report fields may be named differently.
![]()
You can use expressions to manipulate the data coming from Workday before storing it in JumpCloud. To use an expression, click the more option at the end of the field (the stacked ellipses) and select “Add Expression”. Read Use Expressions in Custom API Import Integrations to learn more about expressions.
Attribute Mappings
Workday User Attributes
| JumpCloud Attributes | SCIM Attribute | Notes |
|---|---|---|
| company | $enterpriseUser.organization | |
| costCenter | $enterpriseUser.costCenter | |
| department | $enterpriseUser.department | |
| userName | ||
| employeeIdentifier | $enterpriseUser.employeeNumber | |
| employeeType | userType | |
| firstname | name.givenName | |
| jobTitle | title | |
| lastname | name.familyName | |
| notNullOrEmpty(jcUser.displayname) ? jcUser.displayname : (notNullOrEmpty(jcUser.lastname) ? jcUser.firstname + ' ' + jcUser.lastname : jcUser.firstname) | displayName | |
| notNullOrEmpty(providerUser.externalId) ? providerUser.externalId : jcUser.id | externalId | |
| notNullOrEmpty(providerUser.locale) ? providerUser.locale : 'en-US' | locale | |
| notNullOrEmpty(providerUser.preferredLanguage) ? providerUser.preferredLanguage : 'en-US | preferredLanguage | |
| toScimAddresses(find(jcUser.addresses, .type == 'work') ?? first(jcUser.addresses | addresses | |
| toScimEmails(jcUser.email) | emails | |
| toScimPhoneNumbers(find(jcUser.phoneNumbers, .type == 'work') ?? first(jcUser.phoneNumbers)) | phoneNumbers | |
| JumpCloud Attributes | SCIM Attribute | |
| company | $enterpriseUser.organization | |
| costCenter | $enterpriseUser.costCenter | |
| department | $enterpriseUser.department | |
| userName | ||
| employeeIdentifier | $enterpriseUser.employeeNumber |
- Click Preview Mapping to do a final verification once all your mappings are entered.
- Click Activate.
Removing the SSO Integration
![]()
These are steps for removing the integration in JumpCloud. Consult your SP's documentation for any additional steps needed (like disabling "mandatory SSO login" settings) to remove the integration in the SP. Failure to remove the integration successfully for both the SP and JumpCloud may result in users, including admins, losing access to the application.
![]()
If your data is stored outside of the US, check which login URL you should be using depending on your region. If your organization uses LDAP, RADIUS, or requires firewall allow list configuration, the Fully Qualified Domain Names (FQDNs) will also be region specific. See JumpCloud Data Centers for the URLs, FQDNs, and IP addresses.
To deactivate the SSO Integration
- Log in to the JumpCloud Admin Portal.
- Go to Access > SSO Applications.
- Search for the application that you’d like to deactivate and click to open its details panel.
- Select the SSO tab.
- Scroll to the bottom of the configuration.
- Click Deactivate SSO.
- Click Save.
- If successful, you will receive a confirmation message.
To delete the application
- Log in to the JumpCloud Admin Portal.
- Go to Access > SSO Applications.
- Search for the application that you’d like to delete.
- Check the box next to the application to select it.
- Click Delete.
- Enter the number of the applications you are deleting
- Click Delete Application.
- If successful, you will see an application deletion confirmation notification.
Configuring the Legacy SCIM Integration
![]()
The legacy Workday connector will be deprecated in May 2026. New instances of the legacy integration will no longer be supported starting in March 2026.
Leverage the new Workday connector for full HR-driven lifecycle management, scheduled imports, and granular control over user attributes.
To configure Workday
Creating a Workday Integration System User
![]()
Use good security practices for this user. It should only be used for the Workday <> JumpCloud integration and leverage a strong password.
- In Workday, search "create integration system user" and select the resulting task.
- Specify a User Name and a strong password.
- Set the session timeout to a value as low as possible.
- Select Do Not Allow UI Sessions.
- Select OK, then Done.

Creating a security group
- In Workday, search "create security group" and select the resulting task.
- For Type of Tenanted Security Group, select Integration System Security Group (Unconstrained).
- Specify a name for the group, select OK.

- For Integration System Users, add the user created in the prior step, select OK, then Done.

Assigning the group to domain Security Configuration
In Workday, perform steps 1-4 for each Domain/Permission pair in the table that follows:
| Domain | Permission |
| Workday Accounts | Get |
| Worker Data Public Worker Reports | Get |
| Person Data Work Contact Information | Get |
| Worker Data Current Staffing Information | Get |
| Worker Data All Positions | Get |
| Worker Data Business Title on Worker Profile | Get |
- Search "domain security configuration" and select the result.
- In the Domain field, search the Domain from the table, select the result, select OK.
- Select the (…) next to the Domain name; under Actions, select Domain > Edit Security Policy Permissions.

- Under Integrated Permissions, add the Security Group created in the above steps and select the Permission.

- Select OK, then Done. If an alert to Activate Pending Security Policy Changes is displayed, do this after all domains have been updated for the security changes to take effect immediately.


Authorizing Workday
- In the JumpCloud Admin Portal, navigate to Identity Management > HR Directories.
- Select the Workday tile and click Configure.
- Under Workday Authorization, click Authorize Workday.
- Enter the credentials for the Integration System User created in the steps above.
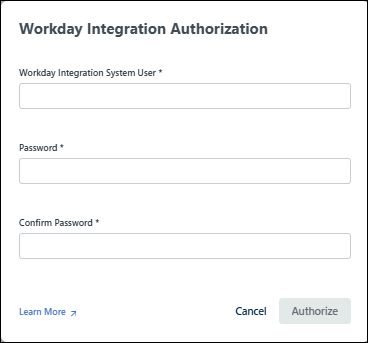
- Click Authorize.
Creating a Custom Report
![]()
Minimize risk by creating a report specifically for importing users to JumpCloud including only the attributes that can be utilized by JumpCloud.
- Search "create custom report" and select the result.
- Specify:
- Report Name
- For Report Type, choose Advanced.
- Data Source: This will depend on the manner Workday is organized. All Active Employees is used here, but your data source may vary.
- Check Enable As Web Service and select OK.

- Edit Custom Report : (* indicates data required for import) Attributes must be mapped in the Columns tab of the custom report, see also the example JSON data below. The Business Object 'Worker' is used for the following fields:

| Field (Your field source may vary) | Column Heading Override XML Alias |
| Workday ID* | id |
| Employee ID | employee_id |
| Email – Primary Work* | |
| User Name* | username |
| First Name | first_name |
| Last Name | last_name |
| Hire Date | hire_date |
| User Name** | WorkdayID |
** (Optional, for use with Workday SAML) The Workday Value mapped to the JumpCloud key WorkdayID will be sent as the SAML Subject NameID in the SAML response.

- Share the report with the integration system user.
- Select the Share tab, then Share with all authorized groups and users.

- Select the Share tab, then Share with all authorized groups and users.
- Get the report URL after completing the new report by selecting the (…) next to the report name; under Actions, select Web Service > View URLs.
- Copy the provided JSON URL and paste into the JumpCloud Workday setting WORKDAY CUSTOM REPORT URL.

Importing Workday Users
Considerations
- Field validation for required data (asterisk indicates the input must be globally unique):
- username* - Usernames must only contain letters, numbers or _ and cannot start with a number
- email* - Must be a valid email address
- Importing large numbers of records may take several minutes to complete. Any import more than 500 records will not return results to the console. A workday import notification will be sent when complete and allow for CSV download of import results.
To import users
- Select Import Workday Users.

- The Workday Import Creation window will present, allowing the selection of users to import and modification to the name, email, and username attributes prior to import. Select the vertical ellipsis to expand and view additional Preview Attributes.
- Select Import when ready. Import results will be displayed on the subsequent screen.
- Users will be imported into an inactive state and can be found on the Imported Users tab. They can now be managed in the same manner as any other JumpCloud user.
- To notify the user of activation, either in the Imported Users tab or the Users Object, the users can be selected, then select the send/resend activation email button.
- Once the user is activated in JumpCloud, they will no longer display on the Imported Users tab.

![]()
The WorkdayID and employee_id (both optional) will be added as a Custom User Attribute to the JumpCloud user as "WorkdayID" and "EmployeeID" respectively, additional "Preview Attributes" listed here are not currently imported into JumpCloud.
Valid JSON example from the Workday custom report:
{
"Report_Entry": [{
"first_name": "Abby",
"last_name": "Brennan",
"location": "Chicago",
"Cost_Center_-_Organization_Top": "33100 Global Support - North America; US - Central; Global Modern Services, Inc. (USA); Other Services",
"username": "abrennan",
"hire_date": "2018-01-03T16:54:35Z",
"id": "6dcb8106e8b74b5aabb1fc3ab8ef2b92",
"email": "abrennan@jumpcloud.com"
},
{
"first_name": "Adam",
"last_name": "Carlton",
"location": "Boston",
"cost_center_-_organization_top": "41200 Payroll; US - Northeast; Global Modern Services, Inc. (USA)",
"username": "acarlton",
"id": "1da8b422311b4929bfa4520f7f0b4e83",
"email": "acarlton@jumpcloud.com"
}]
}