
Use JumpCloud SAML Single Sign On (SSO) to give your users convenient but secure access to all their web applications with a single set of credentials. GravityZone is a multilayered security solution that provides enhanced attack protection by leveraging an extensive set of systems hardening, threat prevention, and detection technologies, as well as machine learning and behavioral analysis. Users can explore the onboarding guide and take their first steps in using GravityZone product.
Read this article to learn how to configure the Bitdefender (GravityZone) SSO connector.
Prerequisites
- A JumpCloud administrator account
- JumpCloud SSO Package or higher or SSO à la carte option
- A GravityZone Cloud administrator account
- An online resource, like AWS S3 bucket with public web access, traditional web hosting, etc., to self host the JumpCloud metadata XML file
Important Considerations
- GravityZone users must have accounts in JumpCloud with the same email addresses
- GravityZone supports only Service Provider (SP) initiated single sign-on
- One can enable SSO for as many GravityZone users as they want, but not for your own administrator account
Creating a new JumpCloud Application Integration
- Log in to the JumpCloud Admin Portal.
![]()
If your data is stored outside of the US, check which login URL you should be using depending on your region. If your organization uses LDAP, RADIUS, or requires firewall allow list configuration, the Fully Qualified Domain Names (FQDNs) will also be region specific. See JumpCloud Data Centers for the URLs, FQDNs, and IP addresses.
- Go to Access > SSO Applications.
- Click + Add New Application.
- You can also enter the name of the application in the Search field and select it.
- You can either select an application from the available list or select Custom Application, and click Next.
- Select the required options from the Select Options page and click Next. The Enter General Info page is displayed.
- On the Enter General Info page, you can customize the display label, description and how the application displays:
- Description - add a description that users will see in their user portal
- User Portal Image - choose Logo or Color Indicator
- Show in User Portal - select to ensure the app is visible in the user portal
- Optionally, expand the Advanced Settings section and customize the IdP URL:
- Enter a custom value to replace the default application name in the SSO IdP URL endpoint ( https://sso.jumpcloud.com/saml2/{custom_value})
![]()
The SSO IdP URL is not editable after the application is created. If you need to change this URL later, you must delete and recreate the connector.
- Click Save Application.
- Next, click:
- Configure Application and go to the next section
- Close to configure your new application at a later time
![]()
Users are implicitly denied access to applications. See Authorize Users to an SSO Application.
Configuring the SSO Integration
To obtain the GravityZone Public Certificate
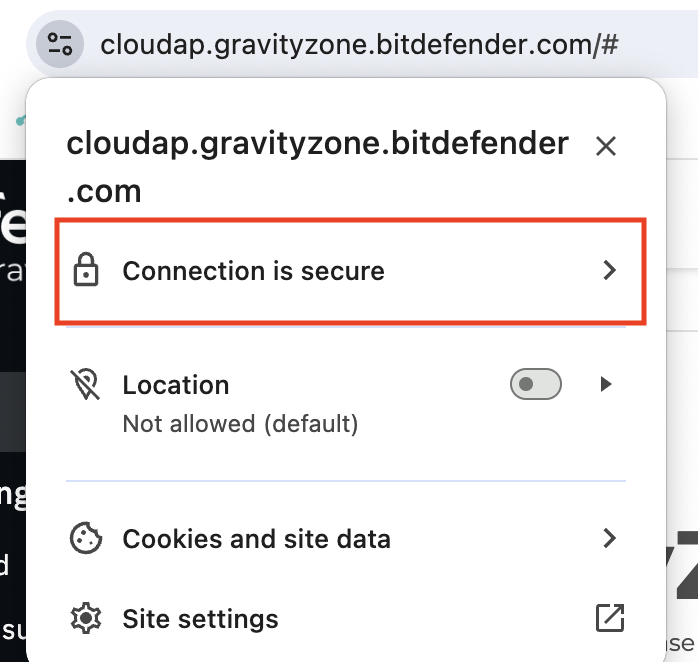
- Using Google Chrome, navigate to GravityZone Control Center | Bitdefender Enterprise
- Click on view site information icon beside the address bar, Select ‘Connection is Secure’ and ‘Certificate is valid’ option. This opens up certificate information for the GravityZone site.
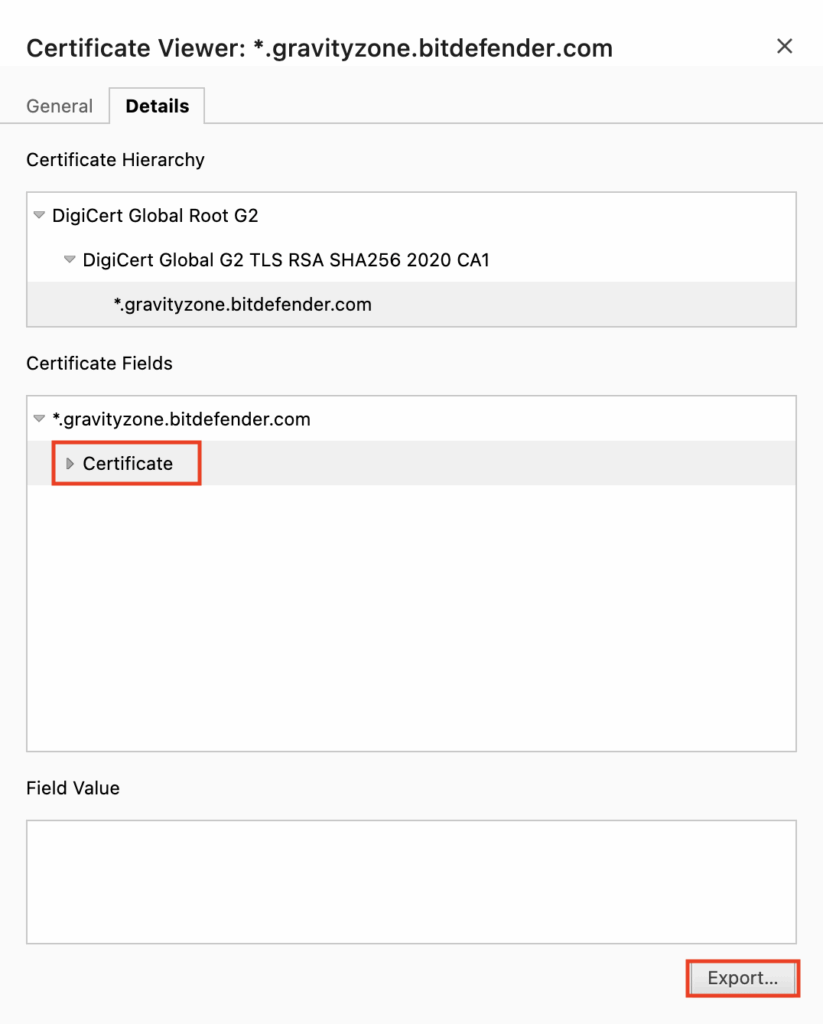
- Go to Details tab, select Certificate under Certificate Fields and export the public certificate of GravityZone site as a .pem file. Make sure to remember while the file is saved.
- Alternatively, the certificate can also be exported using Mozilla Firefox. Navigate to GravityZone Control Center | Bitdefender Enterprise in Firefox.
- Click the lock icon in the address bar, then click the right arrow in the Site information drop-down menu. In the next panel, click More information
- In the Page Info window, go to the Security tab and click the View Certificate button.
- On the certificate page, click PEM (cert) to download the certificate on your computer.
To navigate to your JumpCloud SSO connector
- Log in to the JumpCloud Admin Portal.
![]()
If your data is stored outside of the US, check which login URL you should be using depending on your region. If your organization uses LDAP, RADIUS, or requires firewall allow list configuration, the Fully Qualified Domain Names (FQDNs) will also be region specific. See JumpCloud Data Centers for the URLs, FQDNs, and IP addresses.
- Go to Access > SSO Applications.
- Create a new application or select it from the Configured Applications list.
- Select the SSO tab.
To configure JumpCloud
- Under SP Certificate, click Replace SP Certificate.
- Browse to and select the certificate downloaded in the previous section. Click Open.
- Optionally, configure:
![]()
The Authentication Methods References (AMR) is automatically included in the SAML assertion by default. No additional configuration is required to enable this.
Complete the MFA Claim Configuration to define how the authentication context is sent in the SAML assertion.
- Under Auth Context, choose one of the following options based on your SP's requirements:
- Send a single value for all successful MFA factors - select if the Service Provider accepts a generic confirmation for any MFA login. Enter the single URL or URN they accept
- Send specific factors - select this option to map individual JumpCloud MFA methods to distinct values. In the Factor Mapping table, add each MFA factor enabled in your organization and enter the corresponding value required by the Service Provider
- Send single value and specific factors - select to send both a generic identifier and specific factor details in the assertion
![]()
Refer to your Service Provider's documentation to determine the specific URN or URL values required (e.g., Salesforce Session Security Levels). The values entered in this configuration must exactly match what the Service Provider expects.
| MFA Factor | Service Provider | Notes |
|---|---|---|
| Password | Reference your Service Providers's documentation for the values they expect for each factor | |
| TOTP | ||
| WebAuthN | ||
| Push Notification | JumpCloud Protect or other authenticator application | |
| Duo Security | ||
| Device Trust | ||
| Device Trust + User Verification | JumpCloud Go (requires explicit configuration - see the next table) | |
| API Key | ||
| External Identity Provider |
| MFA Method | MFA Value in AMR Claim |
|---|---|
| apikey | swk |
| duo | mfa |
| pwd | pwd |
| totp | otp |
| unk | |
| wan | hwk |
| push | mfa |
| uv | |
| durt | hwk |
| durt_uv | hwk |
| ext_idp |
Learn more about MFA Claims.
Configure User Attributes to be sent to the SP in assertions. User attributes are unique to each user. You can include attributes for standard user detail attributes or for custom attributes. For example, you can include standard attributes for users’ employee ID and department, or you can include a custom attribute for users’ application ID. Standard attributes are configured in the User Panel Details tab's User Information and Employee Information sections.
Unlike user attributes, a Constant Attribute can be sent for every user in a specific group or application profile.
![]()
If required attributes are present, they are not editable.
- Under User Attributes, click add attribute:
- Service Provider Attribute Name - enter the service provider’s name for the attribute
- JumpCloud Attribute Name - select the corresponding attribute from the drop down list
- Repeat these steps for any desired user or custom attributes.
- Under Constant Attributes, click add attribute:
- Service Provider Attribute Name - enter the service provider’s name for the attribute
- Value - enter the corresponding attribute in JumpCloud
- Optionally, if groups are supported, select Include Group Attribute.
- Optionally, select Include Group Attribute to include the groups that connect the user to the application in the SAML assertion.
- Click Export Metadata.
- Click Save.
- Edit the XML file to include:
<md:SingleLogoutService Binding="urn:oasis:names:tc:SAML:2.0:bindings:HTTP-Redirect" Location="https://sso.jumpcloud.com/saml2/bitdefender"/>
![]()
This must be placed below the "SingleSignonService Location" and before the "</md:IDPSSODescriptor” fields.
- Self host the XML file and then note the URL.
To configure Bitdefender
- Log into GravityZoneControl Center.
- In the upper-right corner, go to Welcome, [your username] > My Company.
- In the Authentication tab, under Single Sign on using SAML, enter the URL for the self hosted metadata in the Identity provider metadata URL field.
- Click Save.
To change the authentication method for Bitdefender users
After enabling SSO for a company, GravityZone user accounts under that company become available for changing their authentication method. You can change the authentication method for users one by one, as follows:
- Go to the Accounts page.
- In the table, click the user’s name.
- Under Settings and Privileges, go to Authentication method and select Login using your Identity Provider.
- Click Save.
![]()
You can enable SSO for as many GravityZone users as you want, but not for your own administrator account.
Authorizing SSO Application Access
Users are implicitly denied access to SSO Applications. After you connect an application to JumpCloud, you need to authorize user access to that application. You can authorize user access from the Applications, Users List or User Groups page.
To authorize user access from the SSO Application’s page
- Log in to the JumpCloud Admin Portal.
![]()
If your data is stored outside of the US, check which login URL you should be using depending on your region. If your organization uses LDAP, RADIUS, or requires firewall allow list configuration, the Fully Qualified Domain Names (FQDNs) will also be region specific. See JumpCloud Data Centers for the URLs, FQDNs, and IP addresses.
- Go to Access > SSO Applications, then select the application to which you want to authorize user access.
- Select the User Groups tab. If you need to create a new group of users, see Get Started: User Groups.
- Select the check box next to the desired group of users to which you want to give access.
- Click Save.
To learn how to authorize user access from the Users or User Groups pages, see Authorize Users to an SSO Application.
Validating SSO user authentication workflow(s)
Check your SP's documentation to ensure that both workflows are supported.
IdP-initiated user workflow
- Access the JumpCloud User Console
- Go to Applications and click an application tile to launch it
- JumpCloud asserts the user's identity to the SP and is authenticated without the user having to log in to the application
SP-initiated user workflow
- Go to the SP application login - generally, there is either a special link or an adaptive username field that detects the user is authenticated through SSO
![]()
This varies by SP.
- Login redirects the user to JumpCloud where the user enters their JumpCloud credentials
- After the user is logged in successfully, they are redirected back to the SP and automatically logged in
![]()
See Additional User Experience Considerations when setting up JumpCloud SSO.
Removing the SSO Integration
![]()
These are steps for removing the integration in JumpCloud. Consult your SP's documentation for any additional steps needed (like disabling "mandatory SSO login" settings) to remove the integration in the SP. Failure to remove the integration successfully for both the SP and JumpCloud may result in users, including admins, losing access to the application.
![]()
If your data is stored outside of the US, check which login URL you should be using depending on your region. If your organization uses LDAP, RADIUS, or requires firewall allow list configuration, the Fully Qualified Domain Names (FQDNs) will also be region specific. See JumpCloud Data Centers for the URLs, FQDNs, and IP addresses.
To deactivate the SSO Integration
- Log in to the JumpCloud Admin Portal.
- Go to Access > SSO Applications.
- Search for the application that you’d like to deactivate and click to open its details panel.
- Select the SSO tab.
- Scroll to the bottom of the configuration.
- Click Deactivate SSO.
- Click Save.
- If successful, you will receive a confirmation message.
To delete the application
- Log in to the JumpCloud Admin Portal.
- Go to Access > SSO Applications.
- Search for the application that you’d like to delete.
- Check the box next to the application to select it.
- Click Delete.
- Enter the number of the applications you are deleting
- Click Delete Application.
- If successful, you will see an application deletion confirmation notification.