
Amazon and JumpCloud have partnered to offer a fully managed virtual desktop infrastructure (VDI) service over the web. Using JumpCloud SSO, a JumpCloud-enabled BYOL image and Amazon WorkSpaces Personal, admins can provision persistent virtual devices for users that are accessible from multiple devices or web browsers.
See our blog for more information about our partnership.
Prerequisites
- A JumpCloud tenant and admin account
- JumpCloud SSO Package or higher
- An AWS Identity Center instance and admin account
- AWS IAM Identity Center SSO configured and enabled
- BYOL is enabled for your WorkSpaces account and an AWS KMS server that your personal WorkSpaces can access for Windows 10 and 11 activation
- An Amazon S3 bucket
Installation Overview
- Create an Amazon WorkSpaces Directory
- Ensure BYOL is enabled on your account
- Create JumpCloud Virtual Machine (VM)
- Download latest Windows ISO
- Configure JumpCloud VM
- Run BYOL Checker
- Create JumpCloud BYOL Image
- Upload the VHD to an S3 bucket
- Export VHD to Amazon EC2
- Import image into WorkSpaces
- Configure WorkSpaces
- Create a custom bundle
- Create JumpCloud workspace(s)
- Connect JumpCloud user accounts
Creating an Amazon WorkSpaces Directory
- Open the WorkSpaces console.
- Go to Directories in the left menu and click Create directory.
- Select Personal and then scroll down and select Custom.
- In User identity source, select your IAM Identity Center instance from the dropdown.
- Enter the following in the Directory information section:
- Directory name - name of your directory
- Directory description - add a description
- VPC - if not already displayed, select it from the dropdown
- Subnet 1 - select your first subnet from the dropdown menu
- Subnet 2 - select your second subnet from the dropdown menu
- Under Configuration, select Enable dedicated WorkSpace.
![]()
This setting is required for BYOL images.
- Click Create directory.
Creating the JumpCloud VM
![]()
Review the BYOL image requirements and best practices before creating the image.
- Download the latest Windows 11 ISO.
![]()
For this integration, Windows 11 Business Editions version 22H2 (updated June 2024) and a Hyper-V VM was used.
![]()
It is not required to user Hyper-V, you can use any program that creates a VM, like VMWare, VirtualBox, etc.
- Create a new VM with the following:
- Disk size - 52GB
- TPM - enabled
- Checkpoints - disabled
- Initialize from the ISO
- Skip naming the computer in the image (if you are making multiple images or all the computers will have the same name)
![]()
See Amazon's Specify a custom computer name format for your image if you want to name the the computer image.
- Start the VM and set up Windows 11. During setup, choose:
- Work/school account
- Select the domain option
- Create a local account named WorkSpaces_BYOL and password
- Save the local admin account info in a secure location, like JumpCloud Password Manager
- Shut down the VM.
- In the VM settings, remove the DVD drive.
- Restart the VM, log in as WorkSpaces_BYOL and password, make sure all the latest Windows updates are installed, and pause Windows Updates, for example, for one week.
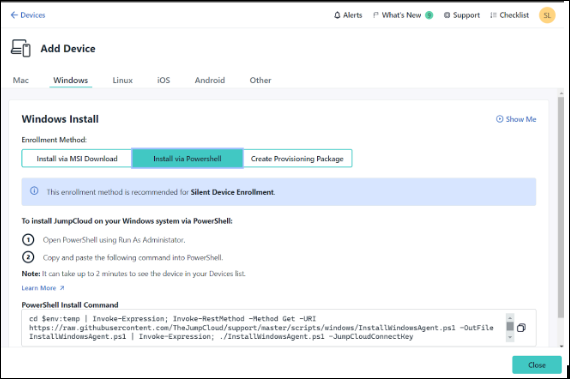
- From the JumpCloud Admin Portal, go to Device Management > Devices >Windows tab and click Add Device.
- Select Install via Powershell and copy the PowerShell Install Command to the clipboard.
- On the VM, create a new folder called C:\JumpCloud.
- In this folder, create a PowerShell script file, for example named install.ps1, and paste the PowerShell Install Command from the previous step into this new file and save it.
- Start the Task Scheduler as an administrator and create as new task as follows:
- Give it a name, like Install Jumpcloud
- Click the Change User or Group button
- Type in SYSTEM and click Check Names
- After the name resolves, click OK

- Select the Triggers tab, add a new trigger and configure as follows:
- Begin the task - select On an event
- Log - select Application
- Source - enter Amazon Workspaces
- Event ID - enter 1001
- Click OK

- Select the Actions tab, add a new action and configure as follows:
- Program/script - enter powershell.exe
- Add arguments(optional) - enter the full path to the installation script created above, i.e., C:\JumpCloud\install.ps1
- Click OK

- Download the BYOL Checker script .zip file to your Downloads folder.
- In your Downloads folder, create a BYOL folder.
- Extract the files from BYOLChecker.zip and copy them to the Downloads\BYOL folder.
- Delete the Downloads\BYOLChecker.zip folder so that only the extracted files remain.
- From the Admin PowerShell, execute the following commands to run BYOL Checker:
cd C:\Users\WorkSpaces_BYOL\Downloads\BYOL
Set-ExecutionPolicy AllSigned -Force
.\BYOLChecker.ps1
- Follow the prompts to run the checks. Address all the warnings and failed checks.
![]()
There is a list of error messages and fixes at the end of Step 3 in the BYOL Checker documentation.
- After all the checks are passed in BYOLChecker, click Run Sysprep.
- Shut down your VM.
Creating a JumpCloud BYOL Image
![]()
For more information about the steps in this section, see Export Your VM from its Virtualization Environment and Prerequisites for importing a VM into Amazon EC2.
- After the VM shuts down, convert your VM to a virtual hard disk (VHD).
- Upload the JumpCloud VHD to an S3 bucket:
aws s3 cp <VHD FILE NAME> s3://<BUCKET NAME>
![]()
It will take some time to complete this step. If the S3 upload operation times out, the VHD file can be copied to an EC2 VM in the same region first, and then uploaded to S3 from the EC2 VM.
- Create a new file containers.json with the following structure:
[
{
"Description": "JumpCloud Disk Image",
"Format": "vhd",
"UserBucket": {
"S3Bucket": "<BUCKET NAME>",
"S3Key": "<VHD FILE NAME>"
}
}
]
- Import the JumpCloud VHD into EC2:
aws ec2 import-image --description "<DESCRIPTION>" --disk-containers "file://~/containers.json" --output json
- Monitor the import status:
aws ec2 describe-import-image-tasks --import-task-ids <IMPORT TASK ID> --output json
- Create the JumpCloud WorkSpace BYOL image:
aws workspaces import-workspace-image --ec2-image-id <AMI ID> --ingestion-process BYOL_REGULAR_WSP --image-name <NAME> --image-description "<DESCRIPTION>"
- Monitor the JumpCloud WorkSpace BYOL image status:
aws workspaces describe-workspace-images --image-ids "<WSI ID>" --no-paginate
Configuring WorkSpaces
- In the WorkSpaces console, create a workspace bundle from the JumpCloud WorkSpace BYOL image.
![]()
If you are planning to use self-service account provisioning, make sure it is enabled in the JumpCloud Admin Portal.
- Create a personal workspace from the workspace bundle created above. Ensure you make the following selections:
- Onboarding options - I know what workspace options I need for my use case
- Basic details - Personal
- Bundle - Use your own custom or BYOL bundle and select your bundle from the dropdown
- Personal WorkSpace directories - select the directory created above.
- Select users from directory - select the user you want to assign to it.
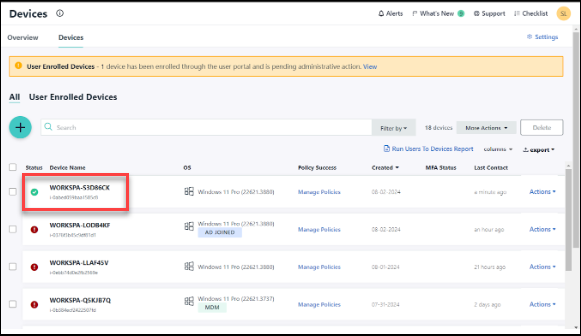
- Monitor the state of the created workspace. Once it becomes available, take a note of the Computer Name field.

- In JumpCloud Admin Portal, verify that the device with the same name appears in the list of managed devices:
- Connect users to the workspaces:
- If Self-Service Account Provisioning is disabled, connect the user account to this device and provide the workspace registration code to the user
- If Self-Service Account Provisioning is enabled, after the user signs in for the first time, the user account gets connected to the device:

- Repeat the steps to create additional workspaces for other users.
User Sign in Experience
- After the user launches the Amazon WorkSpaces client and enters their registration code provided by the administrator, they see the sign-in screen:

- The user clicks Continue to sign in to WorkSpaces and the web browser window pops up. If the user hasn’t logged in to JumpCloud before, they enter their email and click Continue:

- Then the user authenticates by entering their password and clicking SSO Login:

- The user is prompted to navigate back to the Amazon WorkSpaces client application:

- The Workspace lock screen is displayed:

- If Self-Service Account Provisioning is enabled and the user hasn’t been connected to the workspace, then the experience is as follows:
- The user clicks on the lock screen and selects Sign in with JumpCloud
- If a user is connected to the WorkSpace, their name will appear

- The JumpCloud login window pops up:


- After the user authenticates with their JumpCloud credentials, they are prompted to create a Windows Hello PIN:

- After creating the PIN, the user gets signed in to their new Windows account:


- Now that the user account is set up, the user is going to use their PIN to sign in:
