Get Started: SSO Applications
JumpCloud lets you streamline user provisioning, management, and access to applications with features like Single Sign-On (SSO), Just-In-Time (JIT) provisioning, System for Cross-domain Identity Management (SCIM), and AI connections through JumpCloud AI Gateway. This article introduces the ideal workflow for connecting, provisioning, and authorizing users to applications. Later sections also cover how applications connect to AI Gateway.
If you’re interested in using SSO and JIT provisioning, the following articles show you how to configure and connect SSO applications to JumpCloud:
- Get Started: SAML SSO
- SSO using Prebuilt Application Connectors
- SSO using Custom SAML Application Connectors
- OIDC Overview
If you're interested in using SCIM, the following articles show you how to configure and connect SCIM applications to JumpCloud:
If you're interested in AI connections for approved AI clients, see Get Started: AI Gateway.
Application Challenges
Organizations have shifted from having a handful of applications hosted on a local server to using thousands of web-based applications to get work done. This shift has introduced many benefits, like greater agility and faster times to market. However, web-based applications have also surfaced a number of challenges related to provisioning; credential overload for end users, decreased security, and reduced efficiency for end users and IT admins.
Both OIDC and SAML SSO are supported. JIT provisioning is only available on SAML apps.
The Value in SSO and JIT Provisioning
SSO
SSO provides end users with a single set of credentials to access all of their applications. This helps users avoid lock-out delays due to forgetting their password because they only have to remember one. End users also don’t have to enter 50 different credentials to access all of their tools. Instead, users log in to their JumpCloud User Portal, and from there can access their applications with just a click, reducing hassle and allowing more time to focus on work.
Using JumpCloud’s SSO feature helps IT admins to create one place to manage user access to all of the applications in the admin’s environment. This lets admins increase security by centrally enforcing security policies, and enables them to take care of sensitive matters, like compromised credentials, quickly.
JIT Provisioning
JIT provisioning automates many of the IT processes related to provisioning users to applications. Without this feature, IT admins have to create a new user in the identity provider and create an account for that user in each application to which they need access. JIT provisioning eliminates this busywork by creating a new user account in an application the first time a user logs in to the application using SSO.
Connecting SSO Applications to JumpCloud
To gather information from the Service Provider
- Find out if metadata is available from the service provider (SP). If metadata is available, download it so that you can use it to configure the connector in JumpCloud.
- If the SP requires it, enable SAML functionality.
- Keep the SP information handy when you start configuring the SSO connector in JumpCloud.
To configure the connector In JumpCloud
- If a metadata file is available from the SP, start by uploading it to JumpCloud. This will populate SAML connector attributes for that application. If a metadata file isn’t available, use a prebuilt connector, if available, or manually enter the SAML connector attributes. In this case, refer to the SP’s SSO configuration section to retrieve the information you need.
When you upload a metadata file, the fields don't populate right away. You need to save the connector, then open it again to see the SAML connector fields populated.
- After the attributes are entered, activate the connector in JumpCloud. This automatically creates an IDP certificate and IDP private key pair.
- Export the metadata from JumpCloud. To export JumpCloud metadata, navigate to Access > SSO Applications:
- From the Configured Applications list - scroll to or search for the application. Select the checkbox next to the application and then click Export Metadata in the top right corner.
- In the application’s Details Panel - select the SSO tab and then click Export Metadata.
To Configure the Connector in the Service Provider
- Upload JumpCloud’s metadata file to the SP. This populates the SAML attributes in the SP.
- Save the SP configuration settings.
JIT Provisioning and Authorization
User Provisioning and Authorization without JIT
- Create user accounts in JumpCloud, then create them in the SP.
- Assign the JumpCloud users to a user group.
- Authorize the user group’s access to the application.
User Provisioning and Authorization with JIT
- Enable JIT provisioning in the SP.
- Ensure the right attributes are configured in JumpCloud.
- Create user accounts in JumpCloud.
- Assign the users to a user group, then authorize access to the application.
- Users are provisioned to the application the first time they log in to the application using SSO.
The value in SCIM
Using SCIM, you can streamline user access to web applications, making onboarding and offboarding users more efficient. Since JumpCloud is entirely cloud based, you can manage your users’ application identities from a single location.
The following actions are supported with JumpCloud SCIM Connectors:
- Creating - a new account is created for the user in the connected application with your specified attributes.
- Updating - anytime you update the user in JumpCloud, the user is also updated in the application.
- Deprovisioning - after unbinding a user from the application in JumpCloud, the user is deactivated in the application.
Not all applications support all three Provisioning actions.
Connecting SCIM Applications to JumpCloud
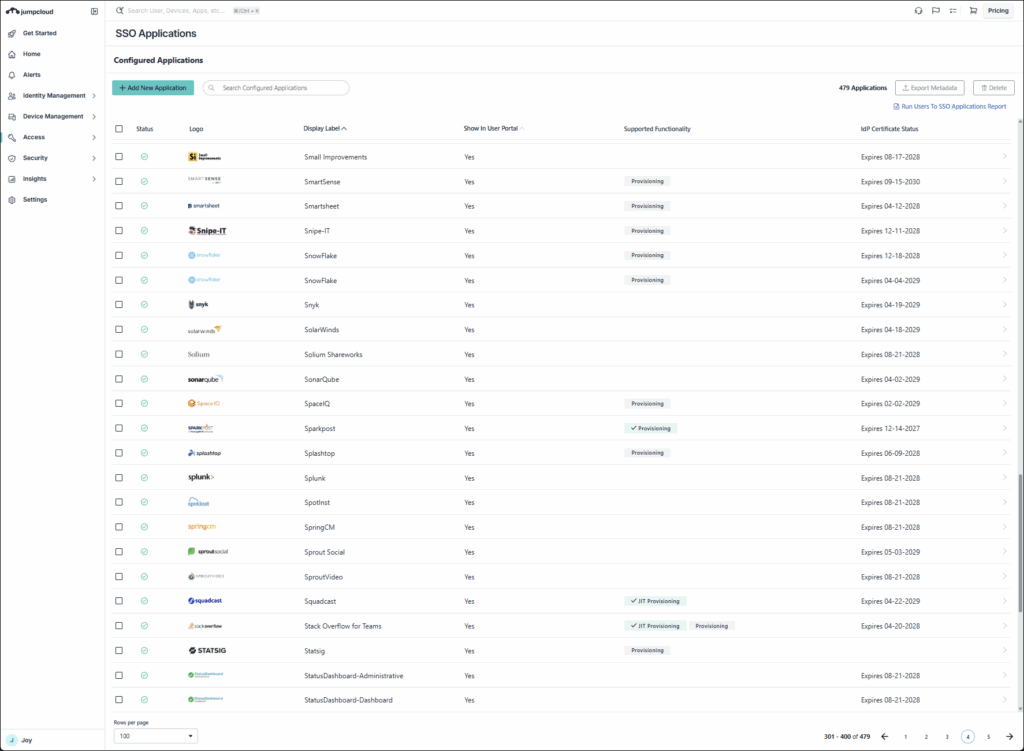
If you have configured prebuilt SSO Applications, you can also integrate with JumpCloud through an SCIM Connector. Check the Configured Applications list for applications that display a Provisioning badge.
- Log in to the JumpCloud Admin Portal.
- Navigate to Access > SSO Applications.
- To connect a new application, click + Add New Application. If the application already has SSO configured, select it from the Configured Applications list.
- Select the Provisioning tab.
- Choose attributes and enter the Base URL and Token Key, click Save.
Linking Applications to AI Gateway
Each application in JumpCloud can route AI tool access through AI Gateway using an MCP (Model Context Protocol) connection. The application record is the anchor for both SSO access and AI connectivity, so reporting, group assignment, and User Portal visibility stay tied to the same app.
When you register an MCP server in Access > AI Gateway, you link it to the SSO application that holds the enterprise data. Configuration happens under Access > AI Gateway. When you open the application from Access > SSO Applications, the linked server appears on the app’s AI Gateway tab. See Get Started: AI Gateway to learn more about MCP servers, authentication methods, and routing.
Configuring an AI connection for an application
Go to the AI Gateway tab of an app to view the MCP servers linked to that app. You can initiate an MCP connection by clicking Add Server and you will be redirected to AI Gateway where all AI server connections are managed.
Not all applications support MCP servers. Confirm MCP support with the vendor or JumpCloud’s supported integrations list before you configure the server. See Configure AI Gateway Integrations.
To add an MCP server for an application
- Open an application from the list and click the AI Gateway tab.
- Click + Add Server to open AI Gateway and add the server for this app.
- In the dialog, click Continue. You are redirected to the AI Gateway page to add the server. The App field is preselected for this application.
- Enter a Name, Prefix, and URL, and choose the MCP authentication method per the application’s setup guide, then click Create.
See Get Started: AI Gateway to learn more. - The server appears under Access > AI Gateway > Servers.
When you open the application from Access > SSO Applications, the same server also appears on the application's AI Gateway tab.
Hiding Applications in the User Portal
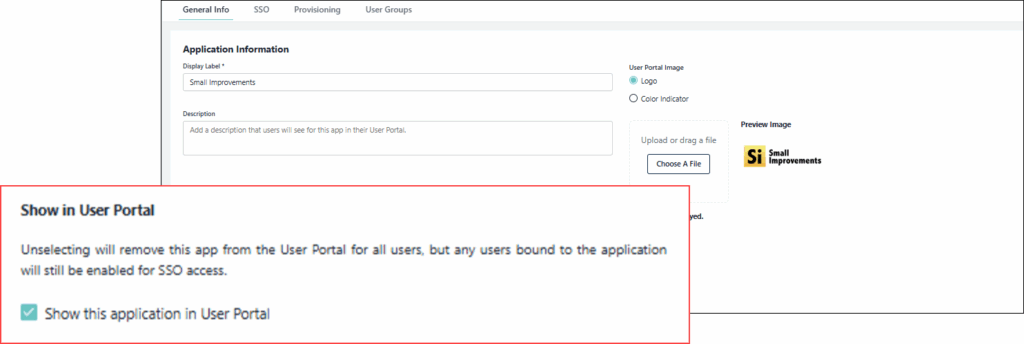
Under certain conditions, you may want to hide some applications in the User Portal. For instance, hiding SAML applications that only support SP-initiated logins can help to reduce user confusion with non working application tiles.
To hide an application
- From the JumpCloud Admin Portal, go to Access > SSO Applications and select it from the Configured Applications list.
- On the General Info tab at the bottom of the screen, deselect the Show this application in User Portal checkbox.
- Click Save.
Was this information helpful?