When you add devices to JumpCloud and you want to take over existing local accounts, you need to match the JumpCloud username or the local user account field with the name of the local account. If they don’t match, a new profile is created on the device. Use this article to learn about the different methods you can use to find the name of existing local accounts on devices.
Finding Local Device Accounts in the Admin Portal
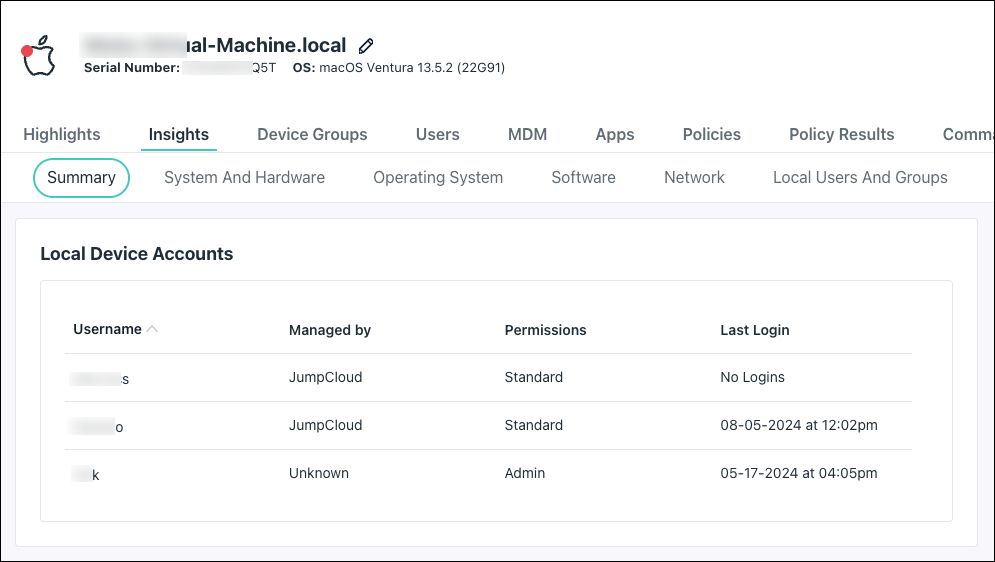
Devices with JumpCloud Agent automatically discover local device accounts and you can find them in the Admin Portal.
To see local device accounts:
- Log in to the JumpCloud Admin Portal.
If your data is stored outside of the US, check which login URL you should be using depending on your region, see JumpCloud Data Centers to learn more.
- Go to Device Management > Devices.
- Select the Devices tab, then find the device.
- Go to the Insights tab.
- Under Local Device Accounts, view the list of local accounts.

Manually Finding the Names of Local Accounts on Devices
If you have a small set of devices, you can manually find the name of existing accounts on Windows, Linux, and Mac devices.
Linux
To manually find the name of an existing account on a Linux device:
- Go to Settings > Users. All users are listed horizontally at the top.
- Select one and unlock to change settings and/or add users.
Another option to find local user names for each Linux device is to use the following command: cat /etc/passwd.
Mac
To manually find the name of an existing account on a macOS device:
- Go to System Settings > Users & Groups.
- Select a user, right-click, then choose Advanced Options....
Account Name is the name of the local account. On macOS Ventura, this field is called User Name.
Windows
To manually find the name of an existing account on a Windows device, go to Control Panel > Administrative Tools > Computer Management > Local Users and Groups > Users.
Name is the local account’s name.
Using the Device Agent to Query and Find Local Account Profiles
If you have plans to take over existing accounts on a large number of devices, automate the process and use the device agent to query and find local account profiles.
Prerequisites:
- The device agent needs to be installed before you can use it to query and find local account profiles. See Agent Compatibility, System Requirements, and Impacts.
- The JumpCloud PowerShell Module must be installed. See our tutorials on installation:
- Tutorial: Installing PowerShell on macOS
- Tutorial: Installing PowerShell on Linux
- Tutorial: Installing the Windows PowerShell Module
To query profiles on Windows and Mac devices:
- Import the following commands to the Admin Portal with the PowerShell Module.
- Import the Mac - List all users command.
- Import the Windows - List all users command.
- Run the imported commands from the Admin Portal. Note: When you run commands in the JumpCloud Admin Portal, they only produce outputs for devices that are currently online and checking in. To run the commands from the Admin Portal:
- Log in to the JumpCloud Admin Portal.
If your data is stored outside of the US, check which login URL you should be using depending on your region, see JumpCloud Data Centers to learn more.
- Go to Device Management > Commands.
- Click the imported commands to open the Commands panel.
- Go to the Device Groups or Devices tab, then select the device groups and devices you want to run the command on. Note: Make sure to select Windows devices and device groups for the Windows command and Mac device and Mac device groups for the Mac command.
- Click save.
- To run the commands, select the checkbox for each command, then click run now. This creates a lot of command results because a command result is produced for each system. Don’t delete these command results.
- From the JumpCloud PowerShell Module, export the command results to a CSV using the following commands. The Windows command is listed first, and the Mac command is listed second.
$CommandName="Windows - List All Users | v1.0 JCCG"
Get-JCCommandResult | Where-Object Name -Like "$CommandName" | Get-JCCommandResult -ByID | Select-Object name, system, systemId, exitCode, output | Export-CSV "WindowsUsers.csv"
$CommandName="Mac - List All Users | v1.0 JCCG"
Get-JCCommandResult | Where-Object Name -Like "$CommandName" | Get-JCCommandResult -ByID | Select-Object name, system, systemId, exitCode, output | Export-CSV "MacUsers.csv"
After you run these commands, you have CSV files with comprehensive lists of all local accounts on your Mac and Windows devices. Now you can:
- Manually create or update user profiles in JumpCloud to take over existing accounts on devices by matching username or local user account fields with the name of the local account. See Take Over an Existing User Account with JumpCloud for more info.
- Use the CSV file and PowerShell Module to create or update user profiles in JumpCloud, and connect them to systems at the same time.