
This article covers how to integrate QNAP NAS devices with JumpCloud’s LDAP, enabling Identity Management and authentication using JumpCloud accounts and credentials. To configure the integration, it's important understand the relationship between the products and how they are integrated. The following diagram in conjunction with the instructions that follow, show the basic interoperation of JumpCloud’s LDAP authentication service, the QNAP NAS, and the client attempting to access files.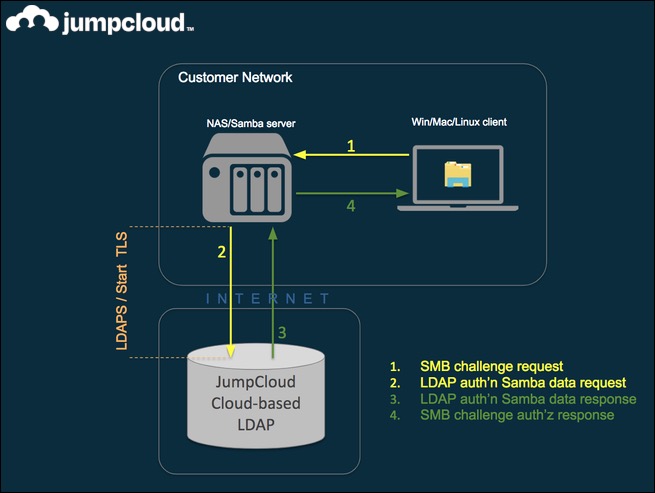
Prerequisites:
- Cloud LDAP is configured correctly in JumpCloud. See Use Cloud LDAP to learn more.
- LDAP users and/or user groups are configured in JumpCloud. See Create an LDAP Group to learn more.
Configuring JumpCloud User Groups for QNAP QTS via LDAP
To proceed, Cloud LDAP and a LDAP BindDN user must be configured. If you’ve not configured a BindDN User, see Creating an LDAP Bind User to learn more.
To configure JumpCloud user groups for QNAP:
- Log in to the JumpCloud Admin Portal.
![]()
If your data is stored outside of the US, check which login URL you should be using depending on your region. If your organization uses LDAP, RADIUS, or requires firewall allow list configuration, the Fully Qualified Domain Names (FQDNs) will also be region specific. See JumpCloud Data Centers for the URLs, FQDNs, and IP addresses.
- Go to Identity Management > User Groups.
- Select a user group that you want to be synced to QNAP QTS.
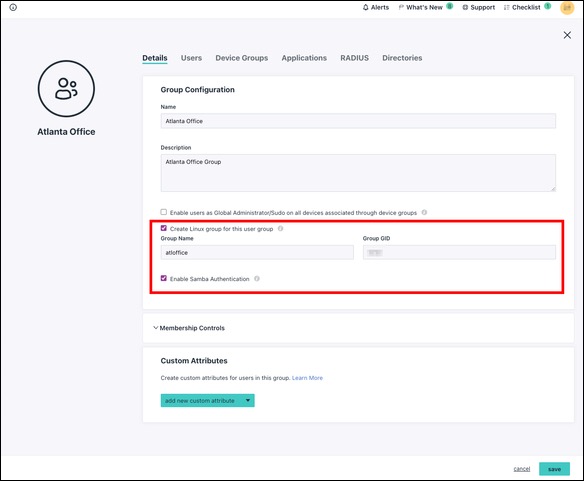
- Under the Details tab, select both Create Linux group for this user group and Enable Samba Authentication checkboxes.
- Fill out a Linux Group Name and Group GID.
- Note: QTS reserves a GID range from 0 to 99. When adding a new account, ensure that the UID and GID does not conflict with an existing UID or GID.
- At the bottom right, click Save to apply your changes.
- Repeat this step for all of the user groups you want to be available in QNAP QTS.
![]()
These JumpCloud User Groups will be available on the NAS in Domain Groups.
Configuring QTS for Microsoft Networking
In order to access file shares on Windows devices, the name of the workgroup configured in QTS must be identical to the name of the workgroup configured in your JumpCloud LDAP Instance.
To view Workgroup information in the LDAP Directory:
- First, get the name of the QNAP QTS Workgroup:
- In QNAP QTS, go to Control Panel > Network & File Services > Win/Mac/NFS/WebDAV > Microsoft Networking.
- Then view the name of the JumpCloud Workgroup:
- In the JumpCloud Admin Portal, go to USER AUTHENTICATION > LDAP.
- Click on the JumpCloud LDAP instance.
- Go the Details tab > LDAP Configuration to locate the Workgroup.
Configuring QNAP QTS to use JumpCloud LDAP
To configure the QNAP QTS device to use JumpCloud LDAP:
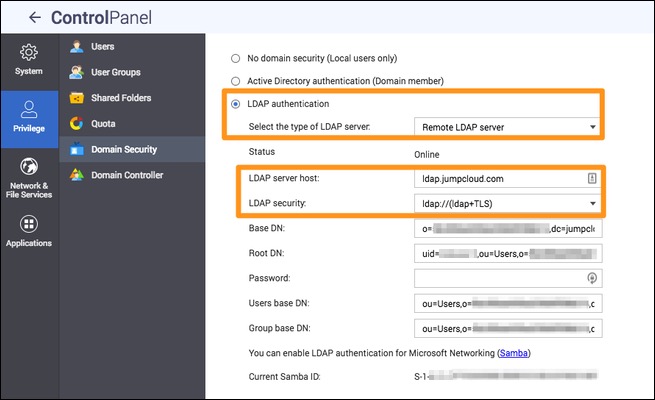
- In QNAP QTS, go to Control Panel > Privilege > Domain Security.
- Select LDAP authentication.
- For Select the type of LDAP server, select Remote LDAP server.
- For the LDAP server host, enter ldap.jumpcloud.com.
- For the LDAP security setting, select a security type such as ldap://(ldap+TLS).

- For the Base DN, enter the string displayed in JumpCloud under ORG DN in LDAP’s Details Tab.
This should look like the value: o=XXXXXXXXXXXXX,dc=jumpcloud,dc=com - For the Root DN, enter the string displayed in JumpCloud under Samba Service Account DN in JumpCloud’s LDAP Details Tab.
This should look like the value: uid=your.ldab.bind.userid,ou=Users,o=XXXXXXXXXX,dc=jumpcloud,dc=com - Enter the password for the SAMBA SERVICE ACCOUNT (the JumpCloud BindDN User LDAP password).
- For Users base DN and Group base DN, enter the same string:
ou=Users,o=XXXXXXXXX,dc=jumpcloud,dc=com
Where the o= value is the same from your earlier configurations from earlier. - Click Apply. The LDAP authentication options window will appear.
- Select LDAP users only: Only LDAP users can access the NAS via Microsoft Networking.
- Click Finish.
The NAS connects to the JumpCloud LDAP directory. The connection is established when the Status displays Online.
Verifying LDAP Users and User Groups
JumpCloud Users will be displayed in Users or Shared Folders under Domain Users.
JumpCloud User Groups will be displayed in User Groups under Domain Groups.