Connect


This tutorial outlines the steps required to establish domainless Windows file sharing for small teams who only need to grant access to a handful of end users. This configuration makes it possible to migrate away from Active Directory (AD) while maintaining established workflows by leveraging Integrated Windows Authentication and local groups. This approach reduces IT overhead and adds user convenience while delivering modern authentication solutions including Push MFA and conditional access.
Prerequisites
- Have a JumpCloud account
- Deploy agents on your server and workstations
- Workstations do not need to be Professional editions of Windows
- Add devices to JumpCloud and bind users to device
- Have a local file server
- Ensure that NTLM isn’t disabled
- Know your local user names
- File access outside of your network will not be possible without a VPN, just as when you use a file server with Active Directory.
In this setup, JumpCloud assumes the role of Active Directory by syncing accounts across devices. IT departments do not require any knowledge of user account passwords for this configuration, because JumpCloud provides the same credentials throughout every server resource. Windows NTLM authentication only requires that the same username and password reside on each file server, which is exactly what JumpCloud’s agent provides.
Next, JumpCloud pushes local group assignments and rights to each shared folder on the file server. This is made possible by the “Commands” role within Device Management. Every command requires a runner (superuser) and a target of either device group or individual devices. Commands includes a Results tab that will display any error messages.
PowerShell Commands to Establish Your Shares
New-LocalGroup -Name "FileShareUsers"
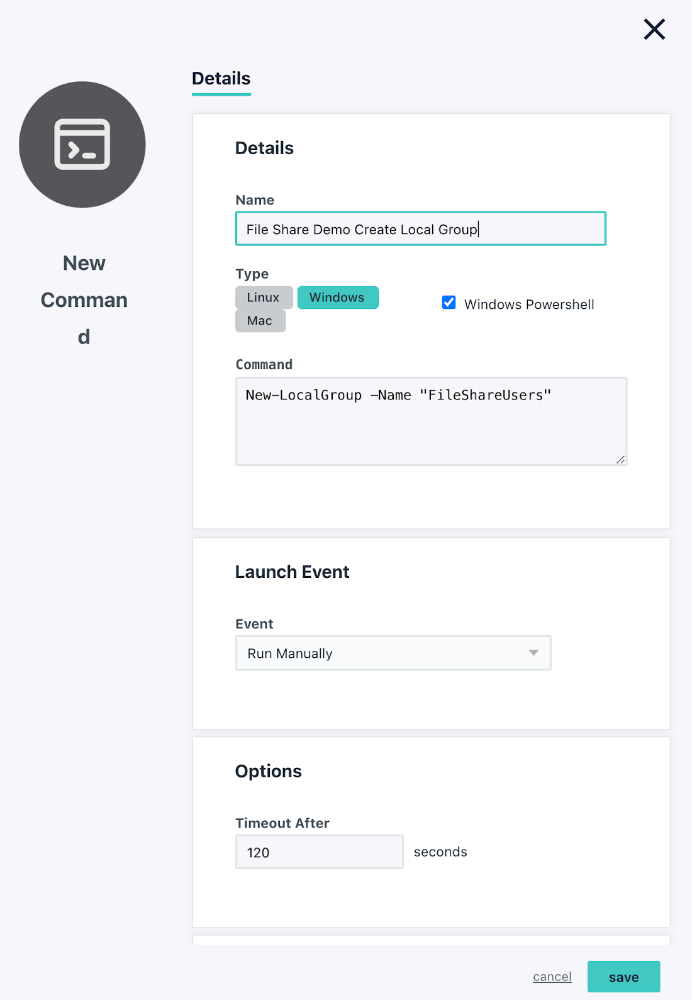
Please note that this command will not work if the Windows PowerShell checkbox isn’t selected.
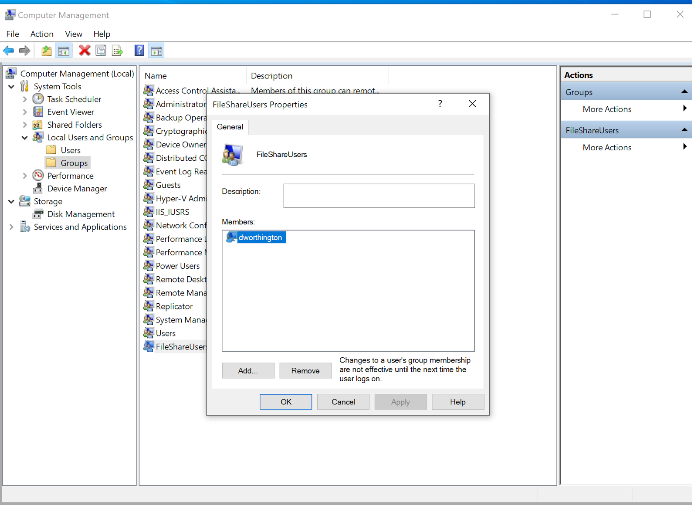
The result will be a local group created on your file server as seen below in the Computer Management interface.

The next step is to add members to the group so that they can collaborate.
- Add users to the local group: (after the user was created in JumpCloud)
Add-LocalGroupMember -Group “FileShareUsers” -Member "YOURNAME"
This step will have to be repeated on a per-user basis for the target Windows devices. You may alternatively create multiple lines within the same JumpCloud command by cutting and pasting, changing the user names, and targeting a Device Group to run this step only once.

Please note that this command will not work if the Windows PowerShell checkbox isn’t selected.
The image below illustrates the result in the Computer Management interface. You’ll notice that the user is now in the local group.
New-Item -Path "C:\MyFolder" -ItemType Directory
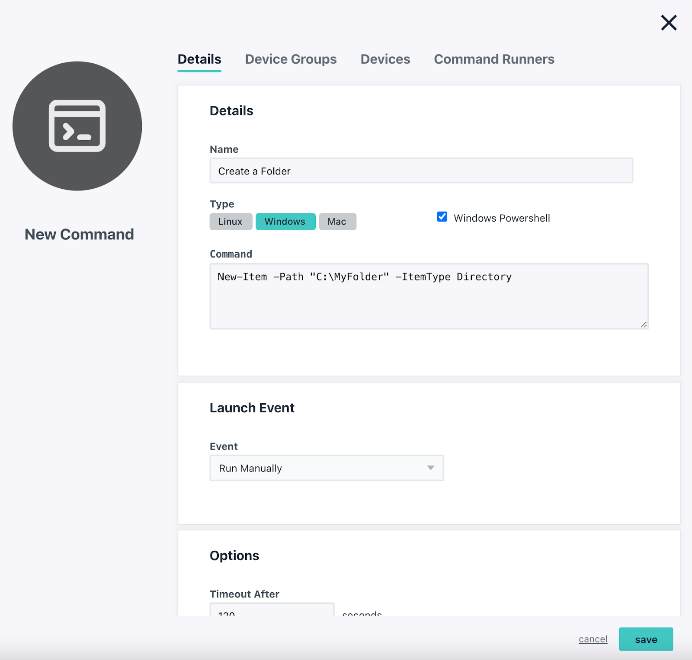
Please note that this command will not work if the Windows PowerShell checkbox isn’t selected.
There will now be a folder on your C:/ drive that you’ll designate as a shared directory in the next step.
- Create a share for this folder: (Note: We chose to use the same FileShareUsers group for this share and to give it FullAccess; the documentation shows how this can be changed.)
New-SmbShare -Name "MyFileShare" -Path "C:\MyFolder" -FullAccess "FileShareUsers"
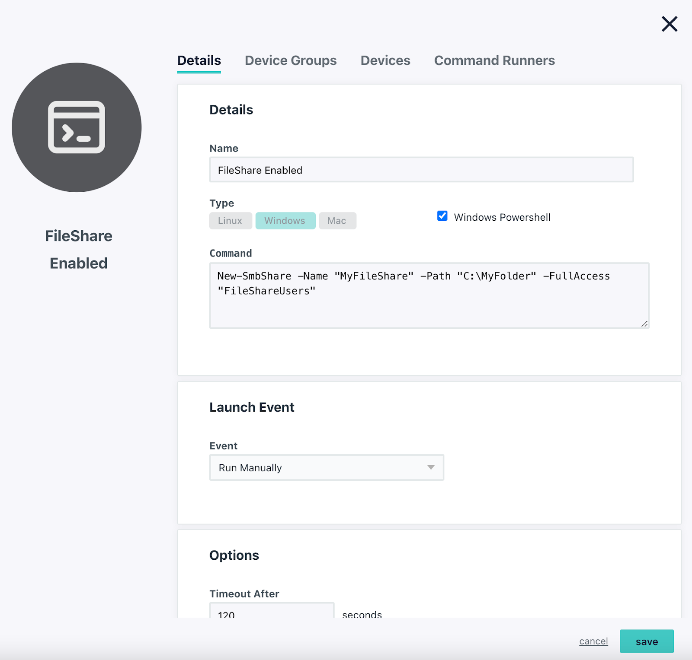
Please note that this command will not work if the Windows PowerShell checkbox isn’t selected.
Windows Advanced Sharing Settings
Next, you’re going to enable sharing for ‘MyFolder’. Right click the folder and select Advanced Sharing and add the group “FileShareUsers” to the folder with the appropriate permissions.
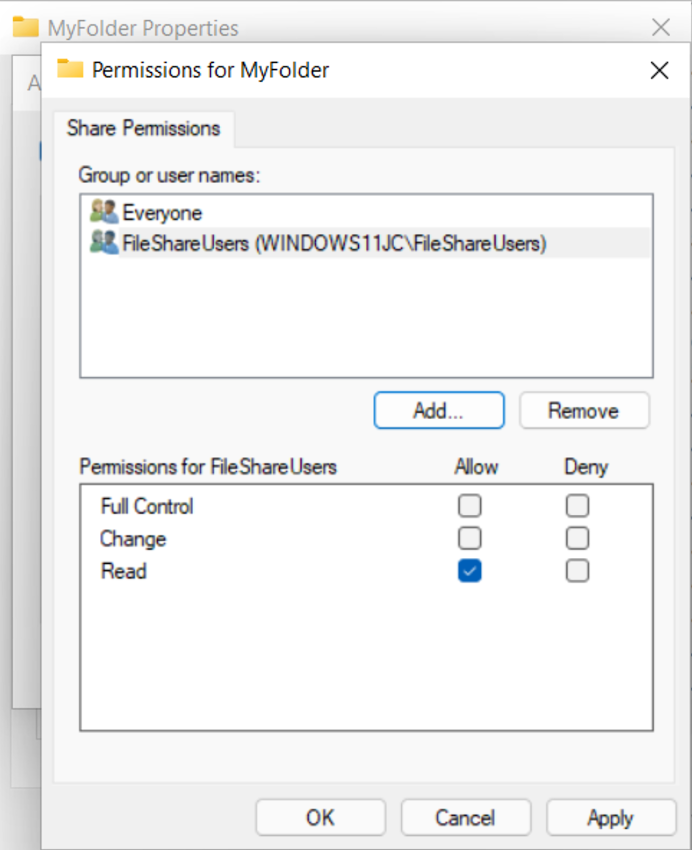
The local user group provides read-only access to the file share.
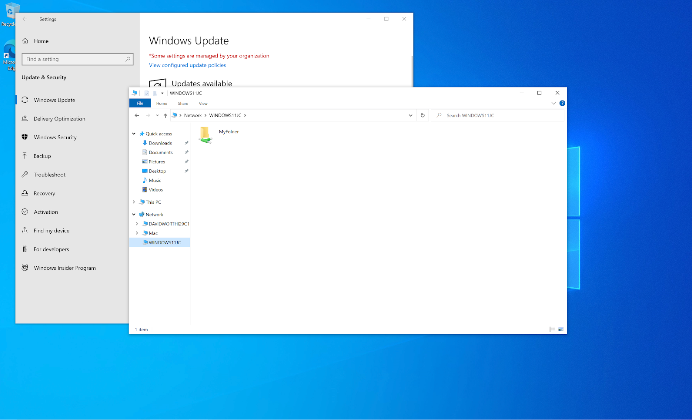
This is an example of what the shared folder will look like on other devices.
Your network file share is now established and can be accessed from other PCs within your organization that have the JumpCloud agent installed and drive mapped for sharing. However, we strongly advise optimizing your security before this workflow goes into production.
Before you get started, review the classification of data within your organization and follow a least privilege administrative model (Consider migrating sensitive data to secure cloud services)
Hardening NTLM
This step should be considered mandatory. NTLM is supported by Microsoft and is the fallback protocol suite when Kerberos isn’t available. It’s important to follow the hardening step below to to prevent downgrade attacks, and only use NTLMv2 responses. There are three categories of changes that you should work through prior to deploying domainless file sharing. They are:
- PowerShell Commands to help to mitigate some of the vulnerabilities that have been discovered by security researched and documented by Microsoft.
- Conditional access to secure access to your internal network resources
- Directory Insights to monitor access attempts for any irregularities
Legacy versions of Windows Server (pre Windows 2008) may encounter compatibility issues with these commands. Roll back to the previous configuration in the event you need to recover previous registry key values. Please refer to Microsoft’s documentation on NTLM before creating this workflow.
Harden NTLM Using PowerShell
These commands will be executed to remote outdated password handling mechanisms within Windows. Please do not skip this step and use EDR to prevent rogue files from entering your shares.
-Path 'HKLM:\SYSTEM\CurrentControlSet\Control\Lsa\' -Name 'LmCompatibilityLevel'

New-ItemProperty -Path 'HKLM:\SYSTEM\CurrentControlSet\Control\Lsa\' -Name 'LmCompatibilityLevel' -Value 5 -Force
You may also consider disabling WLAN for remote users only. Disabling this on PCs have use WLAN for their proxy configuration on a LAN could disrupt internet access.
HKLM\SYSTEM\CurrentControlSet\Services\WinHttpAutoProxySvc\Start
REG_DWORD4
Conditional Access
JumpCloud’s Device Trust limits which devices may access applications and other resources through SSL/TLS certificates. It’s fundamental to conditional access, which can further secure access to resources via geofencing and other measures such as requiring MFA. These features are included in the JumpCloud Platform Plus package. JumpCloud also provides policies to ensure that Windows updates are applied and not delayed, which helps to ensure that any high-priority security patches are delivered to your Windows endpoints.
Monitoring also helps to ensure that your configuration isn’t being misused.
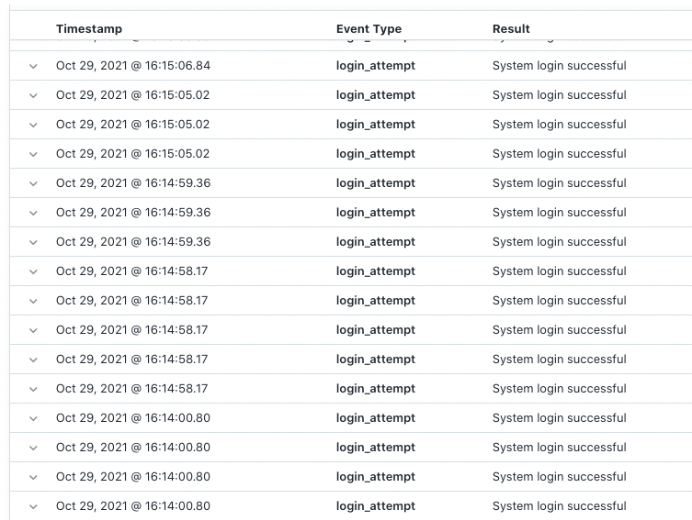
Directory Insights
JumpCloud is a standard feature that Directory Insights provides an audit trail of user logins so unauthorized attempts will be noticed and you’ll be alerted. Directory Insights is a component of the platform and has no additional cost to access.

IT Garage- Domainless File Sharing – jumpcloud-1
Try JumpCloud
Domainless Windows file sharing is possible with JumpCloud using Integrated Windows Authentication (IWA). JumpCloud is free for your first 10 devices and users with complimentary access to premium support 24x7x365 during the initial 10 days of your signup.
Special thanks to Idan Mashaal at Plus500