Connect


Contents
Key Takeaways
- RADIUS (Remote Authentication Dial-In User Service) is a centralized AAA protocol that enables secure authentication, authorization, and accounting for users and devices accessing networks, VPNs, and infrastructure equipment. Originally ratified as an IETF standard in 1997, RADIUS uses UDP port 1812 for authentication and UDP port 1813 for accounting, operating on a client-server model where Network Access Servers (NAS) send requests to RADIUS servers for credential verification.
- RADIUS eliminates the security risks of shared network credentials by enabling unique user authentication tied to core directory identities. Instead of using a single SSID and password across all employees, RADIUS integrates with directories like JumpCloud Directory Platform, Active Directory, or LDAP to authenticate individual users, allowing IT administrators to instantly revoke network access by removing a user from the directory rather than changing organization-wide credentials.
- Modern 802.1x authentication with RADIUS supports advanced security protocols including EAP-TLS, EAP-TTLS, and EAP-PEAP for wireless and wired network access. These protocols use encrypted TLS tunnels and digital certificates to prevent man-in-the-middle attacks, replacing outdated clear-text methods like PAP and providing enterprise-grade WiFi security with VLAN tagging capabilities for granular network segmentation.
- Cloud-based RADIUS solutions like JumpCloud’s Cloud RADIUS eliminate the complexity and infrastructure costs of traditional on-premises implementations. Unlike on-prem options such as FreeRADIUS, Microsoft NPS, or Cisco ISE—which require dedicated hardware, server licenses, technical expertise, and ongoing maintenance—cloud RADIUS is hosted and managed by the provider at $5/user/month, requiring only configuration of wireless access points and client devices.
- RADIUS provides critical visibility and control for hybrid and remote work environments where BYOD policies and distributed networks are standard. By centralizing authentication across multiple locations and network types, RADIUS enables IT teams to enforce consistent access policies, track user activity through accounting logs, and manage both employee devices and infrastructure equipment (routers, switches, firewalls) from a single authentication server.
What is RADIUS?
For a long time, the most common method used to connect users to workplace networks was via an SSID + shared password. This made more sense when the majority of employees were in a brick and mortar office every day, but even then, managing this on top of providing one-off VPN access to those who needed it, turned out to be more than most organizations bargained for. This method makes access management difficult and time-consuming, plus, it’s highly insecure, and networks are easily exploited.
On top of that, now that so many organizations offer hybrid or fully remote work options and the use of personal devices (or BYOD) in the office has skyrocketed, this manual network access provisioning strategy simply doesn’t make sense. Luckily, the RADIUS protocol exists, which simplifies network access for end-users and lessens the network access management load that IT takes on. This article explains the ins and outs of RADIUS, including what it is, how it works, the pros and cons, costs, and ideal RADIUS solutions.
What Is RADIUS Protocol? RADIUS, or Remote Authentication Dial-In User Service, is a widely used networking protocol that enables centralized authentication, authorization, and accounting (AAA) for users who access a remote network. It provides a secure and efficient way to manage access control and user authentication, allowing network administrators to control user access to resources based on policies and permissions.
The Core Details of RADIUS
RADIUS is an open-standard AAA protocol that uses UDP port 1645 or 1812 for authentication and UDP port 1646 or 1813 for accounting. The fundamentals for the RADIUS protocol are defined in its ratification as an Internet Engineering Task Force (IETF) accepted standard in 1997. To get into the nitty gritty of the RADIUS protocol, check out the RFC (Request for Comments), which essentially outlines the standard.
AAA stands for authentication, authorization, and accounting. Essentially, RADIUS is a protocol that determines whether or not a user can access a local or remote network (authentication), establishes what sort of privileges they’re allowed on that network (authorization), and then records the activity of the user while they’re connected to the network resource (accounting). The beauty of RADIUS is that it centralizes these AAA functions across networking infrastructure and locations.
Understanding RADIUS Use Cases
If you’re wondering why you should use the RADIUS protocol at all, consider this: You may have a myriad of networking and infrastructure devices, as well as networks that many users need to access and connect to, but you have no central authentication mechanism to enable access. That’s where the RADIUS protocol comes in.
RADIUS is used to connect core user identities stored in a directory — such as JumpCloud Directory Platform, Microsoft Active Directory (AD), OpenLDAP, or even on the RADIUS server itself — to networking infrastructure. This means that each of your users can access a network or VPN with their own unique login information, and operations personnel can access networking equipment such as routers, switches, firewalls, and more in a more controlled, secure manner.
By utilizing RADIUS, you essentially eliminate the practice of using a single set of credentials (for example, the SSID and passphrase for WiFi access points) for network access across all users in your organization. This strategy gives you full control over access to critical business IT infrastructure that you wouldn’t otherwise have. When it comes time to deprovision a departing employee’s access, removing the user from your core directory effectively eliminates their access to the network, VPN, and infrastructure equipment.
Utilizing RADIUS gives your network a security boost because you gain a more granular method of managing user access to network infrastructure. You can even take it a step further with VLAN tagging and utilizing RADIUS reply attributes to place each user into a section of the network as dictated by their department, unique privileges, or other attributes. On top of this, the simple act of eliminating a single user’s access whenever needed using RADIUS, rather than updating shared access credentials organization-wide saves IT a massive headache.
Now, let’s take a quick look at what components make up the RADIUS protocol.
RADIUS Components
RADIUS uses a client-server model, and its three primary components include the:
- Client/Supplicant: The device/user seeking access to a network.
- Network Access Server (NAS): The gateway between a user and a network.
- RADIUS Server: Authentication server that ensures the user is allowed to access the network with the proper permission levels. This server can also provide accounting functions for the purposes of billing, time tracking, and device/connection details.
Before diving into the intricacies of the RADIUS protocol and how its components work, it’s helpful to understand how the RADIUS protocol came to be. Check out this quick RADIUS history overview:
History of RADIUS
To best understand modern implementations of RADIUS, it’s important to have an idea of where the RADIUS protocol started and how it has changed over time.
In the late 1980s, a nonprofit by the name of Merit Networks, which had networked Michigan universities to one another with its MichNet network, won a contract to begin work on the National Science Foundation’s NSFNET project. NSFNET was a nationwide network that linked NSF-funded supercomputing centers together. It was meant to connect researchers, students, and resources regardless of location. Ultimately, you can think of NSFNET as a precursor to the internet we know today.
One of the requirements that the National Science Foundation set with respect to NSFNET was that there could be no proprietary dial-in servers — they had to be commercial. At this time, people used telephone lines and modems to dial-in to networks. However, Merit’s proprietary servers would not work given the stipulations put in place by the National Science Foundation. To get past this problem, Merit submitted a Request for Information (RFI) and was contacted about half a year later by Livingston Enterprises, in 1991.
Livingston’s proposal essentially described the first RADIUS-like server that allowed for remote authentication. Merit awarded the contract to Livingston, and Merit began installing Livingston “Portmaster” servers in its MichNet network. Essentially, this work enabled people from all over the state of Michigan to dial-in and remotely authenticate into the MichNet network, as well as connect to NSFNET.
Although RADIUS was proven to work for its intended purpose of remote authentication, there were some reservations about whether it was acceptable as a standard. But, as soon as RADIUS became available as an internet draft, it was widely adopted by Network Access Server (NAS) vendors. Then, due to demand for its AAA capabilities, RADIUS went on to become a ratified standard with the RADIUS RFC (Request for Comments) in 1997.
How Does RADIUS Work?
Now, let’s get a little deeper into those three primary components of the RADIUS protocol to understand exactly how it all works.

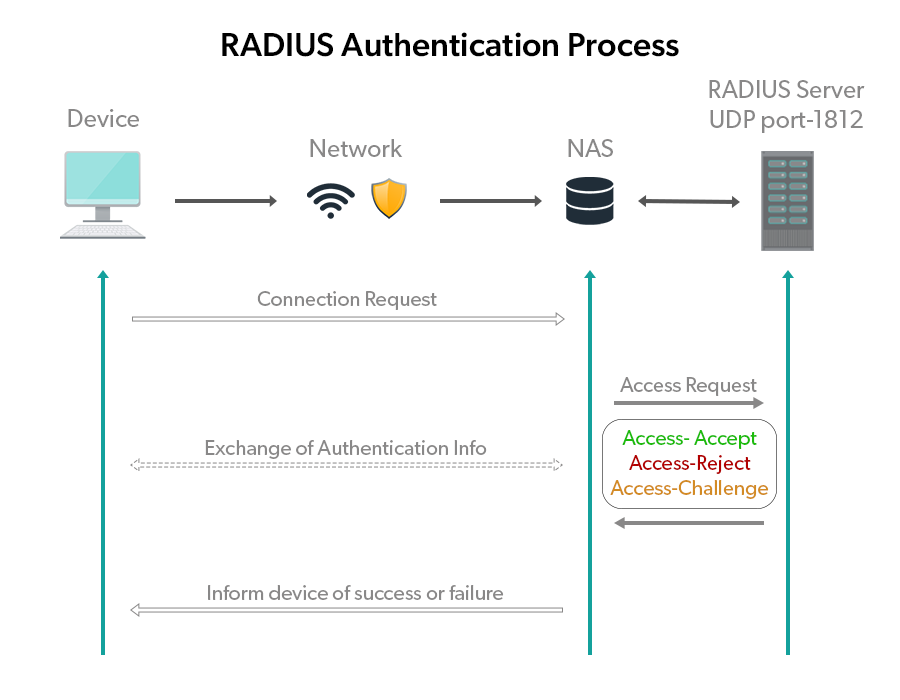
- Supplicant: The supplicant is generally software built-in or installed ad hoc on a user’s operating system that passes information about a user (username, password, etc.) to a second component, the network access server (NAS), along with an Access-Request query. An Access-Request query is just that, a request for access from a client to a server to utilize a resource like a network.
- Network Access Server: In the client/server architecture, the NAS acts as the client. NAS devices can be switches, routers, VPNs, or wireless access points (WAPs), among other things. The client/supplicant asks the server to determine if a user is allowed access to a particular resource — also called authentication.
- RADIUS server: The RADIUS server waits for requests from NAS devices. The benefit of RADIUS is that no matter what type of NAS you’re trying to connect to, the RADIUS server centralizes authentication and simplifies the process.
Once the server receives the access request, it either verifies the user’s identity via an onboard user database or delegates the information to an identity provider.
If the match is made, then the server accepts the user by sending an Access-Accept message back to the NAS. If the match is not made, the user is rejected through an Access-Reject message. At the end of the transaction, the NAS issues accounting data to the RADIUS server which documents the transaction and allows for the storage or forwarding of transactional data.
Example of RADIUS Used in an Office:
After selecting the network you’re attempting to connect to for the first time, you input your credentials (which are subsequently saved so you don’t need to input them every time you log on to the network).
On the back end, an Access-Request to the NAS is sent (most likely a wireless access point or WAP). The NAS then sends that information to the RADIUS server. RADIUS servers have the ability to store user and password information themselves, or the server can check with a database or directory.
If the information you’ve provided is correct, the RADIUS server sends the NAS an Access-Accept response along with any sort of parameters or restrictions regarding what you can utilize on that network.
Underlying RADIUS Mechanisms
Now, let’s get into the behind-the-scenes part of the RADIUS protocol to see how this is possible.
Step 1: Creating a Connection
Of the different types of protocols (Telnet, rLogin, PPP, SLIP, etc.) that a RADIUS server can authenticate users to, PPP is used most often for the types of use cases we most readily recognize — authenticating a user onto a network via their credentials. Specifically, PPP, or Point-to-Point Protocol, is a framework for establishing a direct connection between two nodes — such as a supplicant (i.e. the end-user) and the NAS.
Regarding communication from the NAS to the RADIUS server, every communication between the two is authenticated via a shared secret. The shared secret is a password that is exchanged between the NAS and RADIUS server; it happens invisibly and end-users never see it happen.
Step 2: Data Transmission
In the client-server model, there is something called a transport layer. In the transport layer, data gets bundled into packets. Those packets include information like request types, usernames, passwords, and more. Transport can happen over both the UDP and TCP protocols. For reference, you may be familiar with the acronym TCP/IP as it is the most widely used transport protocol on the internet. RADIUS by default uses an alternative transport protocol: UDP.
The differences between TCP and UDP explain why UDP was chosen. Essentially, UDP has a much lower transmission overhead. TCP is always checking to ensure that data sent has in fact been received. If it has, it is notified. That’s more overhead. Plus, it aggressively resends data to ensure that it gets through. All these moving parts contribute to network congestion, which was a major concern for the low-bandwidth networks of the early 90s. In the case of RADIUS, it is up to the RADIUS server to ensure that the transmission was a success, not the transmission protocol.
Essentially, a chain of events occurs when an end-user inputs their information into their network settings. That process is shown in the following authentication workflow graphic (with CHAP authentication used).
Authentication Protocols
Basically, in order to receive an Access-Accept packet from the RADIUS server (which means that the end-user’s device can access the network), you need to enter the correct information as defined by the authentication protocol that has been put in place to protect the network.
For late 90s RADIUS implementations, that could mean a few different protocols that worked with the Point-to-Point Protocol: PAP and CHAP. Though a bit outdated, it’s important to be aware of the initial authentication protocols in order to fully understand how modern RADIUS works.
What is PAP?
PAP stands for Password Authentication Protocol. PAP, on the end-user side, works as we all readily understand. For example: First, the user inputs a username and password. That information is provided by the user to the client who then sends it from the NAS to the RADIUS server.
Unfortunately, PAP is terribly insecure because it sends both the username and password in plaintext, meaning that anybody who has the ability to intercept packets between the NAS and RADIUS server would be able to discern the username and password easily.
What is CHAP?
As an alternative to PAP, we have CHAP or Challenge Handshake Authentication Protocol. It is a more secure method of authentication than PAP (although it isn’t hard to be more secure than a clear-text password communication). CHAP eliminates the process of sending clear-text passwords and instead utilizes encryption to mask the information being transferred.
How it works: After the user inputs their password, their supplicant will combine that password with a random string of numbers (challenge) that it received from the NAS. It then runs that combination (password and random string) through something called an MD5 hash. This basically scrambles the two together and makes them unintelligible. This is called the response.
The RADIUS server receives the username, challenge, and response and looks up the password that corresponds with the username. It combines the challenge with the password in its database and hashes it. It then compares the result to see if it matches the response received. If so, the user is allowed access to the network.
The problem is, the RADIUS server needs for the password to be stored in plaintext in order to properly hash it so that it can get a result that it can accurately compare to the responses it receives. That’s a problem. Should your RADIUS server be compromised, every user’s password would be in plaintext and easy to steal. That’s why more advanced authentication protocols have since been conceived.
How Does 802.1x Authentication Work with RADIUS?
We know that RADIUS was first designed to work with dial-in networks, but nowadays the majority of users are connecting their systems to networks via ethernet cables to a Local Area Network (LAN) or WLAN (Wireless Local Area Network/ WiFi). These connections follow the standards as prescribed by the IEEE 802.1x RFCs.
802.1x authentication basically sets the parameters for devices and outlines three distinct components (this will look familiar):
- Supplicant: Again, the software on a client device that provides a user’s credentials.
- Authenticator: Network devices that enable a client to access a network resource. Can be a wireless access point or ethernet switch.
- Authentication Server: A RADIUS server is most commonly used for 802.1x authentication, though it is not required.
Similarities to the Past
802.1x uses the Extensible Authentication Protocol (EAP) framework for moving authentication packets between two components. EAP can leverage many more authentication protocols than PAP or CHAP. This includes protocols such as EAP-TLS, EAP-TTLS, and EAP-PEAP, among others. The key here is that EAP is not a protocol itself; it is a framework for establishing a request/response pattern. It is extremely flexible, which is why you see the acronyms TTLS, TLS, and PEAP attached to it.
But, before we get into those authentication methods, let’s take a quick look at how the data moves between the different components in 802.1x authentication.
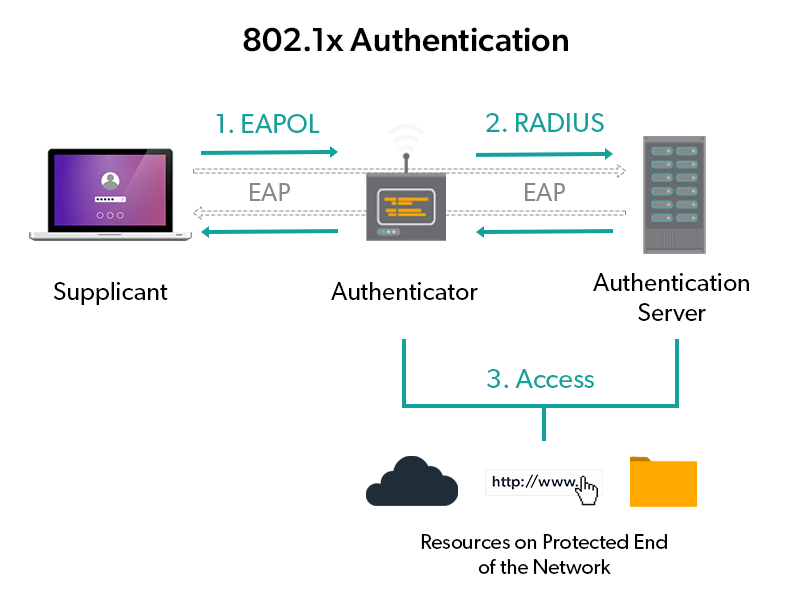
Instead of having to initiate a PPP connection to a modem to dial out to another modem, the supplicant in this case creates an EAPOL or Extensible Authentication Protocol Over LAN connection. Notice in the example above that this is not a physical connection between LAN cables; instead this is demonstrating a WiFi connection, but it could be a wired connection as well.
Now, in place of the NAS server, you see something called an authenticator. The authenticator simply acts as the doorman to the internet or other LAN resources for wired connections. The authenticator could be a switch, and for wireless connections it could be a wireless access point. The RADIUS server is in the same position — it performs the same function, except it utilizes stronger authentication protocols.
EAP-TLS
For wireless networks, protocols like EAP-TLS, which stands for Extensible Authentication Protocol – Transport Layer Security, can be very helpful. With physical connections, security is built-in. Bad actors have to physically connect to a switch or another piece of networking infrastructure in order to get on the network.
However, with wireless connections, bad actors can launch man-in-the-middle attacks that intercept valuable information between two users who think they’re engaged in secure communication. This works by tricking users into thinking they’re connecting to trusted resources, but they’re actually connecting to bad actors.
In order to prevent man-in-the-middle attacks, digital certificates, called CA (certified authority) certificates, are used to authenticate users. There are no passwords exchanged. In the case of EAP-TLS, both parties exchange a certificate in order to authenticate to each other. That way, each party is aware of who and what they’re connecting to. One significant challenge as it relates to EAP-TLS is that it requires a lot of manual configuration in order to make it work. That has resulted in other protocols like EAP-TTLS and EAP-PEAP being used in place of it because they only require the client to authenticate to the server.
EAP-TTLS
By now, you may remember what EAP stands for, but what about the extra “T” in TTLS? Well, that stands for tunneled. EAP-TTLS, like EAP-TLS, utilizes the transport layer security protocol, but TTLS only uses a certificate to authenticate to the server. The server does not authenticate to the client via a CA certificate. Instead, in order to achieve authentication with the client, a TLS tunnel is negotiated between the server and client.
A TLS tunnel is encrypted, so all data that travels between the two points is encrypted too. Once the RADIUS server receives the information from the client, it unencrypts it and verifies the user is in fact able to access the requested resources. If the user is verified, then they can access the requested resource. EAP-TTLS is not as robust from a security perspective as EAP-TLS, but it requires far less configuration.
EAP-PEAP
PEAP stands for Protected Extensible Authentication Protocol. Like EAP-TTLS, it utilizes an encrypted TLS tunnel to send information between the components. As previously noted, PEAP is like TTLS in that it utilizes a certificate to authenticate the client to the server, but the server does not authenticate to the client.
One of the biggest reasons for the usage of EAP-PEAP is that it can be used with a lot of legacy authentication protocols, so it is able to help modernize IT environments that contain older infrastructure.
While it’s clear that different components within the RADIUS protocol have their pros and cons, it’s also integral to understand the general pros and cons of RADIUS itself.
What Are the Pros and Cons of RADIUS Authentication?
Like all other technologies, there are pros and cons of RADIUS authentication that you’ll experience at varying levels depending on your organization’s size, existing infrastructure, and available resources.
Here’s a brief list of those pros and cons:
Advantages of the RADIUS Protocol
- Increased network security and control.
- Learn more in How Does RADIUS Improve WiFi Security?
- Simplified password management.
- Centralized point for user and device authentication.
- Ideal tool for large networks that are managed by multiple IT personnel.
- Reduction in manual IT labor.
- Modern cloud and hosted RADIUS options exist for cloud-forward organizations.
Disadvantages of the RADIUS Protocol
- Traditionally implemented on-prem, but many modern IT environments don’t fit this model.
- Setting up a RADIUS server can be difficult and time consuming.
- Configuration options are widespread, making setup complicated.
- The spread of options for implementing RADIUS can feel overwhelming and confusing.
The benefits of RADIUS are long-lasting and worth it, especially in a digital world where proper security measures are paramount. Plus, depending on how your infrastructure is set up and the RADIUS implementation option you choose to adopt, you can avoid some of the pitfalls that sometimes come along with the protocol. On-prem IT environments and an on-prem RADIUS solution tend to have more disadvantages than cloud-based IT environments with cloud-based RADIUS. Let’s dive into why that is.
On-Prem vs. Cloud RADIUS
Not all RADIUS implementations were created equal — some work well with on-prem infrastructure, while others have evolved to work well with cloud infrastructure or a mix of both cloud and on-prem.
The Roots of RADIUS are On-Prem
RADIUS has historically been an on-prem implementation that effectively required existing on-prem identity and access management (IAM) infrastructure to operate (e.g., directory server, RADIUS server, routers, switches, load balancers, etc.). However, this setup can be difficult and costly to achieve.
In the past, on-prem identity management infrastructure was largely focused on Microsoft Windows, with Active Directory acting as the core identity provider. To be fair, AD does offer its own ancillary RADIUS functionality (in the form of another server called Windows Server NPS – Network Policy Server).
However, as the modern IT landscape continues to diversify, many IT organizations are moving away from implementing AD on-prem due to its numerous limitations in cross-platform and hybrid-cloud environments — especially now that remote work is so popular.
In fact, many IT organizations are shifting their entire on-prem identity management infrastructure to the cloud with a cloud-based directory in place of AD. This approach comes with a variety of benefits such as increased agility and reduced costs, but without anything on-prem.
Modern RADIUS is Cloud-Based
RADIUS in the cloud is a concept that is linked to the implementation of a cloud directory. Instead of using AD, hosting everything on-prem, and struggling to manage anything cloud-based, most organizations are becoming more cloud-forward. This means that by adopting a cloud directory solution with Cloud RADIUS capabilities, you can enjoy all of the benefits of RADIUS without the hassle of building, maintaining, or monitoring physical servers.
To use a managed solution like this, IT admins simply point their networking infrastructure (e.g. VPNs, WiFi access points, etc.) to the cloud RADIUS endpoints for authentication. The best part? The RADIUS servers are managed by the third-party provider rather than implemented and managed by you, which takes a huge load off of IT.
What IT admins do need to figure out is if the directory they’re using is compatible with the service they are aiming to utilize, the types of authentication methods their systems leverage, and whether or not their networking devices (WAPs, switches) are up to snuff. Thankfully, that’s a lesser task compared to actually setting up a RADIUS server from scratch. Plus, when it comes to authentication protocols, if your fleet consists of up-to-date machines, it is likely that this issue will be a non-factor.
Best RADIUS Solutions
Let’s compare the most popular cloud-based and on-prem RADIUS solutions out there.
Cloud-Based RADIUS Solutions:
- JumpCloud
With JumpCloud’s Cloud RADIUS feature, you don’t have to worry about the complicated setup or technical workload that comes with standing up a traditional RADIUS instance. This cloud-based RADIUS solution is set up and hosted by JumpCloud, and you get to use it without any of the headache that comes with outdated on-prem RADIUS models.
Using JumpCloud’s Cloud RADIUS feature, you know up front that the directory and RADIUS implementation work beautifully together, because they were built to work together effortlessly.
The only requirements for IT using JumpCloud’s RADIUS solution are: The admin must configure the hosted RADIUS server from within the JumpCloud platform. Then, the admin needs to configure the wireless access points. After that, it’s time to configure each client (or laptop/desktop), and you’re done! JumpCloud’s modern RADIUS solution is simplified and straightforward compared to the other implementation options out there.
- FreeRADIUS
FreeRADIUS is the most widely used RADIUS server today. It exists as open source software — anybody can download it and install it on their machine, whether that’s a desktop machine or an outright server. But, in order to install FreeRADIUS, you need to run an operating system like Ubuntu, a Debian-based OS, CentOS, RedHat, or macOS. Or, you can simply buy a FreeRADIUS server from NetworkRADIUS, an offshoot of FreeRADIUS.
Contrary to its name, because of the need for hardware, FreeRADIUS is not exactly a free implementation. On top of that, there is no FreeRADIUS GUI, meaning that everything happens on the command line. Due to this, you either need to get familiar with the command line, or you need to leverage a cloud RADIUS solution, Microsoft NPS, or add on an additional program to manage your FreeRADIUS implementation, which of course increases complexity.
FreeRADIUS is technical in nature, but with deep technical know-how, you can get a FreeRADIUS server set up. However, you will need to constantly document everything that you’re doing to ensure that you can fix things when they break. All told, FreeRADIUS is an excellent open source option for taking advantage of the RADIUS protocol if you are willing to do all of the heavy lifting required.
That means purchasing all of the equipment and infrastructure necessary, setting up the software, and configuring all the users to authenticate to your network via RADIUS. Although it doesn’t cost anything for the software alone, the costs quickly rise depending on whether you build your server or purchase it outright, as well as the capabilities that it needs to have.
On-Prem RADIUS Solutions:
- Microsoft NPS
The first on-prem RADIUS implementation we want to mention is Microsoft’s Network Policy Server (NPS), which is a set of features within Windows Server that allows for the same AAA functionality of the RADIUS protocol. The primary stipulation of NPS is that you use Active Directory as your core directory and that NPS is linked to it. If you do choose to go this route, you’re going to be tied to Microsoft, and this endeavor forces you to remain on-prem, limiting your ability to shift core infrastructure to the cloud.
Plus, if you’re new to RADIUS and don’t have much experience with the command line, Microsoft Network Policy can be a major boon to you. One of the reasons is that Microsoft Server utilizes a fleshed-out GUI. In that same vein, for much of the functionality that you need to set up, you will find that Microsoft has provided a wizard, AKA a to-do list, to help you get your NPS server set up correctly.
Ultimately, if you’re looking to manage a homogenous Windows environment, this can be a great option. But you need to make sure you consider your environment and the risks inherent to vendor lock-in.
- Cisco ISE
Cisco Identity Services Engine (ISE) is like NPS in that it is a closed-source platform that makes use of the RADIUS protocol for its AAA capabilities. Cisco ISE is much more aimed at providing compliance and actively monitoring network environments to ensure they’re safe — RADIUS is simply the mechanism by which authentication, authorization, and accounting occurs.
Pros of this system include wide visibility into your network environment. You will be able to see everybody and every device that enters your network. Cons include the fact that whatever you install the ISE software on will then become a dedicated ISE machine. Unlike JumpCloud, FreeRADIUS and Microsoft NPS, where the software runs on a server in the background, your Cisco appliance will be dedicated to one task: network policy management.
Learn more about RADIUS options in Best RADIUS Solutions and FreeRADIUS vs Cisco ISE.
Cost of RADIUS
How much RADIUS costs depends on a variety of factors such as: whether you choose a cloud-based or on-prem RADIUS implementation, what infrastructure and hardware you already have, and how you choose to manage it. While the costs of cloud-based services are relatively easy to calculate, the costs associated with additional equipment and the level of effort you need to set it up are highly variable and should be vetted based on your current situation.
Here’s some pricing information for each RADIUS option listed above:
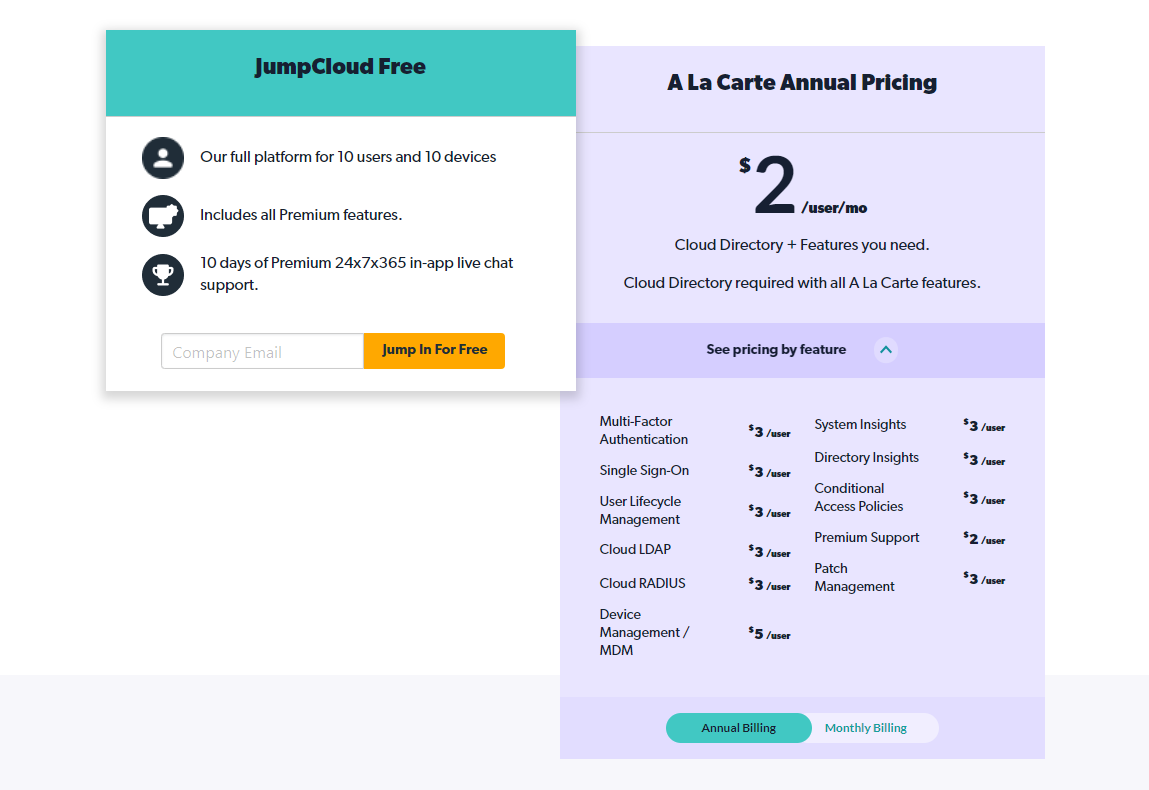
JumpCloud
- $5/user/month for the base directory and Cloud RADIUS capabilities.
Hosted RADIUS solutions often cost less because they require no significant upfront investment in the form of servers, software licenses, labor costs, or the bevy of infrastructure needed. The servers are already paid for, deployed, and configured, so admins simply reap the benefits. These lessened costs are a substantial benefit of using JumpCloud’s Cloud RADIUS solution in your organization.
Furthermore, with JumpCloud, IT admins don’t need to become RADIUS experts (or pay them) to utilize the security benefits that RADIUS offers. You need to figure out which RADIUS server instantiation to use, if you have the budget for it, or where the thing will actually be placed in your datacenter along with the networking gear and infrastructure associated with that setup.
FreeRADIUS
Base Cost:
- $0 for FreeRADIUS itself.
Other Costs to Factor in:
- $x for hardware.
- $x for virtual servers that host the software (plus service contracts in some cases).
- $x for hiring someone to set up and maintain servers.
- $x need for failover/redundancy.
Though FreeRADIUS itself is free, you’ll need to have some sort of hardware to install the software on, and depending on your needs, that can get quite expensive. In terms of cost, you also need to factor in network/infrastructure components, electricity, and the price of having somebody actually set the server up. Additional considerations have to do with space and the noise that these servers can make. For smaller companies especially — this can be prohibitive.
Microsoft NPS
Base Cost:
- $x for a subscription to license servers.
Other Costs to Factor in:
- $x for hardware.
- $x for hiring someone to set up and maintain servers.
- $x need for failover/redundancy.
With Microsoft NPS, you’ll need a server license and a decent server to set it up on, data center space, networking components, load balancing, security processes, and high availability to ensure that your setup works now and in the future. This is often a costly endeavor. Plus, Microsoft products often have a forced end of life (EOL), so even if your software and hardware are working well, Microsoft can stop supporting the software, essentially leaving you open to security vulnerabilities and forcing you to upgrade, costing you more money.
Cisco ISE
Regarding Cisco ISE, there are a number of paths you can take to purchase this solution; you can buy the software license by itself, or you can buy pre-built servers from Cisco (called the Cisco ISE 3300 Series appliance) or other vendors with the software pre-installed. It should also be noted that you can install the ISE software on a VMware server like the ESXi. Because of this, it is very difficult to provide an accurate price range or prerequisites.
That being said, these servers can be prohibitively expensive for the majority of SMBs out there, which is most likely why options like JumpCloud and FreeRADIUS are so popular.
Pricing That Works for You
Your RADIUS decision needs to be aligned with your organization’s needs and budget — every option comes at a cost whether it’s clear up front or not. Consider your infrastructure, if you want to become more cloud-forward, how much technical know-how you have, and how much time and money you want to put into maintaining RADIUS servers among other things, prior to making your decision.
Why JumpCloud RADIUS
Out of the options available, the most modern and cost-effective RADIUS implementation is part of JumpCloud’s Directory Platform. Not only do you get all of the benefits of Cloud RADIUS with none of the traditional hassle, but you also get an entire identity and access management (IAM) solution, all tied together perfectly.
If you’re weighing your options and stressing about potentially needing to implement Active Directory, JumpCloud also serves as a comprehensive cloud-based AD alternative. What this means for you is that there is no need to set up or commit to AD and NPS — you can enjoy RADIUS, plus much more, with JumpCloud as your core directory. The JumpCloud platform is the first cloud-based directory platform to take a cross-platform, vendor-neutral, protocol-driven approach to managing modern IT networks — whether they are remote or on-prem.
By implementing JumpCloud, IT teams can securely manage and connect users to their systems, applications, files, and – specifically as it relates to this topic – networks via RADIUS regardless of platform, protocol, provider, and location. In doing so, administrators are free to leverage the best IT resources for their organization with the peace of mind that comes from knowing they can effectively manage the entire network using hosted cloud-based RADIUS.
Try Cloud RADIUS Free
Test out the Cloud RADIUS feature through a free trial of the JumpCloud Directory Platform.