
Connect


Editor’s note: this article is intended to provide general direction on how one might manage user passwords on a Linux device and does not suggest the means by which JumpCloud handles these types of administrative and security tasks. For more information about how JumpCloud helps IT admins manage passwords across any operating system, check out this Help Center article.
Using a password with an associated user account is the primary method of authentication in Linux and most UNIX systems. It’s one of the few authentication methods supported by the SSH protocol besides public key authentication, which requires admins to create a key pair (public and private key) to authenticate a user with a remote system.
However, unlike public key authentication, passwords are prone to breaches such as brute force attacks that can be executed using automated scripts. Passwords can also be forgotten which means that users get locked out of the system. Weak and easily guessable passwords such as “Password123” can also present a security risk, and are often a consequence of password fatigue.
Password management is, therefore, one of the top-of-mind tasks that any system administrator should carry out. This tutorial sheds light on some of the ways you can manage passwords on a Linux system.
Manage Passwords Using the passwd Command
One of the commands used in managing passwords is the Linux passwd command. The command can be used to perform a wide range of password management operations. Let’s have a glance at some of the operations you can carry out using the passwd command.
Create or Change User Passwords
On Debian/Ubuntu systems, the adduser command walks you through the creation of a new login user. It allows you to specify the username and password, alongside other details. For some Linux flavors such as CentOS, RHEL, and Fedora, you need to invoke the passwd command to specify the user’s password.
The syntax for creating or changing a password takes the following format:
# passwd username
If you are logged in as a sudo user, you need to invoke sudo before the command as follows:
$ sudo passwd username
Suppose you have a user called jack. To change the user’s password simply execute the command:
$ sudo passwd jack

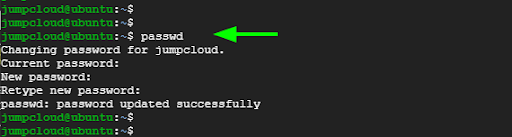
You can also change your own password by simply running the command without any arguments.
$ passwd
Lock a User’s Account or Password
Picture a situation where you have an employee who has been offboarded and you are required to deactivate their account. The best approach to take is to lock the account or deactivate the password. This prevents the user from accessing or logging into their account.
To deactivate the password or lock the account, use the -l option as follows:
# passwd -l username
For instance, to lock Jack’s account and prevent him from logging in, execute the command:
$ sudo passwd -l jack

Unlock a User’s Account or Password
This is the exact opposite of locking a user’s account. To unlock an account, pass the -u option as follows:
# passwd -u username
To unlock Jack’s account run the command:
$ sudo passwd -u jack

Configure a User’s Password Expiry
A security practice often recommended is the regular rotation of users’ passwords. The primary reason for doing so is to avoid account compromise, and ensure that only authorized users are the ones using credentials to log in. While NIST no longer recommends rotating passwords, many organizations still are required by their security policies.It’s generally recommended that you update your password once a month.
You can enforce an immediate expiry of a user’s password using the -e option. This allows them to set a stronger password from their end.
# sudo passwd -e username
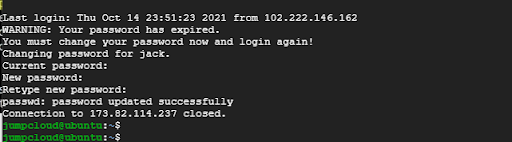
For example, to expire Jack’s password immediately and allow him to change his password run the command:
$ sudo passwd -e jack
The next time Jack tries to log in via SSH, he will be required to reset or change his password.
Enforce Password Change After Max Number of Days
To ensure that users regularly update their passwords, you can enforce a password change after a maximum number of days (MAX_DAYS) using the -x option.
In the following example, Jack’s password is only valid after 90 days, after which he will be compelled to set a new password.
$ sudo passwd -x 90 jack

Set the Minimum Number of Days Before a Password Expires
Additionally, you can set the minimum number of days (MIN_DAYS) using the -n option. This is the minimum number of days before a user can change their password. Enforcing a minimum password age discourages users from reusing old passwords, which is a bad security practice.
Here, Jack can only change the password after every 90 days and not earlier than that.
$ sudo passwd -n 90 jack
Additionally, you can set the minimum number of days before a user gets notified about an impending expiry of their password. The -w option helps you to accomplish this.
In the example below, Jack will start to receive a warning about his password expiry from day 7 prior to the actual date of the password expiry date.
$ sudo passwd -w 7 jack

Disable an Account Based on Password Expiry
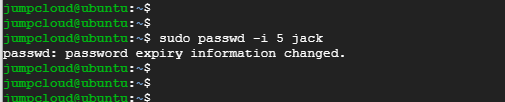
Using the -i option, you can set the number of days after the password expiry before the user account is disabled.
In the following example, Jack’s account will be disabled after 5 days of the password expiry if he doesn’t change his password.
$ sudo passwd -i 5 jack
Display Information About Password Expiration
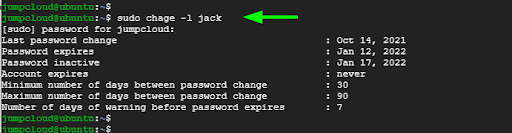
To display information about password expiration and aging use the chage command with the -l option.
$ sudo chage -l jack
How to Enforce Strong Passwords Using the PAM Module
So far, we’ve presented the various ways you can manage users’ passwords using the passwd and chage commands. However, these password management tools do not address the issue of weak passwords — a glaring security risk that can comprise your system.
Characteristics of a Strong Password
When setting a strong password, key aspects to consider include the password length and types of characters used.
Common attributes of a robust and secure password include:
- A minimum password length of 14 characters (the more the better, especially for privileged accounts).
- A mix of both uppercase, lowercase, numerical, and special characters.
A password is considered weak if:
- It comprises the username of the user.
- It is too short (less than 10 characters).
- It has a name that is included in the dictionary, such as elephant, airplane, lightning, solace, etc. This also includes dictionary names with numbers and symbols replacing certain letters in a more obvious way, for example, “Str1k3” or “Aeropl@n3.”
- It includes a series of keyboard characters spelled normally or backward. For example, “qwerty” or “poiuyt.”
- It comprises personally identifiable information (PII) such as birth dates, driver’s license number, Social Security number, etc.
As mentioned earlier, weak user passwords can put your system at risk of a cyberattack. Strong user password enforcement will go a long way in making it harder for nefarious parties to breach your system.
What Is the PAM Module?
PAM, short for pluggable authentication modules, is a suite of libraries that sits between applications and the native Linux authentication mechanism. It’s the core of user authentication for modern Linux distributions. It provides a centralized way of selecting authentication methods for applications by leveraging configuration files.
How to Use PAM to Enforce User Password Complexity
In modern Linux systems such as Debian, CentOS, and Fedora, PAM comes enabled by default.
On Debian/Ubuntu you need to install an additional module known as libpam-cracklib. To achieve this, run the command:
$ sudo apt install libpam-cracklib

Password policies are specified in the common-password configuration file. But before you make any changes to the file, back it up so you can roll back the changes made should something go wrong.
In our case, we’ve made an extra copy of the file and named it common-password.bak.
$ sudo cp /etc/pam.d/common-password /etc/pam.d/common-password.bak
Using your preferred text editor, open the common-password configuration file.
$ sudo nano /etc/pam.d/common-password
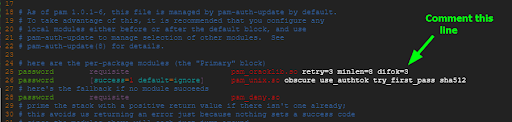
Locate and uncomment the following line:
password requisite pam_cracklib.so retry=3 minlen=8 difok=3
Next, define your password policy by adding the line shown. This spells out the conditions to be met when creating new user passwords.
password required pam_cracklib.so try_first_pass retry=3 minlen=14 lcredit=1 ucredit=1 dcredit=2 ocredit=1 difok=2 reject_username
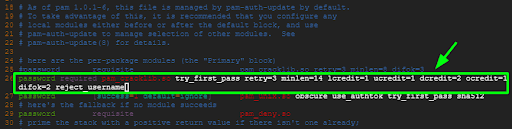
Let’s break down the line and see what each option represents:
retry=3: This is the maximum number of retries allowed when changing a user’s password. The default is usually 1.
minlen=14: This is the minimum acceptable number of characters for a new password.
lcredit=1: The option sets the minimum number of lowercase characters that a password should have to one.
ucredit=1: This sets the minimum number of uppercase characters in a password to at least one.
dcredit=1: The option sets the minimum number of numeric characters or digits in a password to one.
ocredit=1: The option sets the minimum number of special symbols e.g., !, @.$,# etc. in a password to at least one.
difok=2:This sets the minimum number of characters in the new password that must be different from the old password to two.
reject_username: This prevents users from including their usernames in a password.
As stipulated in the password policy, users would have to set a new password with a minimum length of 14 characters, and the password should include one uppercase, lowercase, numeric, and special character. Further, the new password should not include the users’ usernames.
Verifying the Password Complexity
To test drive our password policy, try changing your current password to a new weak password or one which is not compliant with the newly set policy.
The output shown below points out failed attempts at setting a new password which does not meet the minimum requirements laid out by the new password policy.
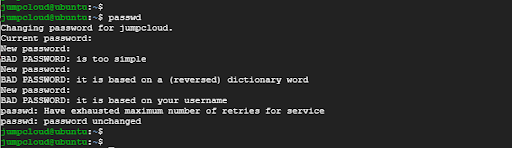
As you can see, you will be unable to set a new password unless you fully comply with the newly configured password policy. This is an ideal way of ensuring that users only set strong passwords which make it more difficult for hackers to breach the system.
And there you go! You have successfully enforced the use of robust and secure passwords using the PAM library suite.
What More Can You Do?
To further mitigate break-ins to your servers using brute force attacks, here are some of the extra steps you can take to bolster password authentication with an extra layer of security.
- Install and Configure Fail2ban
Fail2ban is an open source intrusion detection application that safeguards your Linux machines from brute force attacks. It works by blocking IP addresses after a certain number of password failures which is typical of brute force attacks. It monitors authentication logs and picks out many signs of malicious activity and applies the ban based on configured rules.
- Configure SSH to Allow Connection From Specific Users
The SSH protocol provides a wide range of security controls to harden the security of your system. If you decide to go with password authentication, then you can configure SSH to allow and deny connections from certain groups and users. For instance, you can disallow remote root login and only allow connection from specific users.
- Enable Multi-Factor Authentication
Lastly, you can enable multi-factor authentication (MFA), also known as two-factor authentication (2FA), to provide an extra layer of protection by having a time-based one-time password (TOTP) or push notification sent to your mobile device after authenticating with your password.
Free authenticator apps like JumpCloud Protect™ make it easy to layer MFA across not just Linux devices, but MacOS and Windows devices, as well as SSH sessions. Download the app from the iOS App Store or the Google Play Store today to get started.