
Connect


Updated on January 28, 2025
Secure Shell, or Secure Socket Shell — commonly abbreviated as SSH — is a secure network protocol that allows users to securely authenticate to remote devices. SSH leverages a pair of SSH keys to encrypt communication with a remote system. The key pair is cryptographic in nature and made up of a public and private key. The keys work in tandem to provide authentication between the client and the remote system.
SSH keys grant users access to critical systems such as cloud and on-premise servers and network devices. Typically, these are systems that should only be accessed by authorized users, and no one else. Proper management of these keys is therefore essential to ensure that the SSH keys are in the right hands and used in accordance with the best security practices.
Before we proceed further, let us draw a distinction between public and private keys.
Private and Public SSH Keys
As the name suggests, the private key is only meant for the person who created it, and therefore strictly resides on the client system. It allows users to securely authenticate with the remote server, and should always be kept secret and never disclosed to anyone. In the wrong hands, the private key could be compromised and malicious users can use it to breach your systems. We cannot emphasize this enough: the private key should never be revealed to anyone else.
On the other hand, the public key can be freely shared with any server you wish to connect to without compromising your identity. It is used for encrypting data exchanged between the server and the client. The private key decrypts the messages sent from the remote server and a connection is established. On the remote system, the public key is saved in the authorized_keys file.
Let’s now switch gears and check out how SSH authentication works.
How SSH Authentication Works
SSH authentication is broadly categorized into two types: password-based and public key authentication.
1. Password-based authentication
In password-based authentication, the client sends an authentication request to the server which includes the encrypted username and password for the remote server. Upon receipt, the server decrypts the request and validates the credentials in plain text. Once verified, the client is notified of the authentication outcome.
2. Public key authentication
Public key authentication — also known as asymmetric encryption — uses a cryptographic key pair which comprises a private and public key on the client system. After generating the SSH key pair, both the public and private keys are saved on the client. The client then copies the public key to the remote server.
So, how does the authentication really work?
During authentication, the client system sends an authentication request to the remote server which includes a public key. The remote server then receives the request and checks if the public key matches the one copied to it. If the key is valid and matches the one on the server, the server then creates a secret message and encrypts it with the public key from the client. The message is then sent back to the client whereupon the private key decrypts the message. Because this is asymmetric encryption, only the client system can decrypt the message with the private key. Once the message is decrypted, the server acknowledges it and the authentication is successful.
Public key authentication is the more preferred authentication of the two. It is more convenient and secure than password-based authentication — and for good reasons. SSH keys are complex and difficult to crack thanks to the strong encryption algorithms used. In addition, only the user with the private key can access the remote system.
When public key authentication is enabled, password authentication should be turned off so that only the private key alone can be used to authenticate with the remote system.
How to Generate an SSH Key Pair on Linux
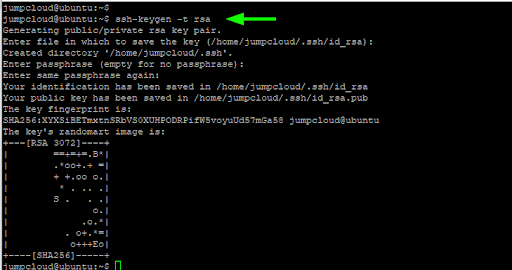
To leverage public key authentication, the first step is to generate the SSH key pair. To do so, launch your terminal on the client and run the following command:
$ ssh-keygen -t rsa
The -t flag specifies the type of the SSH key to be created. In this case, the RSA key pair.
There are two possible values of RSA: “rsa1” for RSA version 1 and “rsa” for RSA version 2. Since the first option is now deprecated and considered weak, here we are going with the latter which is considerably stronger.
Save the SSH Key to a Location
Specify the location that you wish to save the key pair. Typically, the default path is the user’s home directory or simply the ~/.ssh folder (for example, /user/home/.ssh). If you wish to save the keys in this location, simply press “ENTER.”
Next, you will be required to provide a passphrase (optional). This adds an extra layer of security in the rare event that a hacker gets a hold of the key. You can leave it blank or specify a key phrase that will be required on each login attempt. To leave it blank, just hit “ENTER.”
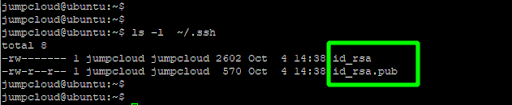
To confirm the keypair has been successfully generated, list the contents of the ~/.ssh directory.
$ ls -l ~/.ssh
The id_rsa is the private key which, as mentioned, should be kept top-secret on the client system to prevent potential compromise.
The id_rsa.pub is the public key that can be freely shared with the server you intend to connect to.
Copy the Public Key to the Remote Server
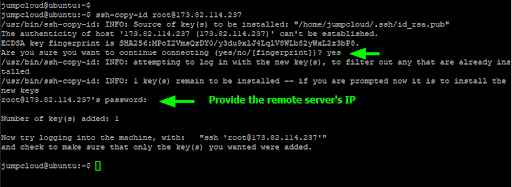
Once the SSH keys are generated, the next step is to copy the public key to the remote server. You can achieve this using the simple ssh-copy-id command:
$ ssh-copy-id username@remote-server-IP
Provide the remote server’s password and hit “ENTER” to copy the public key. You should get an acknowledgment from the remote server that the key was successfully added. The public key is saved to the ~/.ssh/authorized_keys file on the remote system.
Log in with SSH Passwordless Authentication
The next time you attempt to log in, the SSH-key challenge response will take place and you will be automatically logged in without password authentication. This is what is popularly known as SSH passwordless authentication since authentication is fully reliant on the SSH-key pair.
$ ssh remote-server-ip

Troubleshooting Common Issues
Permission Denied Errors
Permission denied errors are one of the most common issues encountered when using SSH keys. These errors typically indicate a problem with file permissions or misconfigurations in the authorized_keys file. Common causes and solutions entail:
- Incorrect File Permissions: SSH requires strict permissions on key files to ensure security.
- Ensure the private key file is only accessible by the owner:
chmod 600 ~/.ssh/id_rsa - Verify the permissions of the ~/.ssh directory:
chmod 700 ~/.ssh
- Ensure the private key file is only accessible by the owner:
- Misconfigured authorized_keys File: This file on the server side must have the correct public key and appropriate permissions.
- Check that your public key is correctly copied into ~/.ssh/authorized_keys on the server.
- Ensure the permissions are set properly:
chmod 600 ~/.ssh/authorized_keys
- Mismatch Between Public and Private Keys: Double-check that the private key on your client matches the public key in the server’s authorized_keys file.
- Use the ssh-keygen command to verify keys:
ssh-keygen -lf ~/.ssh/id_rsa.pub
- Use the ssh-keygen command to verify keys:
ssh-agent Not Running
The ssh-agent is essential for managing SSH keys in memory during a session. If it is not running, you may encounter repeated prompts for your SSH key passphrase or failure to connect.
How to Start and Add Keys Again:
- Start the ssh-agent manually:
eval $(ssh-agent -s) - Add your SSH key to the agent:
ssh-add ~/.ssh/id_rsa- If you encounter errors, ensure the correct private key path is specified.
- To confirm the key has been added:
ssh-add -l
Incorrect ~/.ssh/config
The ~/.ssh/config file can simplify the use of multiple SSH keys but must be configured correctly to avoid connection issues.
How to Validate and Correct Config Files:
- Check for Syntax Errors: Use the following command to quickly validate the file:
ssh -F ~/.ssh/config -T- This will identify any invalid syntax or unsupported options.
- Correct Configurations for Multiple Keys:
- Ensure each host configuration block is defined clearly. For example:
Host github.com
   HostName github.com
   User git
   IdentityFile ~/.ssh/id_rsa_github
Host server.example.com
   HostName server.example.com
   User your_username
   IdentityFile ~/.ssh/id_rsa_server
- Ensure each host configuration block is defined clearly. For example:
- Apply Changes: Restart the SSH session or manually test the connection:
ssh -v [email protected]
How to Manage Linux SSH Keys
Given how critical SSH keys are in granting access to highly sensitive and mission-critical systems, having full visibility of your keys is essential to ensure they are in the right hands. Lack of proper SSH management can leave the organization susceptible to insider attacks orchestrated by disgruntled employees, or even external attacks where hackers steal the SSH keys and have a foothold of your resources. It could also lead to non-compliance by industry regulations such as PCI DSS and HIPAA.
We will take a high-level approach to the best practices you can implement to effectively manage your organization’s SSH keys and protect valuable business assets.
1. Use an SSH key manager to automate the handling of SSH keys
The initial step in proper management of SSH keys is to take an inventory of the existing keys in your network and consolidate them in a central database. Doing this manually is a daunting and time-consuming task which is often prone to errors. An SSH manager helps you to automatically discover SSH keys within your IT environment and determine which systems they have access to.
Automation alleviates the cumbersome task of manually combing through each system in search of the keys. Further, a key manager helps identify orphaned SSH or idle SSH keys. Orphaned keys are public keys whose private keys’ whereabouts are unknown.
Ideally, you do not need to add on another point solution to your already complex IT environment in order to automate SSH key management. A good cloud directory platform can be leveraged instead to gain visibility and control of who has access to what IT resource, no matter where they exist.
2. Apply the principle of least privilege when using SSH keys
The concept of least privilege in this case implies that only authorized users should be granted access to SSH keys.
To enforce this, you need to generate keys and associate them with the authorized users’ accounts. In addition, best practices also recommends the removal of old keys every time an employee exits your organization, which leads us to the next point.
3. Remove idle and orphaned SSH keys
Unaudited keys including forgotten, idle, and orphaned keys can be used as backdoors by hackers or disgruntled employees to gain access and sabotage your IT resources. As a systems administrator, this is something you clearly don’t want to risk.
It’s prudent, therefore, to implement policies that ensure SSH keys associated with employees who have off-boarded are purged — much the same way you would disable email accounts of employees leaving the company. Otherwise, you will have old and orphaned keys lying around that can be exploited by unauthorized parties for nefarious reasons.
The best SSH key lifecycle automation tool will be tied directly to a comprehensive identity and access management solution. This allows IT admins to securely manage users, systems, and access privileges from a single place, and automate employee offboarding with ease.
4. Use different keys for different users and environments
Good SSH key management demands that you have unique SSH keys for specific users and IT environments or servers.
For example, SSH keys assigned to IT administrators with access to production servers should be different from those assigned to developers who should only have access to the staging server. It’s not hard to imagine what the outcome could be if a malicious user accessed the SSH keys of a user in one environment who also happens to use the same keys to access several other IT systems.
5. Periodically rotate your SSH keys
As your IT team grows over time and different members take on different projects, constant changes in access privileges become the norm. These constant changes can present vulnerabilities to your infrastructure when users access keys that should be a reserve for other users or left behind by off-boarded users.
To minimize such risk, it’s always recommended to periodically rotate SSH keys. The cycle of rotation may vary from one organization to another and according to your organization’s audit policies. During SSH key rotation, new keys are generated to replace the old ones. Along the way, idle keys are also purged. By doing so, the chances of your systems being compromised are minimized to the lowest possible margin.
6. Enforce strict SSH key management policies
Your SSH key management strategy is only as effective as the policies you have put in place to ensure the safety of the SSH keys and that they are in the right hands. Policies that merely appear on paper count for nothing. It behooves you, as the system administrator, to enforce strict policies that govern the usage of SSH keys and ensure accountability by those handling them.
Formulate policies that outline everyone’s roles and how the keys will be used — or shared — and secured while in their possession. Most importantly, ensure that the policies are followed and enforced.
Advanced SSH Key Management
Use Different Key Types
Using alternative SSH key types can enhance security and compatibility. Common key types include:
- ECDSA (Elliptic Curve Digital Signature Algorithm):
- Offers similar security to RSA but with smaller key sizes.
- Ideal for environments where performance is critical.
- Generate an ECDSA key:
ssh-keygen -t ecdsa -b 521
- Ed25519:
- A newer elliptic curve algorithm offering enhanced security and speed.
- Recommended for modern systems due to its robustness against certain attacks.
- Generate an Ed25519 key:
ssh-keygen -t ed25519
- When to Use Different Key Types:
- Use RSA for legacy systems.
- Choose ECDSA or Ed25519 for modern applications requiring efficient cryptographic performance.
Restrict Key Usage on the Server Side
Restricting key usage adds an additional layer of security by limiting the actions a key can perform on the server.
Configuration Options in authorized_keys:
- no-port-forwarding:
- Prevents the key from being used for port forwarding.
- Example usage:
command="/usr/bin/your_script",no-port-forwarding ssh-rsa AAAAB3... user@host
- no-agent-forwarding:
- Disables agent forwarding to prevent the key from being used elsewhere.
- Example:
no-agent-forwarding ssh-rsa AAAAB3... user@host
- no-pty:
- Disallows the allocation of a pseudo-terminal.
- This is useful for automated tasks where interactive sessions are not needed.
- Example:
no-pty ssh-rsa AAAAB3... user@host
Applying Restrictions:
- Open the authorized_keys file on the server:
nano ~/.ssh/authorized_keys - Add the desired restrictions before the public key entry.
These restrictions help mitigate risks by ensuring that keys are only used for their intended purposes.
Secure Linux SSH Key Management With JumpCloud
SSH keys provide a more secure and convenient way of authenticating to remote systems compared to the traditional username/password authentication approach. However, for this authentication to continue to provide secure access to your resources, stringent management of the SSH keys is required, along with sound policies that ensure proper visibility of all the keys, what authorization each key has, and who gets to use which keys.
SSH key management has historically been challenging, due to the sheer number of SSH keys and the types of access many organizations must manage. Fortunately, hassle-free SSH key management can be a reality in today’s IT world thanks to the JumpCloud Directory Platform.
At the core of any access request is a secure, verified user identity with the correct permissions for accessing the desired resource, whether it’s a virtualized Linux desktop or an Amazon EC2 instance. By unifying identity, access, and device management into a consolidated, cloud-based console, sysadmins using JumpCloud can reap the benefits of simplified workflows, robust security controls, and comprehensive visibility into their IT environments. JumpCloud’s management capabilities expand beyond SSH and Linux management, to SAML, LDAP, RADIUS, Mac, Windows, and more to effectively meet the demands of your modern IT needs.
Ready to test our open-protocol, vendor-agnostic directory platform with SSH support for yourself? Sign up for JumpCloud Free today, no credit card required, and start managing your first 10 users and 10 devices for free as long as you need until you scale to more.