
Connect


Contents
SELinux, which stands for Security-Enhanced Linux, is a Linux kernel security module that’s implemented in CentOS and Red Hat Enterprise Linux (RHEL) distributions. It adds an additional layer of security by enforcing access control policies for apps, files, and processes. It’s an essential tool for system administrators to reduce the attack surface area. This tutorial will walk you through the basics of SELinux, its core concepts, and how to work with it on CentOS/RHEL systems.
SELinux uses a mandatory access control (MAC) mechanism that supplements the traditional discretionary access control (DAC) provided by file permissions and user/group ownership. DAC is based on the concept of allowing or denying access to files and resources based on user privileges. In contrast, SELinux takes a more granular approach, assigning labels to files, processes, and users, and then defining policies to govern their interactions.
SELinux operates in three main modes:
- Enforcing: In this mode, SELinux actively enforces its policies, denying any actions that violate those policies. This is the recommended mode for a secure system.
- Permissive: In permissive mode, SELinux monitors and logs policy violations but does not actively deny them. This mode is useful for troubleshooting and understanding what would happen in enforcing mode without disrupting system operations.
- Disabled: SELinux is completely disabled, and it doesn’t enforce any policies. This mode should be used with caution, as it reduces security.
Before we dive into exploring SELinux, ensure you have:
- A CentOS or RHEL system (this tutorial assumes CentOS 7 or later)
- Root or sudo access to the system
![]()
Refer to configuration/hardening guides to set up and manage SELinux to ensure the appropriate protection for your systems.
Step 1: Log in to Your CentOS/RHEL Server
First, we need to log in to our server, so make sure that you are using a terminal or some SSH client installed on your local machine. If you’re using Linux or macOS, then you will most likely use the terminal application or command line for this purpose. If you are using the Windows operating system, some standard options include PuTTY SSH client or Windows PowerShell terminal.
Open the terminal or SSH client on your local machine and enter the username and IP address or hostname for your system.
In the terminal or SSH client, use the SSH command to connect to your server:
ssh username@server_ip_address
If this is your first time connecting to the server, you will see a security warning about the authenticity of the host. You can verify that the displayed fingerprint matches the expected fingerprint by typing yes in the prompt and pressing Enter.

Step 2: Check Current SELinux Status
We can check the current status of SELinux on our system by running the following command:
sestatus
You can see the similar output in your system:
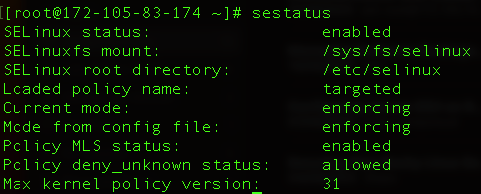
SELinux status: This means SELinux is active and enforcing security policies.
SELinuxfs mount: SELinux uses a virtual file system located at /sys/fs/selinux to interact with the kernel.
SELinux root directory: This line points to the root directory for SELinux configuration files and policies.
Loaded policy name: This line displays the name of the SELinux policy that is currently loaded and enforced on your system. The “targeted” policy is designed to provide targeted protection for specific services and applications.
Current mode: This line shows the current enforcement mode of SELinux. Here, it says “enforcing,” which means SELinux is actively enforcing security policies and denying any actions that violate those policies.
Mode from config file: This line indicates the SELinux mode specified in the configuration file and it should match the current mode. In our case, both are set to “enforcing.”
Policy MLS status: MLS stands for Multi-Level Security, and this line indicates whether MLS is enabled or disabled in your SELinux policy.
Policy deny_unknown status: This line specifies whether SELinux should deny actions for which no policy rule exists. By default, it will give the output of “allowed,” which means SELinux is configured to allow actions for which there is no specific policy rule. This can be useful for applications that don’t have defined policies.
Max kernel policy version: This line indicates the maximum kernel policy version supported by SELinux. The policy version can change over time as SELinux evolves. In our example, the maximum policy version is “31.”
Next, we will check if we have SELinux utilities installed on our system. We can do so by running the rpm package command:
rpm -q policycoreutils
If the package is installed you should get a similar output:

If you get information that the package is not installed you can install it on your system by running the following command:
sudo yum install policycoreutils
Step 3: Work with SELinux Contexts and Policies
SELinux assigns labels, known as contexts, to files, processes, and users. These contexts determine what actions are allowed. The primary components of a context are:
- User: Represents the SELinux user associated with a process.
- Role: Defines the role or function of a process.
- Type: Describes the type or category of a process or object.
- Level: Specifies the sensitivity level of a process or object.
We will create an example of how to serve files via the Apache web server including any related SELinux configuration.
First, we can install the Apache web server by running the following command:
sudo yum install httpd
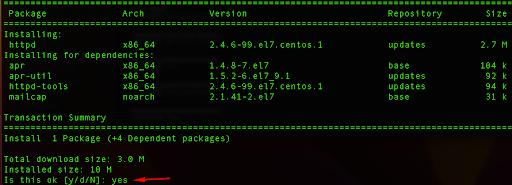
Type yes and press Enter which will install Apache.
Next, we need to start and enable the Apache HTTP server to ensure it starts on boot:
sudo systemctl start httpd
sudo systemctl enable httpd
Create two directories under the following server path for our test:
sudo mkdir -p /vhost/myapp
This is a non-default path that we will use in our SELinux example.
Next, create an index.html in that server path:
sudo vi /vhost/myapp/index.html
Press i to enter the edit mode of Vi editor, and here you can paste the following content:
<!DOCTYPE html>
<html>
<head>
<title>Simple Web App</title>
</head>
<body>
<h1>Hello, World!</h1>
</body>
</html>
After you finish with editing, press Esc and :wq to save and exit the file.
If we run the following command, we can see the context for the file:
ls -lZ /vhost/myapp/index.html

This output shows that the default_t type is not a type specifically associated with web content, so Apache does not have the necessary SELinux policy permissions to access it out of the box.
Now, we can create our custom Apache config:
sudo vi /etc/httpd/conf.d/myapp.conf
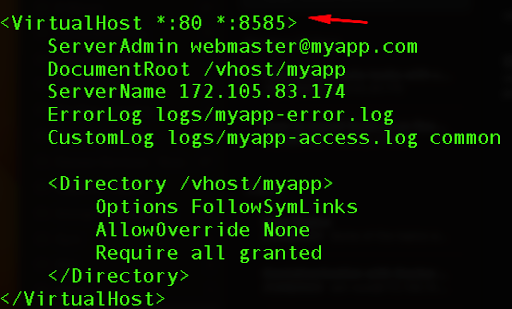
Paste the directives for the config and replace the values for your case:
<VirtualHost *:80>
ServerAdmin webmaster@myapp.com
DocumentRoot /vhost/myapp
ServerName 172.105.83.174 # Replace with your values
ErrorLog logs/myapp-error.log
CustomLog logs/myapp-access.log common
<Directory /vhost/myapp>
Options FollowSymLinks
AllowOverride None
Require all granted
</Directory>
</VirtualHost>
Now, in order to allow read-only access to the Apache web server to our custom directory and any subdirectories and files, we need to apply httpd_sys_content_t context to our SELinux config.
semanage fcontext -a -t httpd_sys_content_t “/vhost(/.*)?”
Next, we need to use the restorecon utility in order to change the label:
sudo restorecon -R -v /vhost

By using restorecon appropriately, you can ensure that your files and directories have the correct SELinux context, which is crucial for proper SELinux policy enforcement and security on your system.
We can now check the syntax for Apache and then restart the Apache service:
sudo apachectl configtest
sudo systemctl restart httpd
Since we require network access so we can curl our file or see it in the browser, we need to check if there is a present SELinux policy for port 80.
sudo semanage port -l | grep http_port_t

If you don’t see a similar output in your version or distribution, then you need to add it.
sudo semanage port -a -t http_port_t -p tcp 80
This command adds a new port definition to the SELinux policy, allowing SELinux to recognize port 80 as a valid port for TCP-based HTTP traffic. This is important to ensure that SELinux permits network access to services running on port 80, such as our Apache web server.
Finally, before we can see our file in the browser or be able to send a curl request, we need to add an exception in our firewalld daemon and reload the rules:
sudo firewall-cmd –permanent –add-service=http
sudo firewall-cmd –reload
We can test if our file is loading by typing the IP address in the browser:
http://172.105.83.174
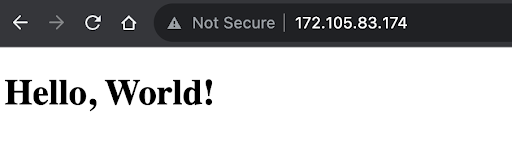
![]()
Note: Learn and use the tools that SELinux provides. For example, the command sealert will load a GUI that will make it possible to review alerts. It offers friendly descriptions of denials and recommendations to adjust your configuration.
Step 4: Troubleshooting SELinux
Let’s say we want to host our application or see our index file on a non-standard port 8585.
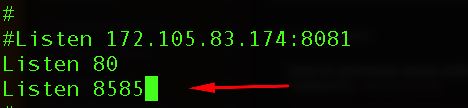
First, we need to change the httpd.conf file for the Apache webvserver and find the Listen directive.
sudo vi /etc/httpd/conf/httpd.conf
Find the Listen directive and add the new line with port 8585.
Next, we also need to edit the config file that we created previously.
sudo vi /etc/httpd/conf.d/myapp.conf
Here we will also add port 8585.
We can check the Apache syntax to make sure we didn’t make any errors:
sudo apachectl configtest
The output of this command should give us information that the syntax is fine.
Now, we can try to restart the Apache server:
sudo systemctl restart httpd
As the output, we will receive information that our Apache wasn’t able to start while the syntax is correct.

In order to troubleshoot this error we will use SELinux’s audit utility:
sudo ausearch -m AVC -c ‘httpd’
As the output, we will clearly see that SELinux has blocked us and that we need to change the policy.

We can do so by running the following command and our custom port:
sudo semanage port -a -t http_port_t -p tcp 8585
Now, we can try to restart our Apache, which should start without issues:
sudo systemctl restart httpd
Next, we need to add this custom port to our firewalld and reload all rules:
sudo firewall-cmd –permanent –add-port=8585/tcp
sudo firewall-cmd –reload
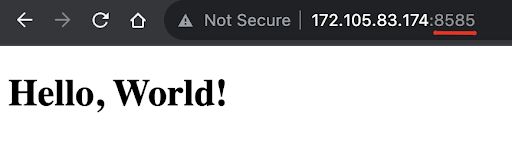
Now, if we reach our website with the custom port, we should be able to see in the browser:
http://172.105.83.174:8585
Step 5: Managing SELinux Modes
There are times when you need to debug your SELinux so you might want to place it in permissive mode. SELinux will log policy violations but won’t block any actions. This mode is helpful for diagnosing potential policy issues or violations without affecting system functionality. It does not permanently change SELinux’s configuration and it will revert to enforcing mode after a system reboot.
In order to set SELinux in permissive mode, run the following command:
sudo setenforce 0
You can always revert to enforcing mode where SELinux actively enforces security policies and may deny actions that violate those policies. In enforcing mode, SELinux provides a higher level of security but may require fine-tuning policies to avoid false positives.
sudo setenforce 1
Finally, you can completely disable SELinux, but it is considered a security risk and should be done with caution as it degrades the system’s security posture. SELinux may seem complex to manage, but it contributes significantly to system security.
In order to disable it completely, you would need to edit its configuration file:
sudo vi /etc/selinux/config
Here you can replace the value to disabled:
SELINUX=disabled
In order to apply the changes and disable SELinux, reboot your system:
sudo reboot
So, the next time you check if SELinux is enabled using the sestatus command, you will see that it’s disabled.

Conclusion
In this walk-through, you have learned how to explore, troubleshoot, and manage SELinux, an important security feature for CentOS and RHEL distributions.
For IT admins who are looking for additional ways to simplify their cloud infrastructure management as a whole and secure access to servers, JumpCloud can help.
Learn more about how our cloud directory platform can be leveraged to automate server management.