
Connect


Contents
Updated on July 18, 2024
In today’s digital age, individuals and organizations are dealing with increasingly sensitive and confidential information. This information includes personal identity information, banking information, medical records, trade secrets, etc. Any data exfiltration can lead to significant losses and risks, including legal and reputational harm.
Encryption has become a necessary technology to protect this sensitive data. The basic principle of encryption is to transform data into an unreadable form and protect it using a key. Only authorized users can decrypt and access the data. This ensures that data is not accessed or stolen without authorization during transmission and storage.
Full disk encryption (FDE) technology can secure the entire storage medium, protecting all data stored on it. If the computer is stolen or subjected to other forms of attack, the encrypted data cannot be stolen. In addition, encryption can also help to meet data security and privacy requirements that are required by certain industries and government standards.
In short, encrypting data is a necessary means of protecting data in the digital age for reasons such as protecting personal privacy, preventing data leakage, guarding against hacker attacks, and meeting regulatory compliance requirements.
FDE on Debian 11
Enabling FDE on Debian 11 is straightforward. The installer program used in Debian 11 provides a “Guided – use entire disk and set up encrypted LVM” option when partitioning disks. It will encrypt everything with the exception of a small boot partition.
If you already have a running instance of Debian 11 and want to enable full disk encryption, you need to reinstall it. Once installed, it cannot be fully encrypted. Encryption can only be performed on directories or partitions after installation.
If you forget your encryption password, all of your data will be inaccessible. Therefore, it is recommended to choose a passphrase that you can easily remember or a strong password that’s stored in a password vault or manager.
Make sure to back up any critical data that may be lost during the reinstallation process before you get started.
Enabling Full Disk Encryption on Debian 11
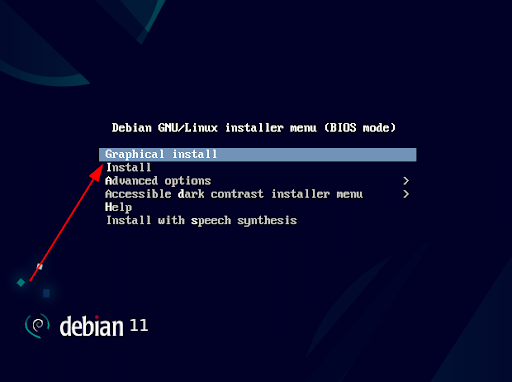
Select “Graphical Install”, then press Enter.
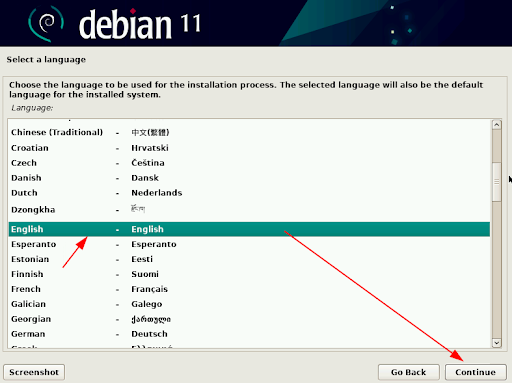
Select the language that suits you, then click “continue”.
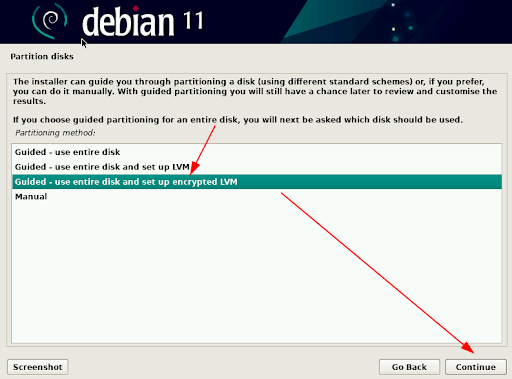
Select “Guided – use entire disk and set up encrypted LVM” option during partition disks and click “continue”.
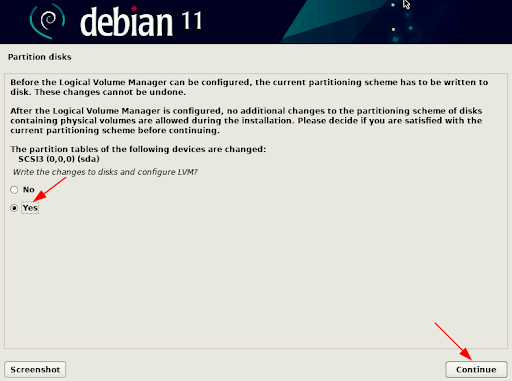
Write the changes to disk, then click “continue”.
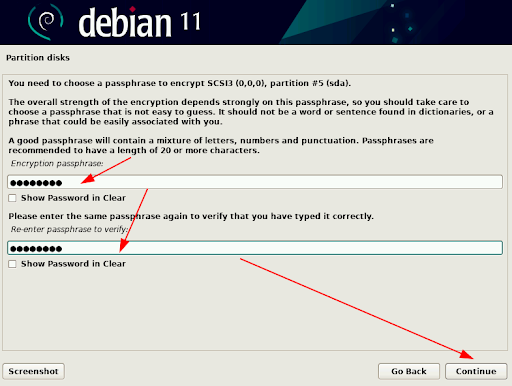
Set a password for full disk encryption. Use a strong passphrase to protect the security of the disks, then click “continue”.
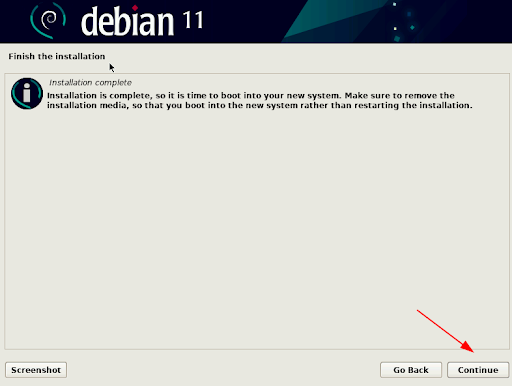
When you see this page, it indicates that Debian 11 has been successfully installed. Click “continue” to complete the installation.
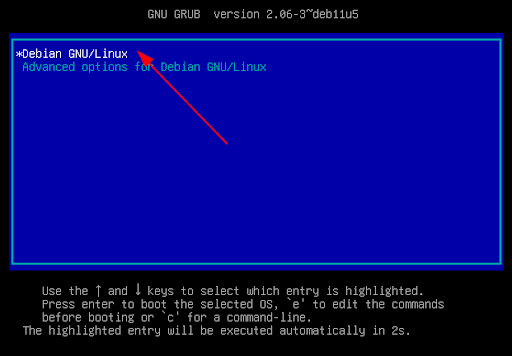
After starting Debian 11 and seeing this page, select “Debian GNU/Linux” and then press Enter.
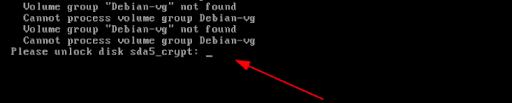
You can see that we are required to enter the disk encryption password, which indicates that FDE has successfully been enabled on Debian 11.
This concludes the process of enabling FDE on Debian 11.
Password Recovery Tips
Emergency recovery disk
Creating an emergency password recovery disk during the installation of Debian 11 can be a vital step for accessing your system if you forget your encryption password. Here’s a detailed layout of how to set this up:
- During Installation: When Choosing the option to encrypt your disk, the installer should prompt you to create a recovery disk.
- Using a USB Drive: Insert a USB drive that will be used as your recovery disk. Make sure it’s formatted and empty as it will be used to store sensitive recovery information.
- Writing Recovery Data: Follow the prompts to write the necessary recovery data onto the USB drive. This typically includes the encryption key and other relevant data needed to unlock your encrypted disk.
- Finalizing and Testing: Once the recovery data is written, finalize the setup. It’s crucial to test the recovery disk to ensure it works properly by attempting to access your encrypted disk using the recovery disk.
- Storing the Disk: Keep the recovery disk in a secure but accessible location. It should be stored separately from your device to avoid simultaneous loss or theft.
- Regular Updates: If you ever change your encryption keys or update your system significantly, remember to update the recovery disk with the new data.
Use Password Management Software
There are many well-reviewed and trusted password managers. Make sure to select ones that have features like end-to-end encryption, zero-knowledge architecture, and multi-factor authentication. The process should include installing the software and creating a master password, which is the only one you’ll need to remember. Then, you can enter your disk encryption passphrase into the password manager. So, whenever you need to retrieve your passphrase, you can access it securely through the password manager using your master password.
Recovery Options in Bootloader
There is a method where you can perform a recovery procedure by configuring bootloader options. It is a good idea because it provides a secure and controlled method to regain access to your system if you forget your main password. This method is built into the system’s boot process and it also offers a customizable layer of security, allowing you to set fallback passwords or other authentication methods that only take effect during recovery scenarios. These features help ensure that you can always access your system without compromising its security, even in emergencies, so you can minimize the risk of losing data in your system.
Here is how you can configure your bootloader for Debian 11, focusing on adding a fallback password or recovery mode that requires additional authentication:
We can generate the fallback password by running the following command:
sudo grub-mkpasswd-pbkdf2
This command will prompt you to enter a password and will then output a hashed version of this password that you need to save.
Then, we need to access the GRUB configuration by running the command in our terminal:
sudo nano /etc/default/grub
This command opens the GRUB configuration file in a text editor.
Next, we want to enable the Recovery Mode:
Find the following line in the file:
#GRUB_DISABLE_RECOVERY=”true”
and change it to:
GRUB_DISABLE_RECOVERY=”false”
This option enables the recovery mode option during boot.
Now, add the following lines to the end of the GRUB configuration file to set up a superuser and a password:
set superusers=”username”
password_pbkdf2 username grub.pbkdf2.sha512.10000.[rest of the hashed password here]
Replace “username” with your desired username and replace [rest of the hashed password here] with the output from the ‘grub-mkpasswd-pbkdf2’ command.
After the editing, save the file and close it.
The next step is to update the GRUB configuration by running the following command:
sudo update-grub
This will update the configuration and you can proceed to reboot your system to test if the recovery options work correctly. During boot, try accessing the recovery options using the fallback password to ensure it prompts and works as expected.
It is a good idea to document your configuration changes and consider securing the GRUB configuration file by setting appropriate file permissions:
sudo chmod 600 /etc/default/grub
sudo chown root:root /etc/default/grub
This setup provides a secure method to recover access to your system, especially useful if the primary authentication method fails.
Conclusion
FDE provides a robust way to safeguard your data in case your device is lost or stolen. However, encryption is just one approach to ensuring the privacy and safety of your data. You’ll also want to consider other security measures such as identity and access management (IAM), patch management, and Zero Trust controls such as multi-factor authentication (MFA).
You can implement all of these measures and more via JumpCloud’s open directory platform, and ensure FDE is enabled across your device fleet, regardless of whether those devices are running Windows, macOS, or Linux.
Learn more about how to configure data encryption for Linux systems using the JumpCloud platform, and sign up for free today to get started.