Connect


Contents
Have you ever looked at your computer’s storage graphic only to notice the generic-sounding “system data” segment, and wondered what’s in there that could be taking up so much space?
The goal of this tutorial is to help you answer that question and learn some simple strategies for clearing your system data.
What Is System Data?
System data refers to files like browser caches, application caches, disk images, system log files, plugins, extensions, etc. Generally, it includes files that do not belong to the Documents, Apps, Music Creation, Music, Pictures, and other categories of Mac Storage.
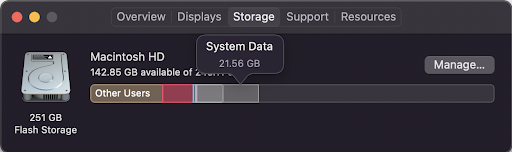
To check your system storage, navigate to Apple menu > About This Mac > Storage. Hover your mouse over each segment of the storage bar to see what they represent; you will see the segment for System Data (as in Figure 1), etc.
Clearing Your System Data Storage
Although you do not have total control over your system data, there are a few things you can do to reduce the storage amount. There are three major ways you can accomplish this:
- Optimize Your Storage via Mac Storage Manager
- Empty the Trash
- Remove the Junk on Your System
1. Optimize Your Storage via Mac Storage Manager
Apple offers a feature that helps you easily optimize your storage. You’ll find it under the Apple menu > About This Mac > Storage and click Manage. A new window is displayed and it offers four things you can do to reduce your system storage (Figure 2).
- Store in iCloud: You can store all files, photos, and messages in iCloud to save space, keeping only recent files on your local Mac.
- Optimize Storage: Save space by automatically removing movies and TV shows you’ve already watched.
- Empty Trash Automatically: Turn this option on to free up space by automatically erasing items that have been in the Trash for more than 30 days.
- Reduce Clutter: Manually sort through documents and other content stored on your Mac to delete what is no longer needed.

2. Empty the Trash
When you delete files from your device, they go to the Trash. But that doesn’t remove them, it simply stores them in a single location. It’s easy to forget about these files and, before you know it, they pile up and occupy a chunk of your storage. Emptying your Mac’s trash is a good way to clear some storage space.
You can do this in two ways:
- Right-click (or hold the control button and click) on the Trash icon in the dock. Then, select Empty Trash (Figure 3a). You will see a pop-up on your device asking you to confirm your choice; click Empty Trash if you would like to permanently erase the items. Refer to Figure 3b.
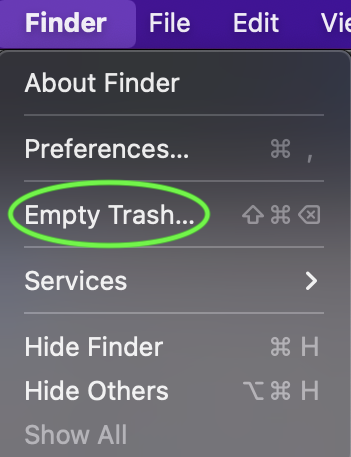
- Alternatively, click on the Desktop to activate it, click Finder in the menu bar, and select Empty Trash (Figure 3c).


3. Remove the Junk on Your System
The first step to removing junk is to figure out what’s eating up space on your device. To do this, open the Terminal app. Type cd / and press return. Then, run du -h -d2 You will see your folders and their respective sizes (Figure 4). Then, you can decide which one(s) to delete.

Before you delete anything, be sure you understand the potential impact. For instance, if you delete ~/Library/Logs, it may make troubleshooting tough for you. And if you delete ~/Library/Cookies, you’ll need to re-enter your info into websites. You can find a complete list of the Library subdirectories here.
For this tutorial, we will delete outdated files from ~/Library/Caches. Once you have decided what to delete, follow these steps:
- Click on the Finder and, in the menu bar, choose Go menu > Go to Folder.
- Type ~/Library/Caches and press Enter (Figure 5).
- Remove the folders associated with apps you no longer use on your device. Refer to Figure 6.
- Repeat the same process for other folders you want to delete.
- Finally, remember to empty the Trash after deleting the junk files.


4. Additional Options
Aside from the three options listed above, there are a few other things you can do to clear your system data including:
- Delete files that you no longer need from your downloads folder. To do this, from the Finder, navigate to the menu bar item Go > Downloads. Then, delete any file that’s no longer useful to you.
- Remove any duplicate files on your device.
- Uninstall applications that you no longer use.
Final Thoughts
From optimizing your storage via Mac Storage Manager to removing out-of-date files, the methods highlighted in this article can help you in clearing your system data storage.
Ready to accomplish even more on macOS? Protect the data you’ve decided to keep on your device and learn how to enable full disk encryption.