Connect


Contents
Updated on December 19, 2024
As a Mac admin, or an IT admin overseeing a cross-OS fleet, your role revolves around managing your company’s Apple system infrastructure. To carry out your role efficiently, it is helpful to understand how to use the common Unix commands.
Additionally, while most users of macOS are more familiar with the graphical user interface (GUI), the command line interface (CLI) is more powerful and saves time. In fact, there are some tasks that cannot be accomplished by any other method except the command line.
In this article we will explore the command line, plus its applications and key benefits for IT admins.
What Is the Command Line?
A command line, accessed with Terminal.app, empowers you to work on Macs remotely or locally and control a macOS system through a series of text-based commands and scripts.
With an admin account, you can make a tweak to almost everything on your Mac via the Terminal.app. You can also leverage the app to securely connect to servers and workstations remotely and to create simple or complex scripts for automating actions.
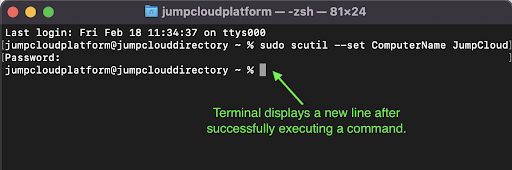
When a command is successful, the command line does not display any indicator to notify you of the success. Instead, you will get a new line with your username as shown in Figure 1. It’s important to note that the command and arguments you type in Terminal are case sensitive.
Launching the Terminal.app
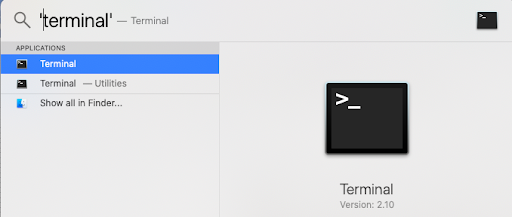
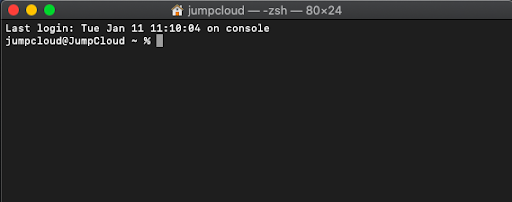
To open Terminal on your Mac, you can search “terminal” in Spotlight as shown in Figure 2 or navigate through Applications > Utilities > Terminal. Once you launch the app, a small window with a command prompt will appear; this is the powerful command line (Figure 3).
What Is Possible with Terminal?
You can accomplish many tasks via the CLI, both easy and difficult. From showing hidden files, to getting a list of actively running computer processes, to rebooting a remote workstation, to automating workflows, the number of tasks you can achieve with the terminal app is impressive.
In this section, we will introduce five common commands that every Mac admin should know, but first, let’s learn how to gain admin level privileges.
How to Get Admin Privileges on macOS
Executing many commands in the command line will require you to have admin level privileges, i.e., you are expected to be a superuser. For instance, if you do not have the correct privileges and you attempt to run the shutdown command, the command line will return an error saying you are not a superuser (as seen in Figure 4).

Therefore, to run commands as a superuser, you need to add the sudo command; sudo stands for superuser do. This can be done in two ways:
- Add sudo to every command you run (as demonstrated in the next part of this article).
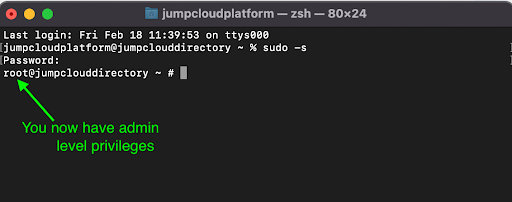
- Execute a sudo command at the beginning of each terminal session so you don’t have to add sudo to every command you run (refer to Figure 5).
To gain admin level privileges via the second method, simply run the following command:
sudo -s
10 Helpful Mac Terminal Commands Every IT Admin Should Know
We’ve put together a full tutorial series on the common commands every Mac admin must know. We will briefly discuss the commands here and provide a link to the associated article (wherever possible) if you would like to learn more.
1. Enable SSH for Accessing a Remote Mac’s Shell Securely
SSH — also known as Secure Socket Shell or Secure Shell — is a secure network protocol that allows users, especially system admins, to securely access remote devices. To enable SSH, enter and execute the ‑setremotelogin command as follows:
sudo systemsetup -setremotelogin on
To know if SSH has been successfully enabled, simply run and execute the following:
sudo systemsetup -getremotelogin
Read our full tutorial on how to enable SSH for accessing a remote Mac’s shell securely.
2. Rename Computer Name, Hostname, and Bonjour on macOS
The ability to name each computer in your Mac fleet will allow you to identify and distinguish between them. Using the scutil command, you can rename your computer name, hostname, and local hostname via the Terminal app.
- To rename the computer name:
sudo scutil --set ComputerName <YourComputerName>- Replace <YourComputerName> with the actual name you want to rename your computer
- To rename hostname:
sudo scutil --set HostName YourHostName - To rename bonjour name (also known as local hostname):
sudo scutil --set LocalHostName YourLocalHostName
Check out the full tutorial on how to rename your computer name, hostname and bonjour name.
3. Bind a Mac to Active Directory
Active Directory (AD) provides crucial user and device management capabilities as an identity provider for IT systems. However, IT admins find it challenging to manage Macs with Active Directory because AD was originally created to support Windows systems. To bind a Mac to Active Directory, run the following command in the terminal app:
sudo dsconfigad -preferred <adserver.example.com> -a <computername> –domain example.com -u administrator -p <password>
Replace <adserver.example.com>, <computername>, example.com, <username> and <password> with your actual information.
Learn more in our full tutorial on how to join Mac to Active Directory services.
4. Install macOS Software Updates Remotely
A Mac admin managing multiple workstations can improve efficiency and productivity if they understand how to install software updates remotely. You can invoke the softwareupdate command in the terminal to achieve this goal. The command will cause macOS to install or download some or all software updates depending on your choice of argument (see a partial list below):
- To install all the updates:
sudo softwareupdate -i -aORsudo softwareupdate --install --all - To install only the updates recommended by Apple:
sudo softwareupdate -i -rORsudo softwareupdate --install --recommended - To install only specific updates:
sudo softwareupdate -i <NAME of update exactly as it appears in the list of updates>
We created a comprehensive tutorial on how to install macOS software updates remotely, you can find the full list of argument options there.
5. Logoff, Restart, and Shutdown
Executing the shutdown command via the terminal app will shutdown, restart, or put your computer in sleep mode depending on the argument used. Below is a list of options:
- To shut down your computer immediately:
sudo shutdown -h now - To shut down your computer 10 minutes from now:
sudo shutdown -h +10 - To restart your computer immediately:
sudo shutdown -r now - To immediately put your computer in sleep mode:
sudo shutdown -s now
Read our full tutorial for more details on how to logoff, restart, and shutdown macOS systems.
6. Get and Manage System Information
Executing the system_profiler command via the Terminal will provide detailed information about the hardware, software, and network settings of your Mac. It’s a great tool for gathering system information quickly.
- To display detailed hardware information:
system_profiler SPHardwareDataType - To display software-related details:
system_profiler SPSoftwareDataType
The top command displays a real-time summary of system processes, including CPU, memory, and disk usage. This command is useful for monitoring system performance.
- To view a live process list:
top - To sort the processes by CPU usage:
top -o cpu
7. View Networking and Connectivity Information
The ifconfig command is used to display or configure network interfaces on your Mac. It provides detailed information about network interfaces, IP addresses, and their statuses.
- To display all network interfaces:
ifconfig - To configure a network interface (e.g., enabling/disabling):
sudo ifconfig en0 up
The ping command checks network connectivity by sending packets to a specified remote host and measuring the round-trip time. It’s useful for diagnosing network connectivity issues.
- To ping a remote host (e.g., Google):
ping google.com
The netstat command displays network connections, routing tables, interface statistics, and other network-related information. It’s useful for monitoring network activity.
- To view all active network connections:
netstat - To display routing tables:
netstat -r
The command ipconfig getifaddr en0 retrieves the IP address of a specific network interface (in this case, en0, typically the primary Ethernet or Wi-Fi interface).
- To get the IP address of the en0 interface:
ipconfig getifaddr en0
8. Troubleshooting and Diagnostics
The log show command displays detailed system logs, which are invaluable for diagnosing and debugging issues. You can filter the logs to find specific events or errors.
- To show all logs containing the word “error”:
log show --predicate 'eventMessage contains "error"' --info
The sudo killall command terminates a running application or process by name. It’s particularly useful when an application becomes unresponsive and needs to be force-quit.
- To terminate a specific process (replace process_name with the application or process name):
sudo killall process_name
The traceroute command is used for network diagnostics. It maps the route packets take to reach a destination, identifying any network bottlenecks or failures. This command can also be accessed via the Network Utility application.
- To trace the route to a website (e.g., Google):
traceroute google.com
The sudo lsof command lists open files and network connections, making it an excellent tool for network troubleshooting.
- To list all open network connections:
sudo lsof -i -n -P
9. Locate Files by Name or Type
The find command is a versatile tool for locating files and directories based on various criteria such as name, date, or type. It’s particularly useful for quickly pinpointing specific files within a directory structure.
- To find a file by name (e.g., “file.txt”) starting from the current directory:
find . -name "file.txt" - To find files modified within the last 7 days:
find . -mtime -7 - To find all files of a specific type (e.g., .log files):
find . -type f -name "*.log"
10. Clear Terminal of All Commands
The clear command removes all previously typed commands and output from the Terminal window, providing a clean workspace. It’s especially helpful when working on long sessions to declutter your screen.
- To clear the Terminal:
clear
Alternatively, you can use the keyboard shortcut: Command + K
Key Benefits of Command Line for IT Admins
Clearly, the CLI is an important tool in IT admins’ arsenal. Some of the key benefits of the command line for IT admins include the following:
- You can use the command line remotely with greater ease and flexibility than the graphic user interface (GUI).
- Once you master it, the command line is faster, more efficient, and more powerful to use.
- Leveraging shell scripting, you can automate long and repetitive tasks in the command line.
- The command line requires far less system memory compared to the GUI.
Whether you’re a command line power user or still learning the ropes, did you know you can leverage the JumpCloud Directory Platform to simplify the management of your Mac fleet? From seamless MDM to directory-integrated patch management, our cloud directory platform was designed to consolidate IT tooling and make admins’ lives easier.