
Connect


This article is the first in our series on the common Unix commands every Mac admin must know.
In a world of endless possibilities where everyone seeks to work smarter not harder, IT and system admins cannot afford to be left behind. A great way for Apple Admins to become smart is to master as many commands as possible.
Terminal.app is a utility that gives the admin direct access to the Unix underpinnings of the macOS operating system. It lets the admin perform tasks quickly and efficiently on the local computer (directly or remotely). All you need to do is to send a few text commands, and you can make your way through both simple or complex tasks easily. It is the magic that saves you time and makes you more efficient. Therefore, we have decided to explore some of the most important macOS commands in this series.
In this article, you will learn how to enable SSH for accessing a remote Mac’s shell securely.
What Is SSH?
SSH — also known as Secure Socket Shell or Secure Shell — is a secure network protocol that allows users, especially system admins, to securely access remote devices. It encompasses a cryptographic network protocol and the suite of utilities that implement the protocol. SSH encrypts the communication with a remote system by utilizing a pair of SSH keys which are cryptographic in nature and made up of a public and private key pair. The keys work collaboratively to provide authentication between the client and the remote system.
SSH keys can and should be used in any situation where there is an unsecured network. Aside from providing strong encryption and secure remote connections, SSH encrypts the data during file transfers or while securely managing network infrastructure components. In addition, it can be configured to allow port forwarding by mapping the default SSH port to an available port number on the destination.
How SSH Works in Mac
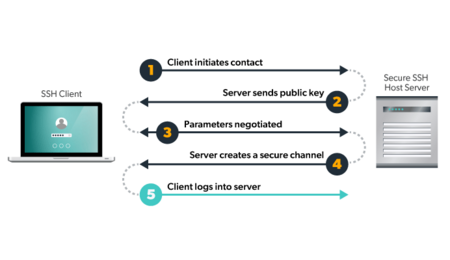
Secure Shell leverages a client-server model to connect an SSH client application (where the session is displayed) with an SSH server (where the session runs). SSH has three layers:
- The transport layer, which establishes secure communication between the client and the SSH server.
- The authentication layer, which sends the supported authentication methods to the client.
- The connection layer, which manages the connection between the client and the server after a successful authentication.
To establish a connection with an SSH server, the client needs to initiate a request with an SSH server. Once the server receives the connection request, encryption negotiation begins. The server sends a public cryptography key to the client and the key is used to verify the identity of the SSH server. Afterwards, the server negotiates parameters and creates a secure channel for the client. Finally, the client logs into the server.
Enabling SSH to Securely Access a Remote Mac’s Shell
SSH remote login to an Apple computer is disabled by default. In this section, we will take you through the process of enabling SSH.
Open the Terminal App on Your MacBook
You can do this by searching “terminal” using the Spotlight search option of your computer or navigating through Applications > Utilities > Terminal.
Enter and Run the Command
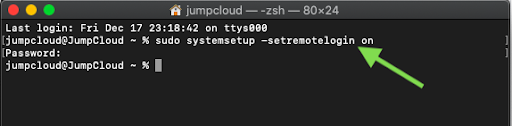
To enable SSH, enter and execute the -setremotelogin command as follows:
sudo systemsetup -setremotelogin on
It is necessary to add sudo because the command requires administrator privileges. You will be required to input your user password when you run the command. Provide the password and press enter (as shown in Figure 1 below).
Note: In Mac, SSH is also known as Remote Login.
Check if SSH is Enabled
Once you complete step 2, you will not get any message to confirm that SSH has been enabled. However, you can use a command to know if SSH has been successfully enabled. Simply run and execute the following:
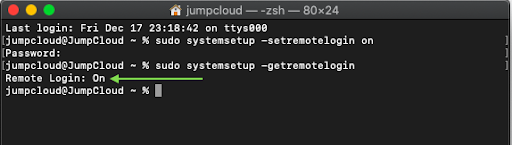
sudo systemsetup -getremotelogin
If SSH is on, you will get a message that reads “Remote Login: On” (refer to Figure 2).
Want to Disable SSH?
While you have now learned how to enable SSH, it’s equally important to know how to turn it off in case you wish to disable any remote login in future. The process of disabling SSH is similar to the process you followed to enable it.
Simply open the terminal app and run the following command:
sudo systemsetup -setremotelogin off
After successfully executing the command, you will get a question: “Do you really want to turn remote login off? If you do, you will lose this connection and can only turn it back on locally at the server (yes/no)?” Refer to Figure 3.
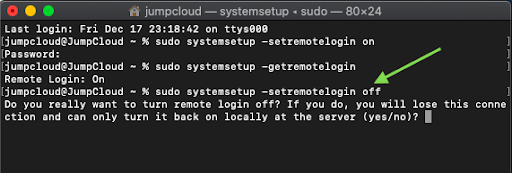
Type “yes” to confirm. This will disable SSH and disconnect any active SSH connections on your MacBook.
Bypass the Yes/No Question Anytime You Disable SSH
Meanwhile, if you want to bypass being asked a question of yes/no anytime you try to disable SSH, you can use the -f flag to force the command to execute immediately and without the prompt.
sudo systemsetup -f -setremotelogin off
To confirm if SSH is off, run the command: sudo systemsetup -getremotelogin
You should get a message that reads “Remote Login: Off” (as shown in Figure 4).

Final Thoughts
As stated earlier, SSH is a cryptographic network protocol used to establish a secure, encrypted connection between two computers. In this article, you learned how to enable or disable SSH by running a command in the terminal app. Enabling SSH will allow you to remotely connect your macOS device, transfer files, and perform admin tasks securely.
There are two other ways you can enable SSH for macOS devices:
- Turn on SSH in the GUI by going to System Preferences > Sharing > Remote Login.
- Leverage the Commands tab in the JumpCloud Directory Platform to enable SSH across your fleet.
Overall, SSH keys provide a more secure and convenient way to authenticate remote systems than the conventional username/password approach. To ensure the authorization each SSH key has is accurate, it’s important to deploy the right management tool and put sound policies in place. Simplified SSH key management is one of the many ways IT admins can make their lives easier with our cloud directory platform. Sign up for a trial of JumpCloud today to test out the possibilities in your own environment.