One of the most dangerous issues for an IT admin is having dormant admin users on machines. Compliance regulations such as PCI call this issue out (see Section 8, page 46 of the PCI standard), but with a large number of servers, applications, and network devices it is often hard to keep track of all of your servers and accounts. Even if you happen to use a directory service like LDAP or Active Directory, chances are you have some user accounts not connected to those directory services. Also, you may have some servers that aren’t part of the “domain”. Either way, having an accurate picture of every admin account on all of your systems is an important and critical issue to track.
Today, outside of trusting your OpenLDAP server or AD implementation there isn’t really a good way to solve for this issue. You may write a script to tell you, but that inherently has all of the trouble of ensuring that you know about each server, can log into it, and then can bring back all of the data. With JumpCloud, we are going to tell you about two methods that you can solve for this issue.
JumpCloud centralized user management – monitoring and managing server access
The first option to solving this issue is to use JumpCloud as your centralized user management platform or what we call Directory-as-a-Service®. JumpCloud’s cloud-based, centralized user management solution can manage Linux (SSH) and Windows user accounts (and Mac user accounts as well among all kinds of other applications and network infrastructure components). You simply create the privileged user account in JumpCloud and then link it in an easy-to-use web-based UI to the servers that the person should have access to. You can manage access across internal servers, virtual servers, and cloud servers across providers and operating systems. We provide a central console for you to manage and track access. If you manage all of your accounts within JumpCloud, you can easily add, delete, and modify access controls with just a few clicks. No writing code to manage your users and getting in the middle of handling SSH keys or passwords. JumpCloud’s end user portal handles all of those issues for you so that you aren’t in the middle of it – which by the way is a security risk anyway. JumpCloud will track all access so you have a log of all logins and privileged commands executed by the user. That’s a nice wrap-up to ensuring you know who is on your servers – what they are doing!
JumpCloud command execution functionality to report on all privileged users on a server
The second option provides an audit or double check. JumpCloud’s server orchestration functionality enables you to execute tasks across your entire server infrastructure. You can use JumpCloud’s command execution functionality for all kinds of tasks including checking of log files, patching servers, setting security conditions, and thousands of other tasks that you need to execute. In this case, we are going to leverage the functionality to get a quick report of every privileged user on each server. We’ll also tell you when they last logged in, if they logged in from a strange location, or if it’s the first time they used their account.
Let’s put together how you would accomplish this task within JumpCloud.
Step 1: JumpCloud agent on servers
Ensure that the JumpCloud agent is on all of your servers. There are two ways to make that happen automatically – one, include the JumpCloud agent with your standard image or AMI; two, distribute the agent with your favorite configuration automation solution.
Step 2: Develop a script to query all servers for their users
Here’s our script to accomplish that:
Linux
awk -F’:’ ‘{ if ($2 != “*”) print }’ /etc/shadow
Windows
Get-WmiObject -Class Win32_UserAccount
Step 3: Schedule
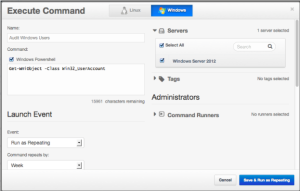
Let’s put this script to run weekly so that we know exactly what’s happening with our servers:
- Login to the JumpCloud console
- Go into the Commands tab on the left hand navigation.
- Click on “Create Command” at the top of the “Saved Commands” table.
- Select whether the command is for Linux or Windows at the top of the window.
- Select a name for the command, such as “Audit Windows Users”
- Select the user to run as to ‘root’ (if you’re running against Linux servers)
- Select the set of servers to run the command against, either server-by-server, or via the tag.
- Then, cut and paste one of the commands below (make sure you’re pasting a Linux command if you select Linux in step 4, same for Windows).
- Change the Launch Event to “Run as Repeating”
- Select “Command Repeats By: Week”
- Select the days you’d like to run on during the week, and the time of day to run on.
- Click “Save & Run as Repeating”
Your screen should look like the following:

Step 4: Execute across server infrastructure
Let’s run it across our entire server infrastructure. To do so, we’ll just take the scheduled command we created, and run it now.
- Login to the JumpCloud console
- Go into the Commands tab on the left hand navigation.
- Find the command you just saved, and click the green “Run Now” button next to it.
Step 5: Let’s process the output
Your user list for each host will appear on the Commands tab in the Command Results table. Just click “Details”, and you’ll be able to see the list of all active users on each server.
It was that easy. Feel free to use these scripts and modify them for your JumpCloud installation. Automating key tasks like this is the power of JumpCloud. We’ll be putting out many more “how to’s” – if you have any suggestions on tasks that you would like us to highlight, please feel free to let us know!


