
Connect


When it comes to executing administrative tasks on a Linux system, best practice recommends running them as a sudo user instead of root – and for good reasons. The root user wields absolute power in a Linux system and can run any commands, including those that can result in the corruption of a filesystem or a fatal system failure. To avoid that, running privileged tasks as a sudo user is highly recommended.
A sudo user – short for super user do – is a regular user with privileges to run or execute administrative tasks. The sudo command temporarily elevates the privileges of the regular user in order to allow them to carry out administrative tasks. This takes away the need for the user to switch to the root account, which should only be reserved for the system administrator to perform certain unique tasks.
In this walkthrough, we will delve into how you can create a sudo user on CentOS 8.
Creating a sudo is quite a straightforward procedure, and we will demonstrate this shortly in a few simple steps.
Step 1: Log in to your remote server
To start off, log in to your remote CentOS 8 server instance as the root user by running the following command on your terminal.
$ ssh root@server-ip
When prompted, provide the root password and press ENTER to access the shell of the remote user.
Step 2: Create a new sudo user
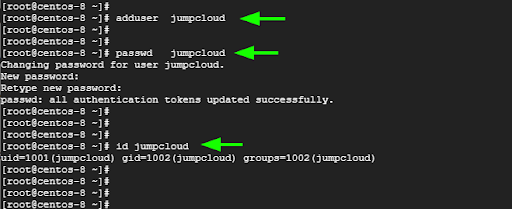
On the remote server, create a regular user using the adduser command. In the following command, we have created a user called jumpcloud.
# adduser jumpcloud
Be sure to assign a password to the newly added user. This will prompt you to type the user’s password and confirm.
# passwd jumpcloud
Once done, confirm the existence of the user using the id command as follows.
# id jumpcloud
This displays salient information about the new use including the UID (User ID), GID (Group ID), and the groups to which the user belongs.
Here is a breakdown of the commands.
All user account information is stored in the /etc/passwd file. You can probe this file and verify if the user exists.
# cat /etc/passwd | grep -i jumpcloud
The output provides confirmation about the existence of the user.

Step 3: Transform the regular user into a sudo user
The remaining step will act to elevate the regular user to a sudo user. There are two ways of doing this. One approach is to add the user to the wheel group. This is a special group that controls the users who have access to root privileges or who can execute commands as root.
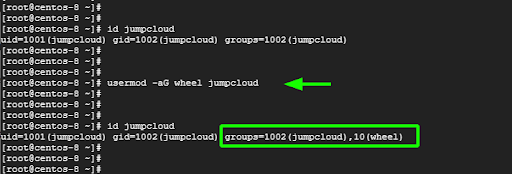
To achieve this, invoke the usermod command to add the jumpcloud user to the wheel group.
# usermod -aG wheel jumpcloud
Next, run the id command to verify the user details. You will notice that the user now belongs to two groups – the jumpcloud group which is the primary group that was created when the user was created in the Linux system, and the wheel group.
Better still, you can use the groups command to limit the output to the groups that the user belongs to.
# groups jumpcloud
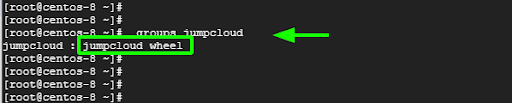
That is solid confirmation that we have added the user to the wheel group.
Another way you can achieve this feat is by directly adding the users to the sudoers file which is the /etc/sudoers file. The sudoers file is a special file that dictates who can run what commands. It’s a file that system administrators use to grant special rights or privileges to users.
To add the user to the sudoers file, edit the file using the visudo command as shown.
$ visudo
The sudoers file should never be opened using a conventional text editor such as gedit or vim. This can lead to corruption of the file which can result in locking everyone out. Good practice requires that you invoke the visudo command.
Once you have accessed the sudoers file, scroll until you get to this section
## Allow root to run any commands anywhere
root ALL=(ALL) ALL
The second entry grants the root user all the rights to run commands anywhere. Below this entry, add the following line taking care to replace username with the real name of the user.
Username ALL=(ALL) ALL
In our case, we will edit that as follows:
jumpcloud ALL=(ALL) ALL

To save the changes, press the ESC button, type a full colon followed by wq! and press ENTER.
We have managed to add the user to the sudoers group by editing the sudoers file. Let’s now proceed and test the sudo user.
Step 4: Testing the sudo user
We need to ensure that our sudo user can perform elevated tasks. To do so we will switch to the user from root.
$ su - jumpcloud
When running privileged tasks as a sudo user, you need to invoke sudo before the command.
$ sudo command
If you omit the sudo keyword you will bump into an error alerting you that the command needs to be executed with superuser privileges.
For example, to update the system packages, run the command:
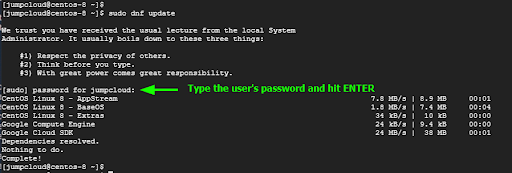
$ sudo dnf update
When running a privileged task for the first time, you will get some instructions on what you need to keep in mind when using the sudo command.
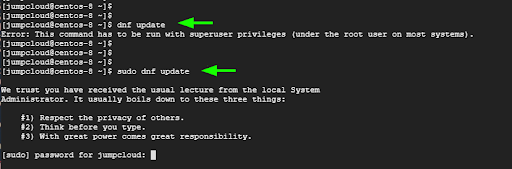
Provide the user’s password when prompted and press ENTER to proceed with the execution of the command.
Step 5: Viewing sudo privilege logs
Lastly, you can keep track of all the commands executed using the sudo command by viewing the logs in the /var/log/secure log file. This provides a clear picture of the sudo commands that were executed and the sudo users that executed them.
You can view the logs in real-time using the tail command as provided.
$ tail -f /var/log/secure
Here is a sample output of the detailed log file indicating the commands executed by the user.

Both successful and failed sudo commands are logged in this file and this provides a comprehensive picture of all the commands executed regardless of their exit status.
Conclusion
You now have the steps needed to create sudo users to perform administrative tasks on your CentOS 8 system, which is a more secure way to grant elevated privileges than allowing users to have root access. Having said that, it’s not a good idea to simply give out sudo access to every user on the server. Sudo privileges should only be granted to authorized users, as they will be able to execute commands that can heavily impact the system.
If checking and monitoring sudo privilege logs seems cumbersome to you in addition to all of your other user management tasks, then you’ll want to consider using a cloud directory platform like JumpCloud for managing sudo access. You’ll not only be able to manage user privileges and security settings for files, servers, networks, apps, and more, you’ll also be able to manage sudo access across your entire Linux fleet (in addition to macOS and Windows devices).
To evaluate our highly secure user and device management capabilities for yourself, try JumpCloud Free today. Enjoy the full functionality of our platform for up to 10 users and 10 devices, with 10 days of 24×7 premium in-app chat support to help you get started.