Connect


As your organization matures and expands, you will likely find yourself trying to address the common challenges that most organizations face during these moments of growth. One of these common challenges is having a siloed IT infrastructure, where all of your systems are functioning independently and you, the IT admin or IT group, are solely responsible for operating each system and maneuvering essential data from one to the next. In short, your day is filled with manual, often menial and even uninspiring work that chews up time you’d otherwise spend driving larger, proactive and interesting projects.
The answer seems simple, yet unattainable: IT automation. Simple in the sense that the logical processes to connect various systems seem obvious, yet unattainable if you have not dedicated much of your career or free time learning and mastering the programming languages needed to build out these integration points and automated processes. Fortunately, there have been huge strides in the way of middleware solutions, or webhook platforms, that can be the conduit to connect systems so long as they can be accessed programmatically and via the internet.
In this basic level walk through, we will cover some entry level automations that you can start with today within your JumpCloud account. As a cloud-based directory platform with a robust API framework, you can leverage many of the automation tools out there, and they all bring a certain level of functionality depending upon what you want to accomplish. Tools like Zapier, Workato, Integromat and Tray.io are some robust webhook platforms. What’s nice is you can usually demo these solutions before leveraging their features, and I would suggest playing with a few of them to see which one solves your specific need.
But before we dig in, let’s take a quick moment to define a couple of key terms you’ll need to know as you embark through this initial tutorial.
What are Webhooks and API’s?
Webhooks are used to create communication between two different applications based on events or triggers. When an event happens in an application, it processes that event and sends the data to an API endpoint that can accept this data.
An API, or Application Programming Interface, is an intermediary endpoint between two applications. This allows an application to make POST, GET, UPDATE and sometimes even DELETE requests to an application and exchange data. It’s a great way for applications to communicate and to automate with one another.
The Manual Process Around User Onboarding
Let’s take a real world scenario, such as user onboarding, to find a way to automate some of the more repetitive tasks that might consume our day.
Say you are in an organization where HR typically generates new employee tickets for IT to get their technology needs setup before their start date. That workflow probably looks something similar to this:
- HR Places an IT ticket for a new hire
- IT receives this ticket and starts to allocate software licenses, hardware etc
- User accounts are created in the various systems individually by an IT Admin
- Users’ machines have to be manually set up with user credentials and a temporary password that has to later be changed by the user…along with all the other various applications they need as well.
You would then need to follow those same steps in reverse order for user offboarding. In a growing organization where you may see multiple new hires a week (and possibly some departures as well), this can cause a lot of overhead and opportunities for something to be missed. By automating some of these tasks, you could both simplify the process as a whole while also reducing the potential for error which could spiral into additional troubleshooting and time spent, not to mention security risks.
In this case, we can use a triggered event (webhook) to send out user data from HR to JumpCloud (via an API). From there, you can assign the user to a device and groups to provision access into your SAML or SCIM applications. The amount of time dedicated to onboarding is drastically reduced by simply having the user automatically created within JumpCloud.
User Creation Tutorial
For this walkthrough, I will be showing how to use Google Sheets to create a User in JumpCloud. As a practical solution, you could have this Google Sheet filled out through a Google Form, or even populated by another integration from your ticketing system. This data will be collected by an automation tool (in this case we will be using Integromat) and then sent to JumpCloud in a JSON format in order to create a user.
Let’s get started!
What you will need
- JumpCloud tenant – you can sign up for a free account with up to 10 users and 10 systems free of charge.
- Integromat Account – a free account will be sufficient for this. Some premium applications might require basic subscription.
- Data Source – Google Sheets.
Setting up your Data Source
I will be using Google Sheets for this since that is pretty generic, but you will want to use whatever data source you have. Even an HRIS platform can be used for this if it allows for either a webhook or API calls.
The first thing you want to do is create an import template. You can do this simply by downloading the CSV Template from your JumpCloud admin console.
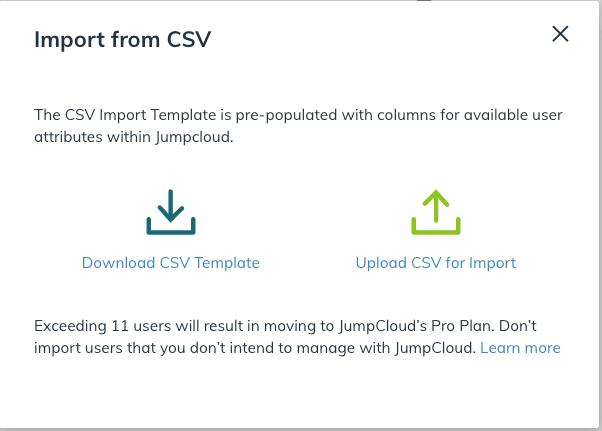
After you download and import the CSV file into Google Sheets, you will have a very basic user import template. You can use our Powershell Module to create a more robust user import file that includes groups, systems, custom attributes etc if you like (we’ll cover that in an upcoming post). You will then want to add some user information into the Google Sheet.
One thing to note: if you leave the password field blank, this will create a pending user in JumpCloud. When a user is Pending, it means they have not set or created a password for their JumpCloud user. In this tutorial we will be setting a temporary password.

Connecting your Automation Tool
You will need to configure the Integromat connection to your Google Sheet. The best way to do this is to follow their documentation to establish a connection to set up your Google Sheet correctly. Make sure you are selecting “Watch Changes” during the initial selection. After you have that setup, we can hook up our automation into JumpCloud to create users.
Once you have followed the above documentation, your Integromat Diagram should look this this:
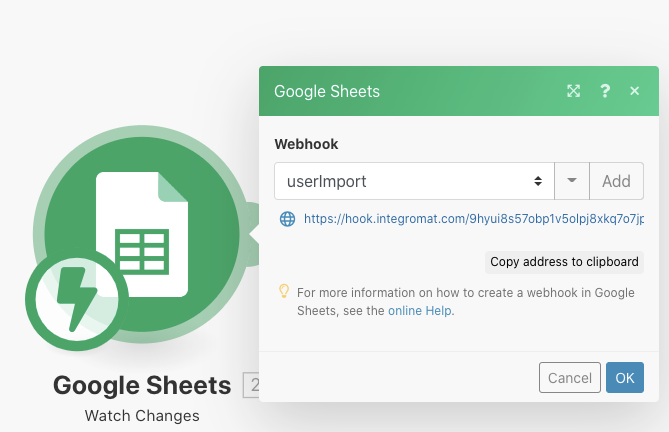
Now this will immediately push any changes from the Google Sheet to our automation. We will then use it to create a user in JumpCloud!
Creating a New User
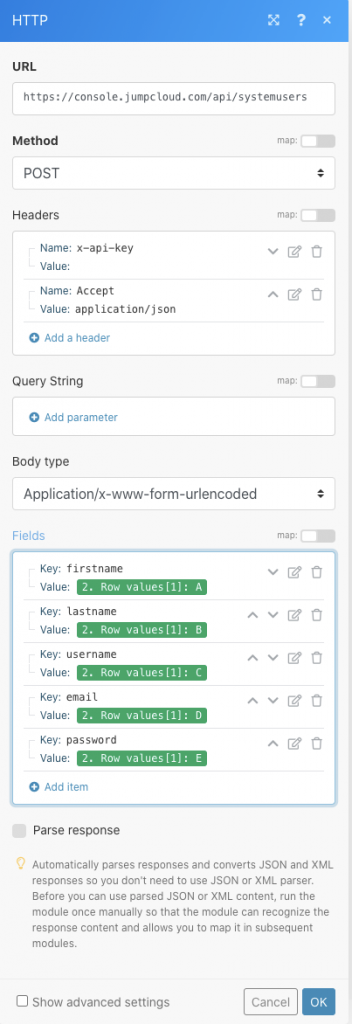
To accomplish this, we will keep it simple by using Integromats HTTP module. Again, there are many other methods, so this is simply used to highlight a basic proof of concept. Add the HTTP module to your diagram and configure as seen below. You will find your API key in your JumpCloud Admin Panel.
Conclusion
Congratulations! You have taken the first step in creating an automated IT infrastructure. From here you can take this basic proof of concept and mold it to fit your needs; for example, maybe have your HRIS platform simply push new users directly into JumpCloud through a direct connection or populated into this Google Sheet you’ve created. From there, you can add user groups to the newly created JC user so they are automatically provisioned into SCIM integrations, RADIUS, and LDAP associations.
To understand what’s possible or see some real world examples, you can look at some other automation tools that we have provided, such as our JumpCloud Powershell Module and our Slack Application.
Watch this brief video of this integration doing it’s work!

If you’re new to JumpCloud and interested in learning more about what kind of IT automation is possible, you can easily evaluate JumpCloud today! JumpCloud Free grants admins 10 devices and 10 users free to help evaluate or use the entirety of the product. Once you’ve created your JumpCloud account, you’re also given 10 days of Premium 24×7 in-app chat support to help you with any questions or issues if they arise.