Connect


Yesterday, Amazon announced its Directory Service offering – a new service which assists AWS users who are growing their hybrid (on-prem/cloud) infrastructure by helping provision users on Virtual Private Clouds (VPCs). We decided to have a look at their new offering and walk through a standard use case which users of JumpCloud’s Directory-as-a-Service are very familiar with: provisioning users on Linux hosts.
It should be noted that AWS Directory Services is not yet aimed at Linux devices. In their announcement Amazon talked about supporting Windows devices, but since many AWS customers are leveraging Linux instances, we wanted to walk through the process and also understand how our JumpCloud’s DaaS offering could complement AWS’ offering when it comes to managing Linux users.
It wasn’t as easy as we’d hoped — AWS DS does not make it easy to integrate LDAP server authentication against your EC2 instances — but the positive takeaway from this exercise is that both solutions can work together nicely.
Getting Started with AWS Directory Services
Discovering the feature was easy, as it is now offered as a menu selection within the AWS console. We chose to leverage the creation of a new directory, versus connecting to an existing Microsoft Active Directory. Doing so will instantiate the creation of a SAMBA-based directory core.
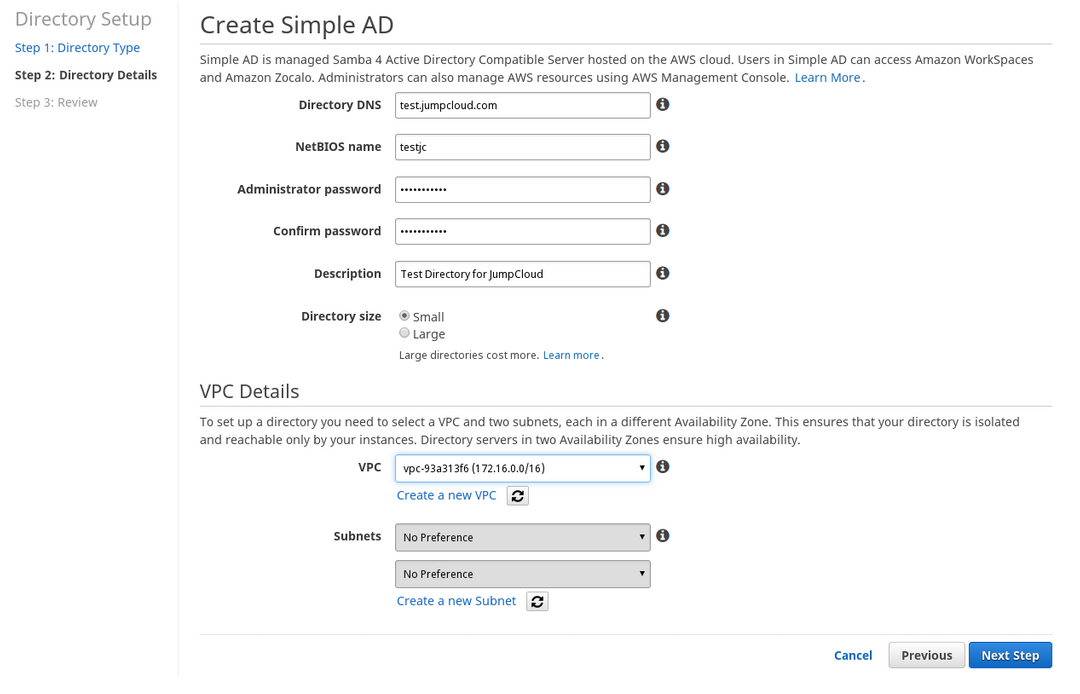
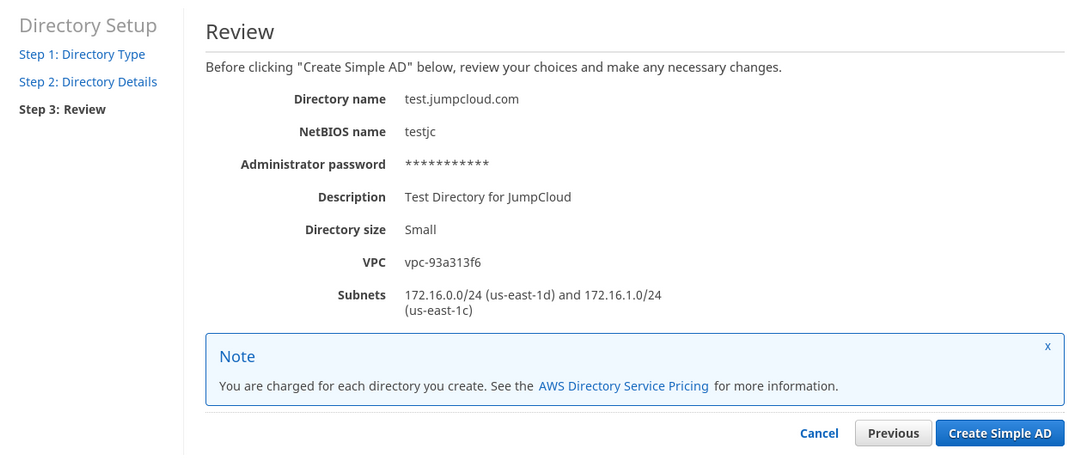
Creating the AWS Directory
The process within AWS was fairly straight forward, assuming the sysadmin’s knowledge of the networking infrastructure.

TECH NOTE: AWS Users outside of Amazon’s East Zone will not have access to Amazon’s Directory Service as it is limited to that Availability Zone.
With our new SAMBA-directory ‘created’, we were then in a holding pattern for the database/directory to be finalized and provisioned to our VPC, a process which took 11 minutes to complete.

The SAMBA directory is now live and we were ready to begin our use case testing, getting a user provisioned to a Linux host…

Detailed View:
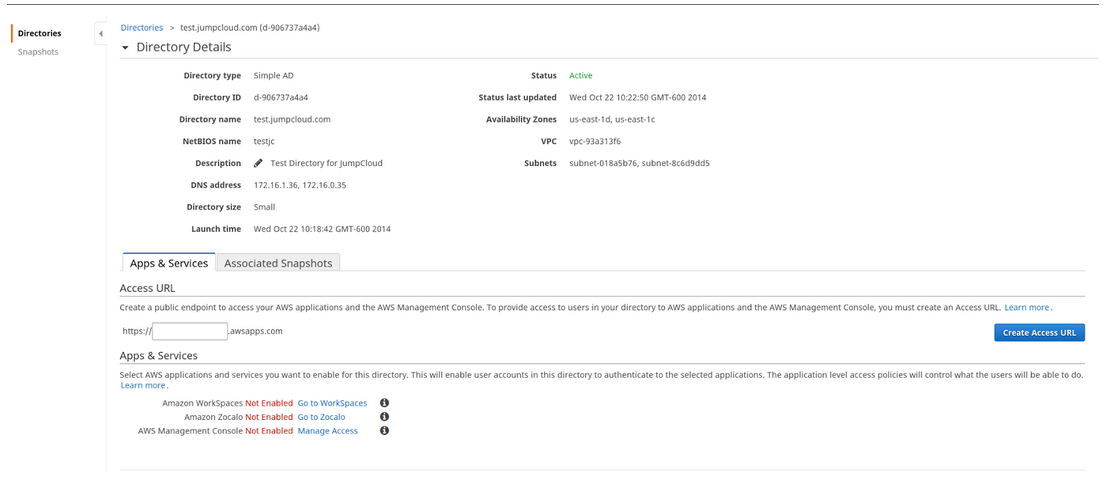
What we initially discovered was this: our sysadmin returned to the AWS console to look for User Administration interfaces but none were available. What we didn’t realize was: in establishing the SAMBA directory on AWS, we would still need to utilize other management tools in order to ‘operate’ it. As a result, we spun up another instance, with a Windows 2012 Server and used Microsoft’s Active Directory management tools to interface with our AWS/SAMBA Directory Service.
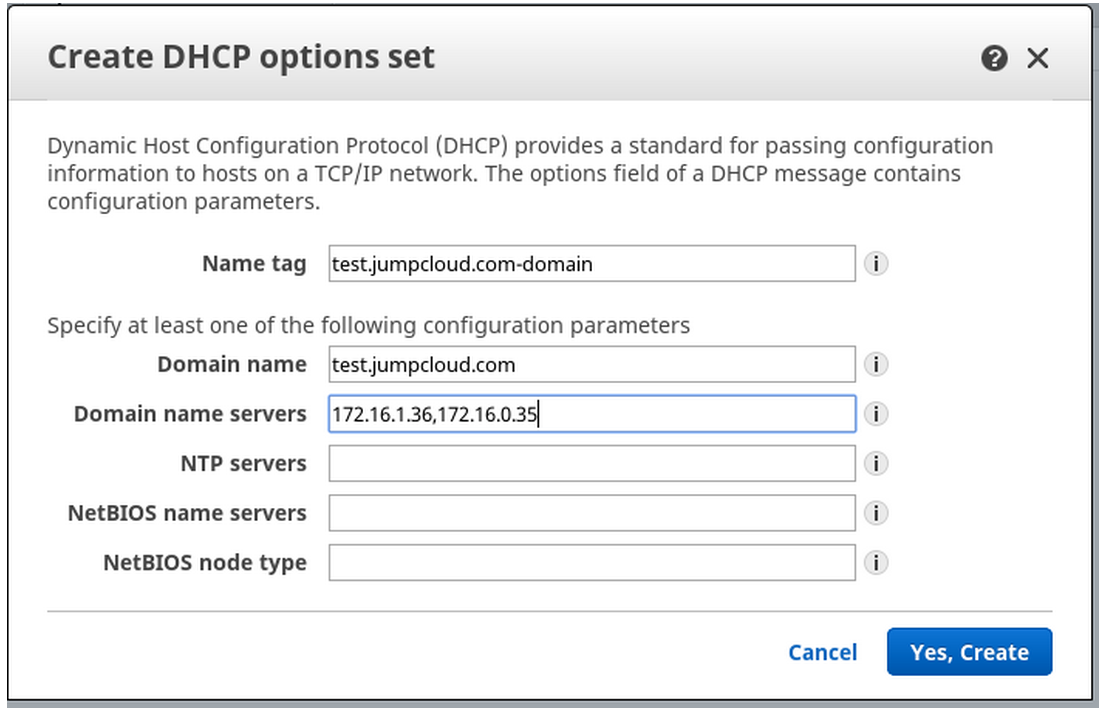
Configuring the AWS VPC DHCP
To get this process started, our sysadmin navigated through the AWS Dashboard, walking through the DHCP Option Sets to create a new DHCP Option Set.
Managing and Operating the AWS Directory Service
With DHCP set, we now needed to move to standing up tools to manage the AWS Directory Service. Our sysadmin went through the process to build out a Windows instance. This process demanded another block of time, 17 minutes, to perform to bring the Windows Server up live. We were curious as to why we weren’t prompted in this process to have the server auto join the domain, reducing misunderstanding in the connection process.
After concluding the Windows Server build and enabling the Active Directory tools, it was time to join the Windows client to the AWS Directory. In other words, have this new client join the domain in Windows AD parlance. This process required another 11 minutes, forcing a reboot to conclude the connection.
Finally, the Windows AD Tools needed to be employed to start building out Groups and adding in AD Users. Rather than show screen shots here, you can review this documentation on exactly how to do this if unfamiliar with Active Directory. Depending upon size and scope of users and groups in your org, plan on 15-30 minutes.
Configure the Linux Host for Authentication with AWS Directory Service
Now, we’re ready for the final part of our use case – establishing a user on Linux from the AWS Directory Service. First we needed to prep the instance and the following was done from a command standpoint by our sysadmin:
Linux Configuration
For this we used the stock Ubuntu 14.04 LTS build from Amazon.
We will be using realm to do most of the heavy lifting in connecting to the Amazon Directory and authentication configuration but there are some things that we need to prepare first.
Configure name resolution.
For a successful handshake, it is critical that the hostname of the server be resolvable. According to our sysadmin, the easiest way to do this is to add it to /etc/hosts with its ip (not 127.0.0.1)
As an example…
echo $( ifconfig eth0|grep inet\ addr|awk '{print $2}'|sed -e
's/addr://g' ) $( hostname ).test.jumpcloud.com $( hostname ) >>
/etc/hosts
Install required packages
sudo apt-get update
sudo apt-get -y install sssd samba-common-bin samba-libs sssd-tools
krb5-user adcli realmd
TECH NOTE: Users will be prompted for your Kerberos 5 realm. This is your domain name in all uppercase. (e.g. TEST.JUMPCLOUD.COM)
With the above completed, it is now time to configure the AWS SAMBA instance we established initially above, but still requires further updating.
We need to prepare the ‘triple-S-D’ configuration file for realm.
SSSD Preconfigure
sudo vi /etc/sssd/sssd.conf
Copy the following in.
[nss]
filter_groups = root
filter_users = root
reconnection_retries = 3
[pam]
reconnection_retries = 3
And then fix the permissions on it.
sudo chown root:root /etc/sssd/sssd.conf
sudo chmod 600 /etc/sssd/sssd.conf
Next up, configuring Kerberos, an essential part of the authentication mechanism utilized in both Active Directory and AWS’s Directory Service. Our sysadmin included some explicit instructions for this to be done per below.
Configure kerberos for your AWS realm
In your …./etc/krb5.conf …. ensure that default_realm is set to your domain and is all uppercase:
default_realm = TEST.JUMPCLOUD.COM
Then find the section called [domain_realm] and add these lines, changing them to match your domain:
.TEST.jumpcloud.com = TEST.JUMPCLOUD.COM
TEST.jumpcloud.com = TEST.JUMPCLOUD.COM
This configuration should now be tested as follows, this test is required for the next step with realm…
sudo kinit [email protected]
Password for [email protected]:
sudo klist
Ticket cache: FILE:/tmp/krb5cc_0
Default principal: [email protected]
Valid starting       Expires              Service principal
10/22/2014 23:19:19  10/23/2014 23:19:07
krbtgt/[email protected]
With testing complete it is time to join with the Directory using realm, there is lots of output from realm that we have truncated, the important bit is the last line.
Join the Directory
sudo realm --verbose join test.jumpcloud.com
[email protected] --unattended
{ … Lots Of Output … }
* Successfully enrolled machine in realm
Now we need to go back and do some post configuration cleanup from what realm did as well as make sure our users have home directories and ssh access.
SSSD Postconfigure
We need to remove the line use_fully_qualified_names = True so that users don’t have to type [email protected], and then restart sssd.
sudo vi /etc/sssd/sssd.conf
sudo service sssd restart
At this point you can test that things are working by running this command:
id Administrator
It should return something similar to this.
uid=1533200500(administrator) gid=1533200513(domain users)
groups=1533200513(domain users),1533200518(schema
admins),1533200520(group policy creator owners),1533200572(denied
rodc password replication group),1533200512(domain
admins),1533200519(enterprise admins)
In the sssd.conf file you may have noticed that it is configured to put user’s home directories at /home/<domain>/<user>. This is great but the system needs to know to create this.
Configure Home Directory Creation
You must create a file in … /usr/share/pam-configs/my_mkhomedir … and will essentially look like this:
Name: activate mkhomedir
Default: yes
Priority: 900
Session-Type: Additional
Session:
        required                        pam_mkhomedir.so umask=0022
skel=/etc/skel
Once you have that file run pam-auth-update to activate and your directory users will get home directories just like your local users.
One final step remains if your user is going to ssh in, you will need to allow password authentication in ssh as Amazon DS does not have ssh keys in it. With a restart of the ssh service your linux users can now authenticate against the Amazon DS.
So after some work and exploration with AWS Directory Service, we were eventually able to provision and authenticate a user on a Linux host in our VPC. It’s not trivial or easy — we discovered that the configuration required fairly in-depth expertise which we have on staff via our sysadmin to establish all of the low-level configurations between the Windows AD, the AWS Directory and of course the Linux instance where we wanted the user provisioned.
Total time for the process was roughly 5 hours, 20 minutes, including the configuration, machine builds and reboots, and ancillary research time required during the set-up. Now that we’ve worked out these issues subsequent machines would probably be quicker to get connected of course, but again… not trivial.
As we said at the outset, AWS does not claim that they support Linux systems yet. While they may in the future it appears that this solution is squarely aimed at Windows machines and the process we went through confirmed that. However, for users that are set on using their Linux instances with AWS Directory Services, it is possible but just requires time and expertise.
An alternative to this approach is to leverage JumpCloud’s Directory-as-a-Service solution in conjunction with AWS Directory Services. Linux user management can be done through the quick install of an agent via JumpCloud and users can be managed closely. The nice part is that it only takes a couple of minutes. If you would like to chat with us about how we can help you manage your users on AWS Linux instances, drop us a note and we’d be happy to discuss it with you.
We would like to thank these sites for their help in configuring our Linux host to authenticate against the Amazon Directory:
http://docs.aws.amazon.com/directoryservice/latest/adminguide/getting_started.html