Vault: Install a Connector
Vault operates with a hybrid software architecture, meaning part of the system runs in the cloud and another part operates within your company's infrastructure. Connectors are a crucial component of this architecture, serving three main functions: acting as an access proxy, recording sessions (if your subscription includes this feature), and performing password backups.
Only Vault administrators can perform the connector installation.
Prerequisites
Operational System
Ubuntu
Ubuntu Server 24.04
Docker
The connector run with docker, so you must install docker on the machine before the Connector installation. Refer Docker Documentation for more information.
Hardware
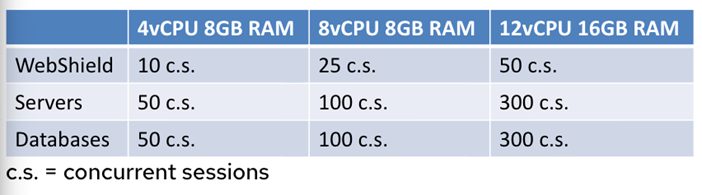
To install the Vault Connector correctly, make sure you meet one of the hardware requirements options based on the number of concurrent sessions per Connector:
Storage: 80GB of available disk space on '/' (root partition). Note that the operating system and other system files will consume part of the total disk space. To ensure the 80GB requirement is met on '/', we recommend provisioning a VM with at least 100GB of total storage.
Network
The network administrator must apply some basic firewall settings on the server where the Connector will be installed.
- Inbound Rules:
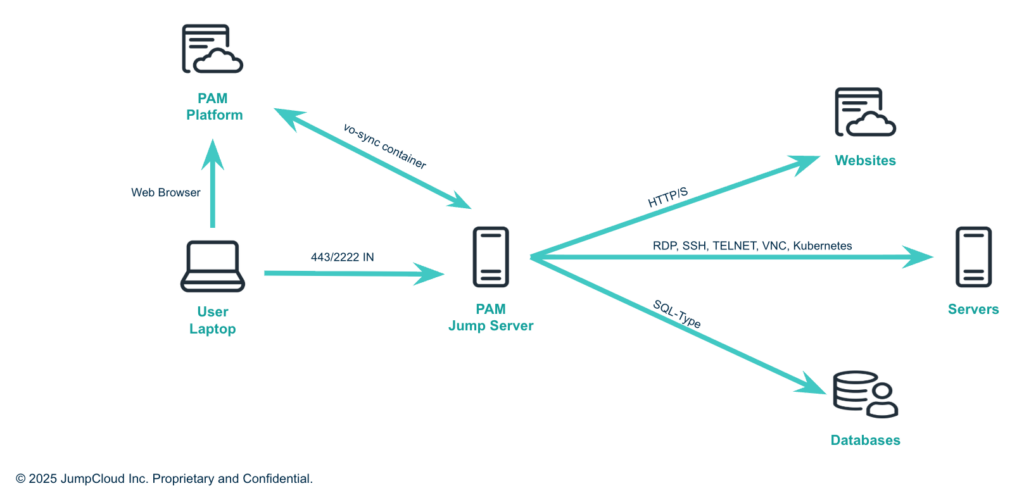
- The server must accept incoming connections on port 443 (browser-based sessions) and port 2222 (Direct Access via Bastion).
- Both 443 and 2222 are configurable at Connector creation if you need to avoid conflicts with other services on the host.
- Outbound Rules:
- the Connector must be able to reach the target resources over the protocol used for each connection type, HTTP/HTTPS for Websites, and RDP, SSH, Telnet, VNC, Kubernetes and SQL-Type DBs.
Outbound connectivity
In addition to the inbound rules above, the server where the Connector is installed must be able to reach the following addresses over port 443 (outbound), according to your PAM data center:
| US Data Center |
|---|
*.vault.jumpcloud.com:443 |
*.api.vault.jumpcloud.com:443 |
*.app.vault.jumpcloud.com:443 |
*.connect.vault.jumpcloud.com:443 |
b-4e73f8f9-5209-4e31-b0e9-b53a88287a70.mq.us-east-1.on.aws:5671 |
public.ecr.aws:443 |
*.cloudfront.net:443 |
*.s3.us-east-1.amazonaws.com:443 |
clients2.google.com:443 |
| EU Data Center |
|---|
*.vault.eu.jumpcloud.com:443 |
*.api.vault.eu.jumpcloud.com:443 |
*.app.vault.eu.jumpcloud.com:443 |
*.connect.vault.eu.jumpcloud.com:443 |
b-1b7a56b2-c4ea-4ef3-bfaa-f7a46f806487.mq.eu-central-1.on.aws:5671 |
public.ecr.aws:443 |
*.cloudfront.net:443 |
*.s3.eu-central-1.amazonaws.com:443 |
clients2.google.com:443 |
| India Data Center |
|---|
*.vault.in.jumpcloud.com:443 |
*.api.vault.in.jumpcloud.com:443 |
*.app.vault.in.jumpcloud.com:443 |
*.connect.vault.in.jumpcloud.com:443 |
b-3e2a9040-3eeb-46ae-b7c4-918bf4c69efb.mq.ap-south-1.on.aws:5671 |
public.ecr.aws:443 |
*.cloudfront.net:443 |
*.s3.ap-south-1.amazonaws.com:443 |
clients2.google.com:443 |
PAM Connector (Jump Server) Topology
Installing a Vault Connector
Installation of a new Vault Connector is a two stage process. The first stage involves creating and configuring a new connector. And the second stage involves installation of the connector.
Registering a Connector in Vault
- Log in to Vault platform.
- Go to Administration > Connectors. A list of available connectors is displayed.
- Click +Add Connector. The Create new connector page is displayed.
- On the Add new connector, configure the connector by entering the following details:
- Description
- IP Address (IPv4 only)
- Web Port
- Shell Port
- Edition
- Click Save to save the details and register the connector.
Installing the Connector
The first step has already been completed, but your connector will still not work properly, you now need to INSTALL IT.
- After registering the connector, you will be redirected to the connectors board.
- Locate the connector you just registered and click on Actions then Install.
- You have two options:
- Copy the command line and paste it on the Linux machine
- Click Downloadto download the installation script and run the script on the Linux machine prepared to be the connector
- Access the linux machine and change to root user by using the
sudo sucommand. - After being the root user, paste the command from the platform. This requires an authentication from a local Vault user.

Verify Installation
You can verify the installation by the following options:
- To confirm that the connector has been successfully installed, check the connectors menu in your Vault platform. If the software version and the last access date of your newly installed connector appear correctly, the installation was successful.
- Use the
docker ps -acommand to verify if all containers are up and healthy.

Checking Connector Health
You can check the status, performance, and other parameters of a connector by:
- Log in to Vault platform.
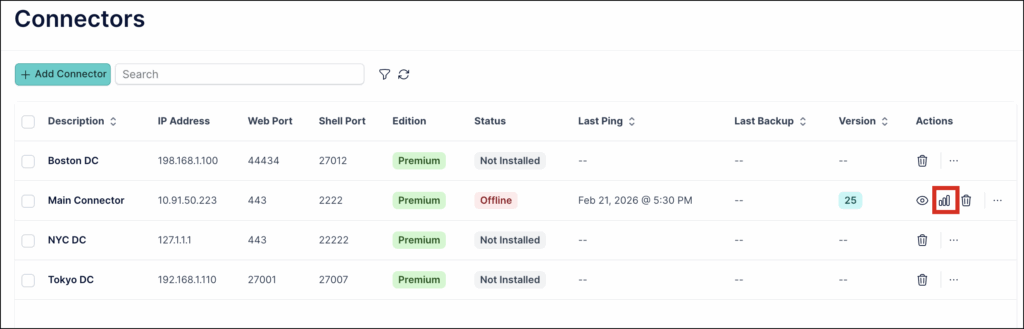
- Go to Administration > Connectors. A list of available connectors is displayed.
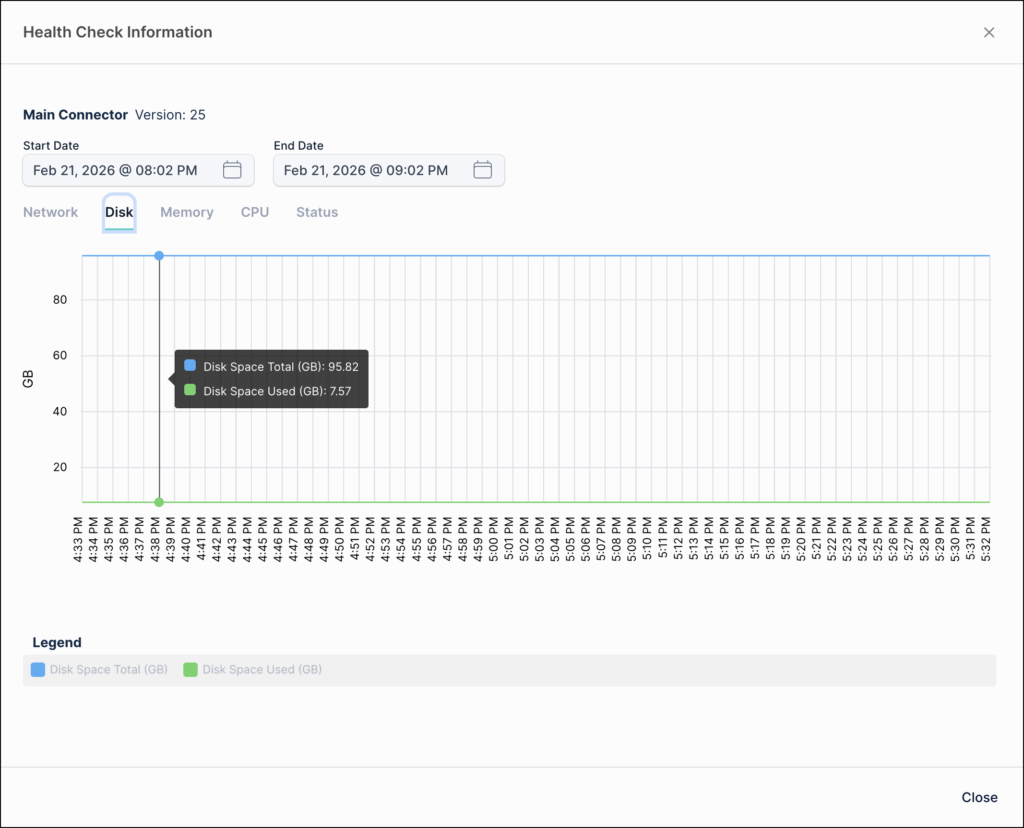
- Select a connector and click the Health Check icon under Actions column. The Health Check Information page is displayed.
- On the Health Check Information page, select the Status tab to view the connector's operational status. A status value of 1 indicates the connector is working as expected, while 0 indicates it is down.
Was this information helpful?