Update PAM Jump Server
Keeping your Jump Server on a supported version helps you receive platform improvements and features that require a newer Jump Server build.
In JumpCloud Privileged Access Management (PAM), updating and installing use the same path. You open Install Jump Server for an existing Jump Server, choose the target version, download the install file, and run it as root on the Linux host. The install file removes and recreates the Jump Server containers for the version you select. You do not need a separate update tool.
This article is for Administrators who update or reinstall Jump Servers that are already registered in the JumpCloud Admin Portal. If this Jump Server has never been installed, follow Install PAM Jump Server instead. That article also covers host, Docker, and network requirements.
Prerequisites
- The Jump Server is already registered. It appears under Access > PAM > Jump Servers with a Name and IPv4 address.
- The host still meets install requirements: Docker is running, you have root on the host, and outbound allow list rules still allow the Jump Server to reach JumpCloud. See Install PAM Jump Server for the full host and network tables.
- A maintenance window of about 10 to 20 minutes when users cannot open new remote sessions through this Jump Server.
- Root privileges on the Linux host (
sudo suor equivalent). The update must run as root.
Considerations
- While the update runs, users cannot access resources through that Jump Server. Coordinate with your team before you start.
- The install file handles container replacement. Do not manually delete Docker volumes for a normal update. Manually deleting volumes can remove session recordings that were not yet uploaded, SSH keys, and certificates. Use a destructive clean reinstall only when JumpCloud Support or a troubleshooting article tells you to.
When to Update or Reinstall
Use Install Jump Server again in these cases.
| Situation | What to do |
|---|---|
| A newer Jump Server version is available, or you need a feature that requires a newer build | Open Install Jump Server, choose the target version, and run the install file on the host. |
| You need to move to an earlier version (downgrade) | Open Install Jump Server and choose the earlier version. The same install file recreates the containers for that version. |
| You changed Web Port or Shell Port on the Jump Server | After you save, the Admin Portal shows Reinstallation required. Reinstall so the host uses the new ports. |
| You enabled PAM MCP Server for this Jump Server | The Admin Portal shows Reinstallation required. Reinstall so the install file includes the PAM MCP Server container. |
Do not remove Docker volumes for a normal update. The install file handles container replacement. Manually deleting volumes can remove session recordings that were not yet uploaded, SSH keys, and certificates. Use a destructive clean reinstall only when JumpCloud Support or a troubleshooting article tells you to.
Updating the Jump Server
Open Install Jump Server
- Log in to the JumpCloud Admin Portal.
- Go to Access > PAM > Jump Servers.
- Find the Jump Server you want to update.
- In the row Actions, select Install Jump Server.
The Install Jump Server page opens for that Jump Server.
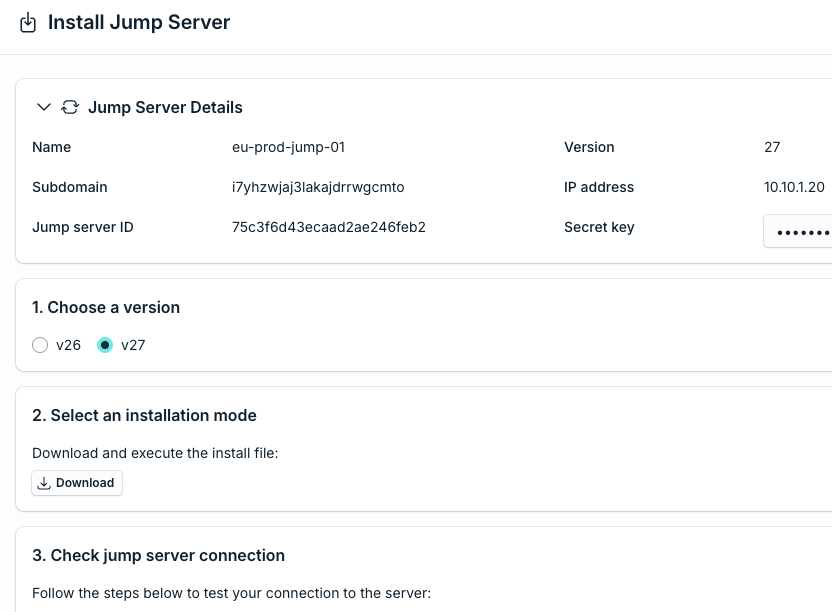
Choose a Version and Download the Install File
On the Install Jump Server page, complete these steps.
| Step on the page | What you do |
|---|---|
| 1. Choose a version | Select the version to install. Choose the latest version for a normal update, or another listed version if you need to change to that build. |
| 2. Select an installation mode | Under Download and execute the install file, select Download. |
Put the Install File on the Jump Server Host
Use either option. The file must end up on the Linux host that already runs this Jump Server.
| Option | Steps |
|---|---|
| Transfer the downloaded file | Copy the downloaded install file from your workstation to the Jump Server host (for example with SCP, SFTP, or your usual file transfer tool). Note the directory path where you place the file. |
| Copy and paste with a text editor | On the host, open a text editor such as nano, paste the full contents of the install file, save the file, then continue with the run steps below. |
Run the Install File as Root
On the Jump Server Linux host, switch to root:
sudo su
Make the install file executable, then run it. Replace the path and filename with your file:
chmod +x /path/to/<install-file>
/path/to/<install-file>
The same install file used for a first install removes the existing Jump Server containers and creates them again for the version you selected. You do not need to stop containers by hand for a normal update.
Root is required. If you are not root, the update fails. Use sudo su (or equivalent) before you run the install file.
Check Jump Server Connection
- Return to the Install Jump Server page in the JumpCloud Admin Portal.
- Under 3. Check jump server connection, select Check Connection.
- A new browser tab opens for the test. Compare the result to the table below.
| Result | What you see | What it means |
|---|---|---|
| Success | This server can only be accessed from the application. | The connection check succeeded. You can close the new tab. |
| Failure | The page does not load, or the browser shows an error such as This site can't be reached. | The host or network path is not ready. Confirm Docker, outbound allow list rules, and that the install finished without errors. |

Verifying the Update
Confirm success in the Admin Portal and on the Linux host.
In the JumpCloud Admin Portal
- Go to Access > PAM > Jump Servers.
- Confirm the Jump Server Status shows Online.
- Confirm the Version column shows the version you selected.
On the Linux Host
Run:
docker ps -a
Confirm the Jump Server containers are present and show Up.
| Container | Role |
|---|---|
| vo-core | Session engine and recording for many session types |
| vo-web | Web entry point for browser sessions |
| vo-sync | Sync, backups, and Platform commands |
| vo-bastion | Direct Access / shell port path |
| vo-database | Database session path |

Quick Reminder
| Step | Where | What you do |
|---|---|---|
| Open update path | Jump Servers > Actions > Install Jump Server | Open Install Jump Server for the existing row |
| Choose version | Install Jump Server | Select the target version |
| Download | Install Jump Server | Select Download |
| Transfer or paste | Your workstation to Linux host | File transfer, or copy into nano (or similar) |
| Execute | Linux host as root | chmod +x then run the install file |
| Verify | Admin Portal and host | Check Connection, Version column, docker ps -a |
Was this information helpful?