Monitor and Audit Server Access
This article explains how you monitor and audit access to resources in the Servers list in JumpCloud Privileged Access Management (PAM). In the JumpCloud Admin Portal, the menu and list are named Servers. That list is not limited to traditional operating-system servers. It includes privileged targets you reach through protocols such as SSH, RDP, Telnet, VNC, and Kubernetes.
You can read recording and in-use status from the Servers list, confirm resource configuration in Details, watch real-time sessions with Live session, disconnect users, and review finished sessions in Session History.
Unlike Databases, server session detail does not use a Query history panel. Post-session audit for Servers centers on Session details and Session recording when recording was enabled.
This article is for Administrators who manage Servers in JumpCloud PAM.
Prerequisites
- Access to the JumpCloud Admin Portal.
- At least one server resource already exists under Privileged Resources > Servers.
Considerations
- If a server shows Recording disabled, that resource does not produce video recordings for Session History.
- If you want sessions recorded, review rows that are missing Recording enabled. Then update that server’s session recording settings as needed.
- In use means the resource has active sessions open.
- From the Active Sessions page, click View all to open Session History for that server resource.
Opening the Servers List
- Log in to the JumpCloud Admin Portal.
- Go to Access > PAM.
- Open Privileged Resources.
- Click the Servers tab.
Reading the Status Column
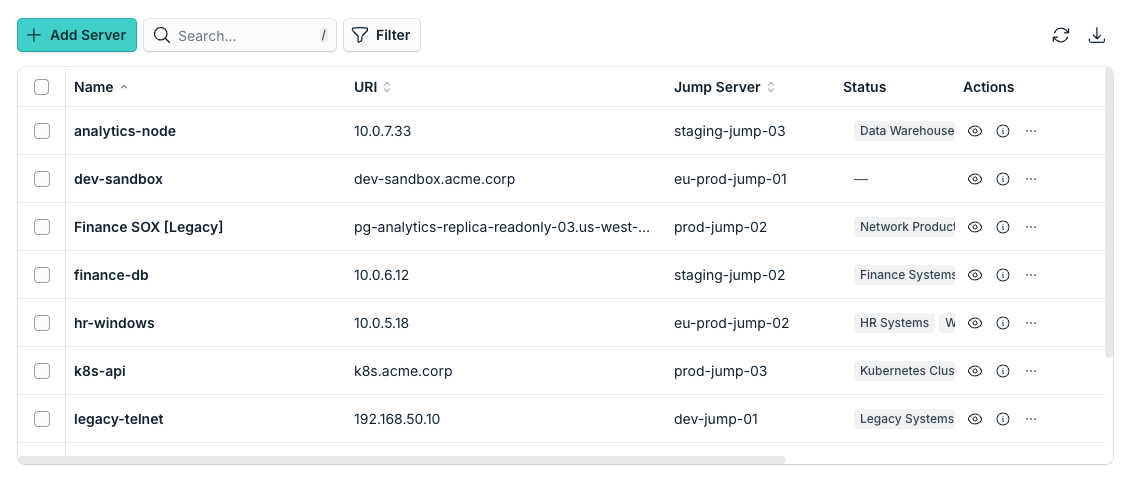
On the Servers list, use the Status column to monitor each resource without opening it. Hover each icon to see its tooltip.
| Icon | Tooltip | What it means |
|---|---|---|
| Camera | Recording enabled / Recording disabled | Whether session recording is on for that server resource. |
| Signal | In use / Not in use | In use means the resource has active sessions open. |
If a server shows Recording disabled, that resource does not produce video recordings for Session History. If you want sessions recorded, review rows that are missing Recording enabled. Then update that server’s session recording settings as needed.

Viewing Server Details
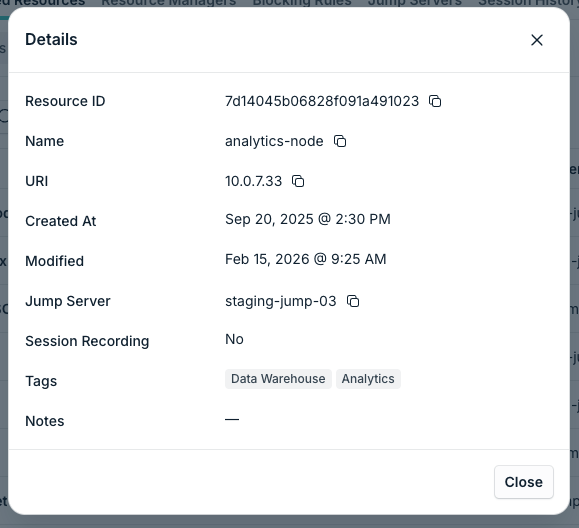
Use View Details to confirm how an existing server resource is configured.
- On the Servers list, find the resource you want to review.
- In the Actions column for that row, click the information icon. The tooltip is View Details.
- The Details dialog opens.
- Review the following fields:
- Resource ID
- Name
- URI
- Created At
- Modified
- Jump Server
- Session Recording
- Tags
- Notes
- Click Close.
Jump Server and Session Recording show how users reach the target and whether sessions can be recorded.
Viewing Active Sessions
When Status shows In use, open real-time sessions for that server resource.
- On the Servers list, find the resource that shows In use.
- In the Actions column for that row, click the eye icon. The tooltip is View Active Sessions.
- The page titled {server name} Active Sessions opens. The Back control is labeled Servers.
The Active Sessions table includes these columns:
- User
- Username
- Credential
- Start Date
- Actions
Watching a Live Session
- On the Active Sessions page, in the session row Actions, click the eye icon.
- The Live session opens.
- Review User, Resource, Type (shows Server), Username, Credential, and Start.
- Watch the live stream area.
- Click Cancel to close without disconnecting, or click Disconnect to end the session.
Disconnecting a User from a Resource
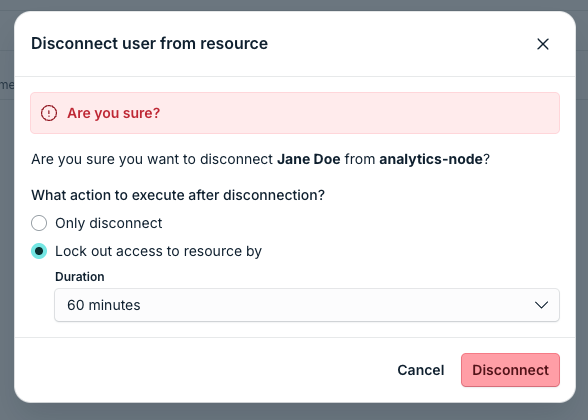
- On the Active Sessions page, in the session row Actions, click the power / disconnect control.
- The Disconnect user from resource dialog opens with Are you sure?.
- Confirm you want to disconnect the User from the Resource.
- Under What action to execute after disconnection?, choose one of the following options:
- Only disconnect
- Lock out access to resource by, then under Duration, choose a lockout period (for example, 60 minutes).
- Click Cancel to keep the session, or click Disconnect to end it.
On the Active Sessions page, click View all to open Session History for that server resource.
Reviewing Session History
Use Session History for after-the-fact audit of finished server sessions, including recordings when recording was enabled.
- Log in to the JumpCloud Admin Portal.
- Go to Access > PAM.
- Open Session History.
You can also reach Session History from Active Sessions by clicking View all.
- Find the server session. Look for Resource Type Servers (or Type Server in related session views).
- Open the session. Use View Recording or the session detail action for that row.
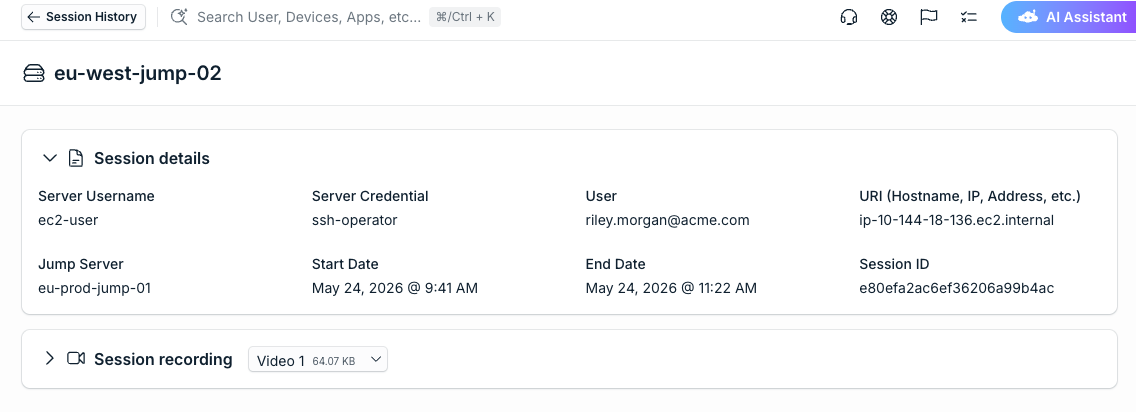
- On the session detail page, review these panels:
- Session details
- Session recording
In Session details, review fields such as:
- Server Username
- Server Credential
- User
- URI (Hostname, IP, Address, etc.)
- Jump Server
- Start Date
- End Date
- Session ID
In Session recording, select a video when recordings are available (for example, Video 1).
For Servers, post-session audit centers on Session details and Session recording when recording was enabled. Unlike Databases, server session detail does not use a Query history panel.
Was this information helpful?