Monitor and Audit Database Access
This article explains how you monitor and audit access to databases that already exist in JumpCloud Privileged Access Management (PAM). You learn how to read status at a glance on the Databases list, confirm connection details, watch real-time active sessions, disconnect users, and review post-session history including Query history.
Prerequisites
- Access to the JumpCloud Admin Portal.
- At least one database already exists under Privileged Resources > Databases.
Considerations
- If a database shows Recording disabled, that database does not produce video recordings for Session History.
- If you want every database recorded, review rows that are missing Recording enabled. Then update that database’s DB Shield and session recording settings as needed.
- In use means the database has active sessions open.
- From the Active Sessions page, click View all to open Session History for that database.
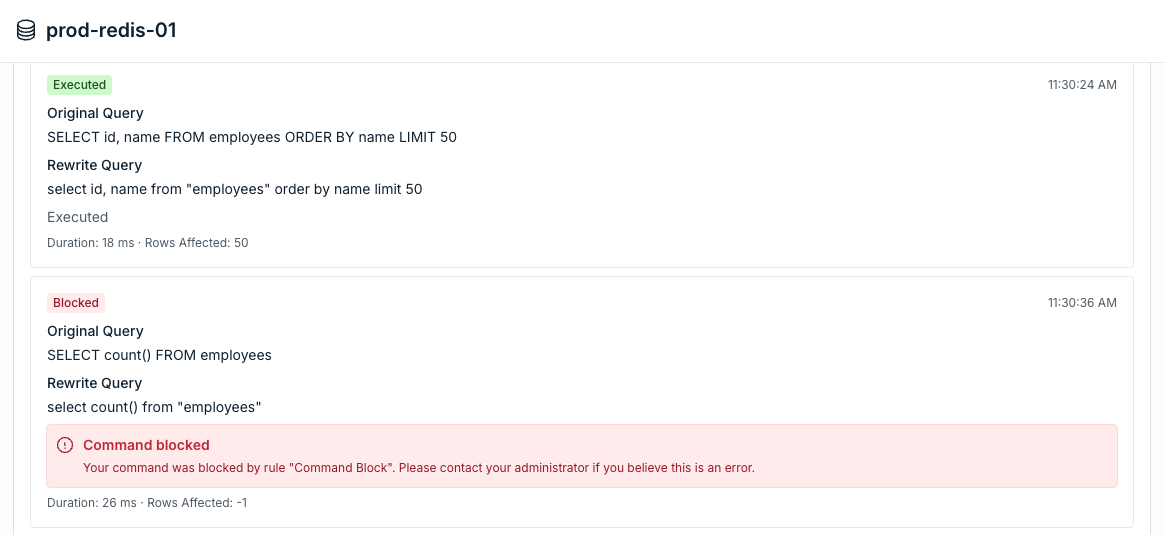
- For databases, Query history shows the commands typed during the session, including queries that were blocked.
Opening the Databases List
- Log in to the JumpCloud Admin Portal.
- Go to Access > PAM.
- Open Privileged Resources.
- Click the Databases tab.
Reading the Status Column
On the Databases list, use the Status column to audit each database without opening it. Hover each icon to see its tooltip.
| Icon | Tooltip | What it means |
|---|---|---|
| Shield | DB Shield Enabled. / DB Shield Disabled. | Whether DB Shield is on for that database. |
| Camera | Recording enabled / Recording disabled | Whether session recording is on. Recording applies when DB Shield supports isolated or recorded sessions. |
| Signal | In use / Not in use | In use means the database has active sessions open. |
If a database shows Recording disabled, that database does not produce video recordings for Session History. If you want every database recorded, review rows that are missing Recording enabled. Then update that database’s DB Shield and session recording settings as needed.

Viewing Database Details
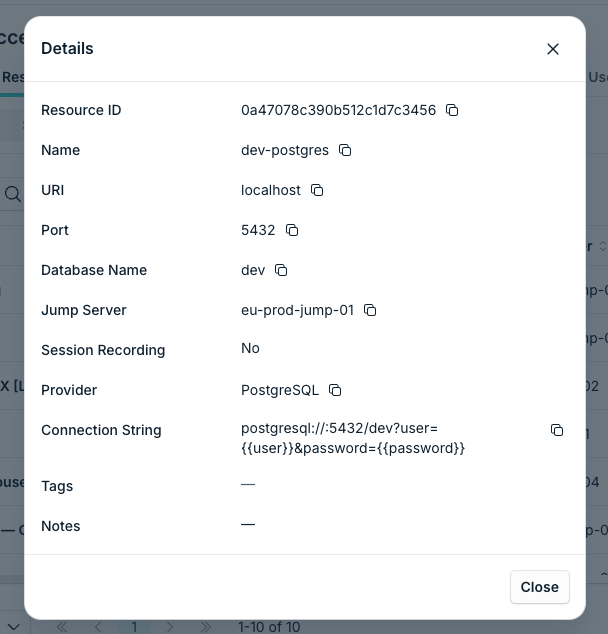
Use View Details to confirm how JumpCloud PAM connects to an existing database.
- On the Databases list, find the database you want to audit.
- In the Actions column for that row, click the information icon. The tooltip is View Details.
- The Details dialog opens.
- Review the following fields:
- Resource ID
- Name
- URI
- Port
- Database Name
- Jump Server
- Session Recording
- Provider
- Connection String
- Tags
- Notes
- Click Close.
Connection String shows how JumpCloud PAM connects to that database. Jump Server and Session Recording show how users reach the target and whether sessions can be recorded.
Viewing Active Sessions
When Status shows In use, open real-time sessions for that database.
- On the Databases list, find the database that shows In use.
- In the Actions column for that row, click the eye icon. The tooltip is View Active Sessions.
- The page titled {database name} Active Sessions opens. The Back control is labeled Databases.
The Active Sessions table includes these columns:
- User
- Username
- Credential
- Start Date
- Actions
Watching a Live Session
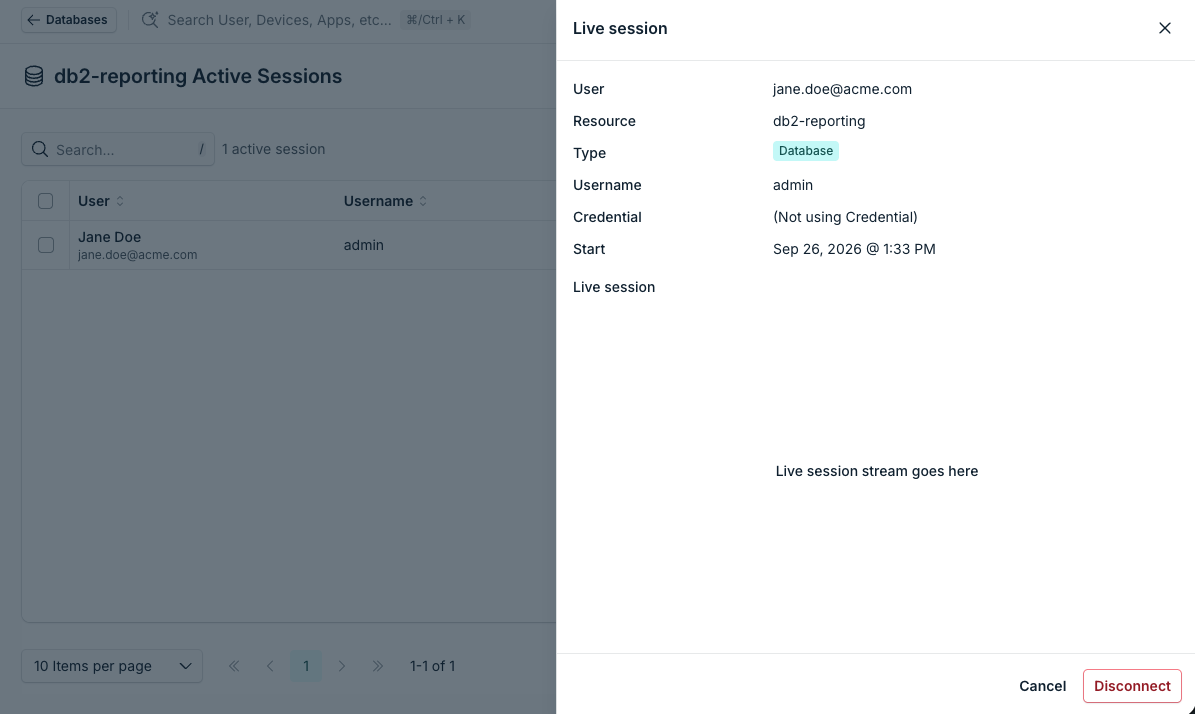
- On the Active Sessions page, in the session row Actions, click the eye icon.
- The Live session drawer opens.
- Review User, Resource, Type (shows Database), Username, Credential, and Start.
- Watch the live stream area.
- Click Cancel to close without disconnecting, or click Disconnect to end the session.
Disconnecting a User from a Resource
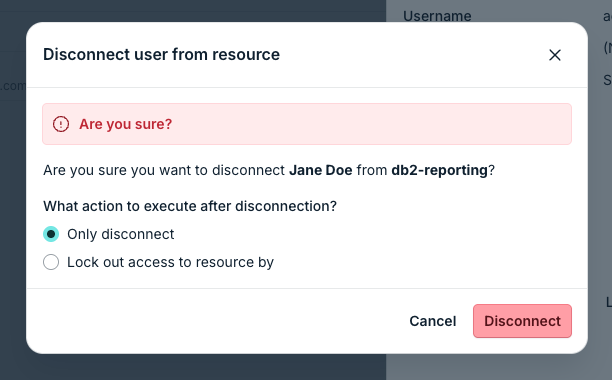
- On the Active Sessions page, in the session row Actions, click the power / disconnect control.
- The Disconnect user from resource dialog opens with Are you sure?.
- Confirm you want to disconnect the User from the Resource.
- Under What action to execute after disconnection?, choose one of the following options:
- Only disconnect
- Lock out access to resource by, then under Duration, choose a lockout period.
- Click Cancel to keep the session, or click Disconnect to end it.
On the Active Sessions page, click View all to open Session History for that database.
Reviewing Session History and Query History
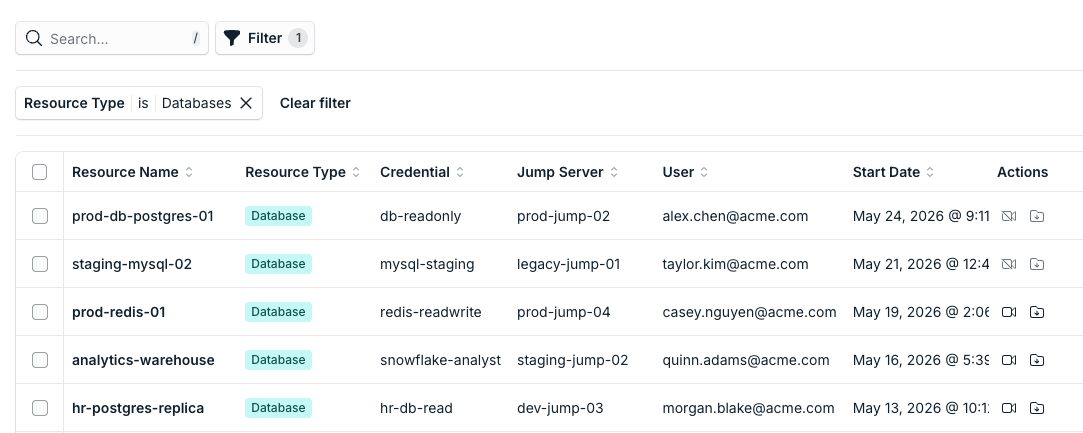
Use Session History for after-the-fact audit of finished database sessions, including recordings and SQL commands.
- Log in to the JumpCloud Admin Portal.
- Go to Access > PAM.
- Open Session History.
You can also reach Session History from Active Sessions by clicking View all.
- Find the database session. Look for Resource Type Database. You can filter by Resource Type set to Databases.
- Open the session. Use View Recording or the session detail action for that row.
- On the session detail page, review these panels:
- Session details
- Session recording
- Query history
Reviewing Query History
In Query history, review the following:
- Original Query
- Rewrite Query when it is shown
- Status Executed or Blocked
- The Command blocked message for blocked commands
- Duration
- Rows Affected
- Download
- Search
For databases, Query history shows the commands that were typed during the session, including queries that were blocked.
Was this information helpful?