Migrate From a Non-JumpCloud CA to JumpCloud CA for PKIaaS
Use this guide to migrate JumpCloud Remote Authentication Dial-In User Service (RADIUS) from a non-JumpCloud Certificate Authority (CA) to a JumpCloud-managed CA. This migration applies to an existing Passwordless configuration that uses user certificate-based authentication (CBA).
RADIUS does not trust the non-JumpCloud CA and the JumpCloud-managed CA at the same time in this migration. Selecting JumpCloud replaces the non-JumpCloud CA trust. A device can hold both user certificates during preparation, but RADIUS accepts only certificates issued by the selected CA.
Automated certificate delivery is available for Windows devices and Mac computers. The procedures in this article use JumpCloud Mobile Device Management (MDM). Simple Certificate Enrollment Protocol (SCEP) is standards based, so a third-party MDM that supports SCEP can use the endpoint. Follow the MDM vendor's instructions for policy configuration.
You can also issue certificates manually through the Admin Portal or allow Users to generate them through the User Portal. Manual certificate authentication to RADIUS has been tested on Windows, macOS, Linux, iOS, and Android. This article does not cover device CBA.
The automated macOS user policy path applies to newly enrolled Mac computers. The MDM-enrolled User must have a user channel. Use the manual certificate path for existing enrolled Mac computers until updated guidance is available.
Prerequisites
- Admin Portal access with permission to manage Certificate Authority, RADIUS, and certificate delivery policies.
- A JumpCloud RADIUS server configured for Passwordless authentication with Non-JumpCloud selected under Manage Certificate Authority.
- A wireless access point or router that supports Extensible Authentication Protocol Transport Layer Security (EAP-TLS), such as WPA2-Enterprise or WPA3-Enterprise Wi-Fi.
- An inventory of the Users and devices included in the migration.
- A maintenance window outside business hours.
- A copy of the legacy CA certificate and a record of the existing RADIUS and Wi-Fi policy settings.
Considerations
- Create and assign a new Wi-Fi policy for the JumpCloud-issued certificate. Retain the original Wi-Fi policy and legacy user certificates until migration is accepted.
- Issue and install the JumpCloud certificates before changing RADIUS trust.
- Deploy the new Wi-Fi policy before switching RADIUS to the JumpCloud-managed CA.
- A temporary Wi-Fi interruption can occur after the new policy is applied and before RADIUS trust is switched. Perform the cutover during the maintenance window.
- Verify policy status before switching RADIUS. If a device does not receive the policy, the User can manually select the installed JumpCloud-issued certificate.
- Save the SCEP challenge password when you create the endpoint. JumpCloud displays it once.
- Regenerating the SCEP challenge affects enrollment and renewal requests that use the previous challenge. It does not affect certificates that were already issued. Replace the challenge in every associated SCEP policy immediately.
Creating a JumpCloud Root CA
- Log in to the JumpCloud Admin Portal.
- Go to Security > Certificate Authority.
- Click the Root Certificates tab.
- Click Add CA.
- Review Common Name, Serial Number, Validity Period, and Expires.
- Copy the CA thumbprint.
- Download the root certificate for use in the certificate policies.

See Certificate Authority Management for more information.
Creating a SCEP Endpoint
Complete this section for automated certificate delivery.
- Create a SCEP endpoint by following Manage SCEP Endpoints.
- Select the JumpCloud CA created for the migration.
- Select the Users profile.
- Record the Unique Endpoint URL, CA fingerprint, and challenge password.
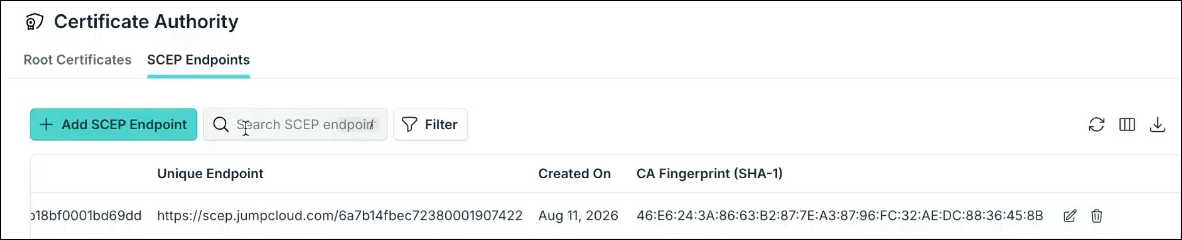
If you regenerate the challenge, update every associated SCEP policy immediately. Enrollment and renewal requests using the previous challenge fail. Certificates that were already issued remain valid.
Use the full endpoint URL for your region. The hostnames are scep.jumpcloud.com for the US, scep.eu.jumpcloud.com for the EU, and scep.in.jumpcloud.com for India.
Preparing Automated Certificate Delivery
Follow the Windows or macOS configuration in PKIaaS Configuration. These profiles issue user certificates.
Preparing Windows Devices
Configure these policies:
- An Install Certificate policy for the JumpCloud CA at the device level.
- An Install Certificate policy for the root CA that owns the RADIUS server certificate at the device level.
- A SCEP Profile policy at the user level.
- A new WiFi Configuration policy at the device level. Set AuthenticationMode to User.
In the new WiFi Configuration policy, configure CA Thumbprints, Trusted Servers, Certificate Issuer, and Certificate Issuer CA Thumbprints as described in PKIaaS Configuration. The certificate issuer setting directs the client to use a certificate issued by the JumpCloud CA.
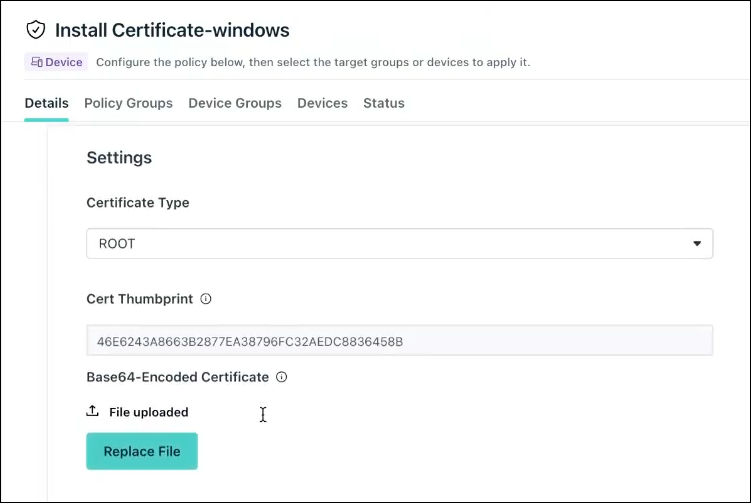
Assign the certificate and SCEP policies first. Verify their status and confirm that the user certificate is installed before assigning the new Wi-Fi policy.
Preparing Mac Computers
Configure these policies at the user level:
- An Install Certificate policy for the JumpCloud CA.
- An Install Certificate policy for the root CA that owns the RADIUS server certificate.
- A SCEP Profile policy.
- A new WiFi Configuration policy.
In the new WiFi Configuration policy, use Identity Certificate UUID to select the saved SCEP policy. Configure TLS Trusted Certificates and Add Server Name as described in PKIaaS Configuration.
Verify that each target Mac computer is newly enrolled and that the MDM-enrolled User has a user channel. Use manual certificate issuance for an existing enrolled Mac computer.
Preparing Manual Certificate Delivery
Use manual delivery for Windows, macOS, Linux, iOS, and Android devices that are not using the automated path. Issue and install each certificate before the maintenance window.
Allowing User Portal Certificate Generation
- Go to Security > Certificate Authority.
- Select the organization.
- Open Settings.
- Select the Allow Self-Service Portal Certification checkbox.
- Click Save.
The User completes these steps:
- Log in to the JumpCloud User Portal.
- Go to Security > Certificate Authority.
- Click Generate Certificate.
- Enter a password.
- Click Generate to download the password-protected certificate.
- Install the certificate by following User-Initiated Certificate Generation.
Issuing Certificates From the Admin Portal
- Go to Security > Certificate Authority.
- Select the organization.
- Click + Add.
- Select the Users who need certificates.
- Issue and download the certificates.
- Distribute each certificate to its intended User for installation.
Confirm that the JumpCloud-issued user certificate is installed on every device included in the manual migration path. Keep the legacy user certificate installed for rollback.
Piloting the Migration
Pilot the migration with a small group of representative Windows devices and Mac computers before the production cutover. Choose a test method that fits your network design and accounts for every client using the RADIUS configuration being changed.
- Confirm that the pilot devices contain the legacy and JumpCloud-issued user certificates.
- Create the new Wi-Fi policy by following PKIaaS Configuration.
- Assign the new Wi-Fi policy to the pilot group.
- Verify the policy status and confirm that the policy reached the pilot devices.
- Switch the test RADIUS configuration to the JumpCloud-managed CA.
- Reconnect each pilot device.
- Verify that EAP-TLS authentication succeeds with the JumpCloud-issued certificate.
- Verify the recovery and rollback procedures before scheduling production cutover.
The pilot is operational guidance. You can adapt the test setup to your network environment.
Performing the Production Cutover
Perform the cutover during the planned maintenance window.
Recording the Existing Configuration
- Go to Access > RADIUS.
- Open the target RADIUS server.
- Click the Authentication tab.
- Confirm that Non-JumpCloud is selected under Manage Certificate Authority.
- Retain a copy of the legacy CA certificate outside JumpCloud.
- Record the existing RADIUS settings, Wi-Fi policy settings, and policy assignments.
- Retain the original Wi-Fi policy and the legacy user certificates.
Switching to the JumpCloud-Managed CA
- Confirm that the JumpCloud-issued user certificate is installed on every target device.
- Assign the new Wi-Fi policy to the target Users, devices, or groups required by the platform-specific policy.
- Review policy status and identify devices that have not received the policy.
- On the RADIUS Authentication tab, select JumpCloud under Manage Certificate Authority.
- Review the confirmation message.
- Click Save.
- Reconnect the pilot devices first.
- Confirm that they authenticate with the JumpCloud-issued certificate.
- Reconnect and verify the remaining devices.
A device that did not receive the new Wi-Fi policy can continue to select the legacy certificate and fail authentication after the RADIUS switch. Manually select the installed JumpCloud-issued certificate to reconnect that device.
For a device using the manual delivery path, select the installed JumpCloud-issued certificate when connecting after the RADIUS switch. Later connections authenticate automatically after the first successful connection.
Rolling Back the Migration
Use this procedure if the production validation fails.
- On the RADIUS Authentication tab, select Non-JumpCloud under Manage Certificate Authority.
- Upload the retained legacy CA certificate.
- Click Save.
- Restore the original Wi-Fi policy assignments and settings so the devices select their retained legacy user certificates.
- For a Windows policy that remains active, replace the JumpCloud CA value in Certificate Issuer CA Thumbprints with the legacy CA thumbprint.
- Reconnect the affected devices.
- Confirm that EAP-TLS authentication succeeds with the legacy user certificate.
Do not remove the legacy user certificates or original Wi-Fi policy until the migration is accepted. Switching RADIUS back to the non-JumpCloud CA does not complete rollback if a device still selects the JumpCloud-issued certificate.
Completing the Migration
- Monitor authentication while Users reconnect.
- Record successful authentication with the JumpCloud-issued certificate for the target devices.
- Resolve devices that missed the Wi-Fi policy or still select the legacy certificate.
- End the rollback period after the migration is accepted.
- Remove obsolete Wi-Fi policy assignments and legacy user certificates according to your organization's certificate retirement process.
- Confirm that the legacy CA is not used by other services before retiring it.
Was this information helpful?