Get Started: Password Vault
JumpCloud Password Vault provides a unified, cloud-first solution to secure, and manage shared company credentials. With a scalable architecture, it eliminates identity and tool sprawl and reduces the risk of credential-based attacks across the organization.
This article guides Admins through the setup process—from enabling the Vault and enrolling user groups to managing shared credentials and audit logs.
Enabling Password Vault
In the Admin portal, Admins can enable the Password Vault.
To enable Password Vault:
- Log in to the JumpCloud Admin Portal.
If your data is stored outside of the US, check which login URL you should be using depending on your region. If your organization uses LDAP, RADIUS, or requires firewall allow list configuration, the Fully Qualified Domain Names (FQDNs) will also be region specific. See JumpCloud Data Centers for the URLs, FQDNs, and IP addresses.
- Go to Access > Password Vault.
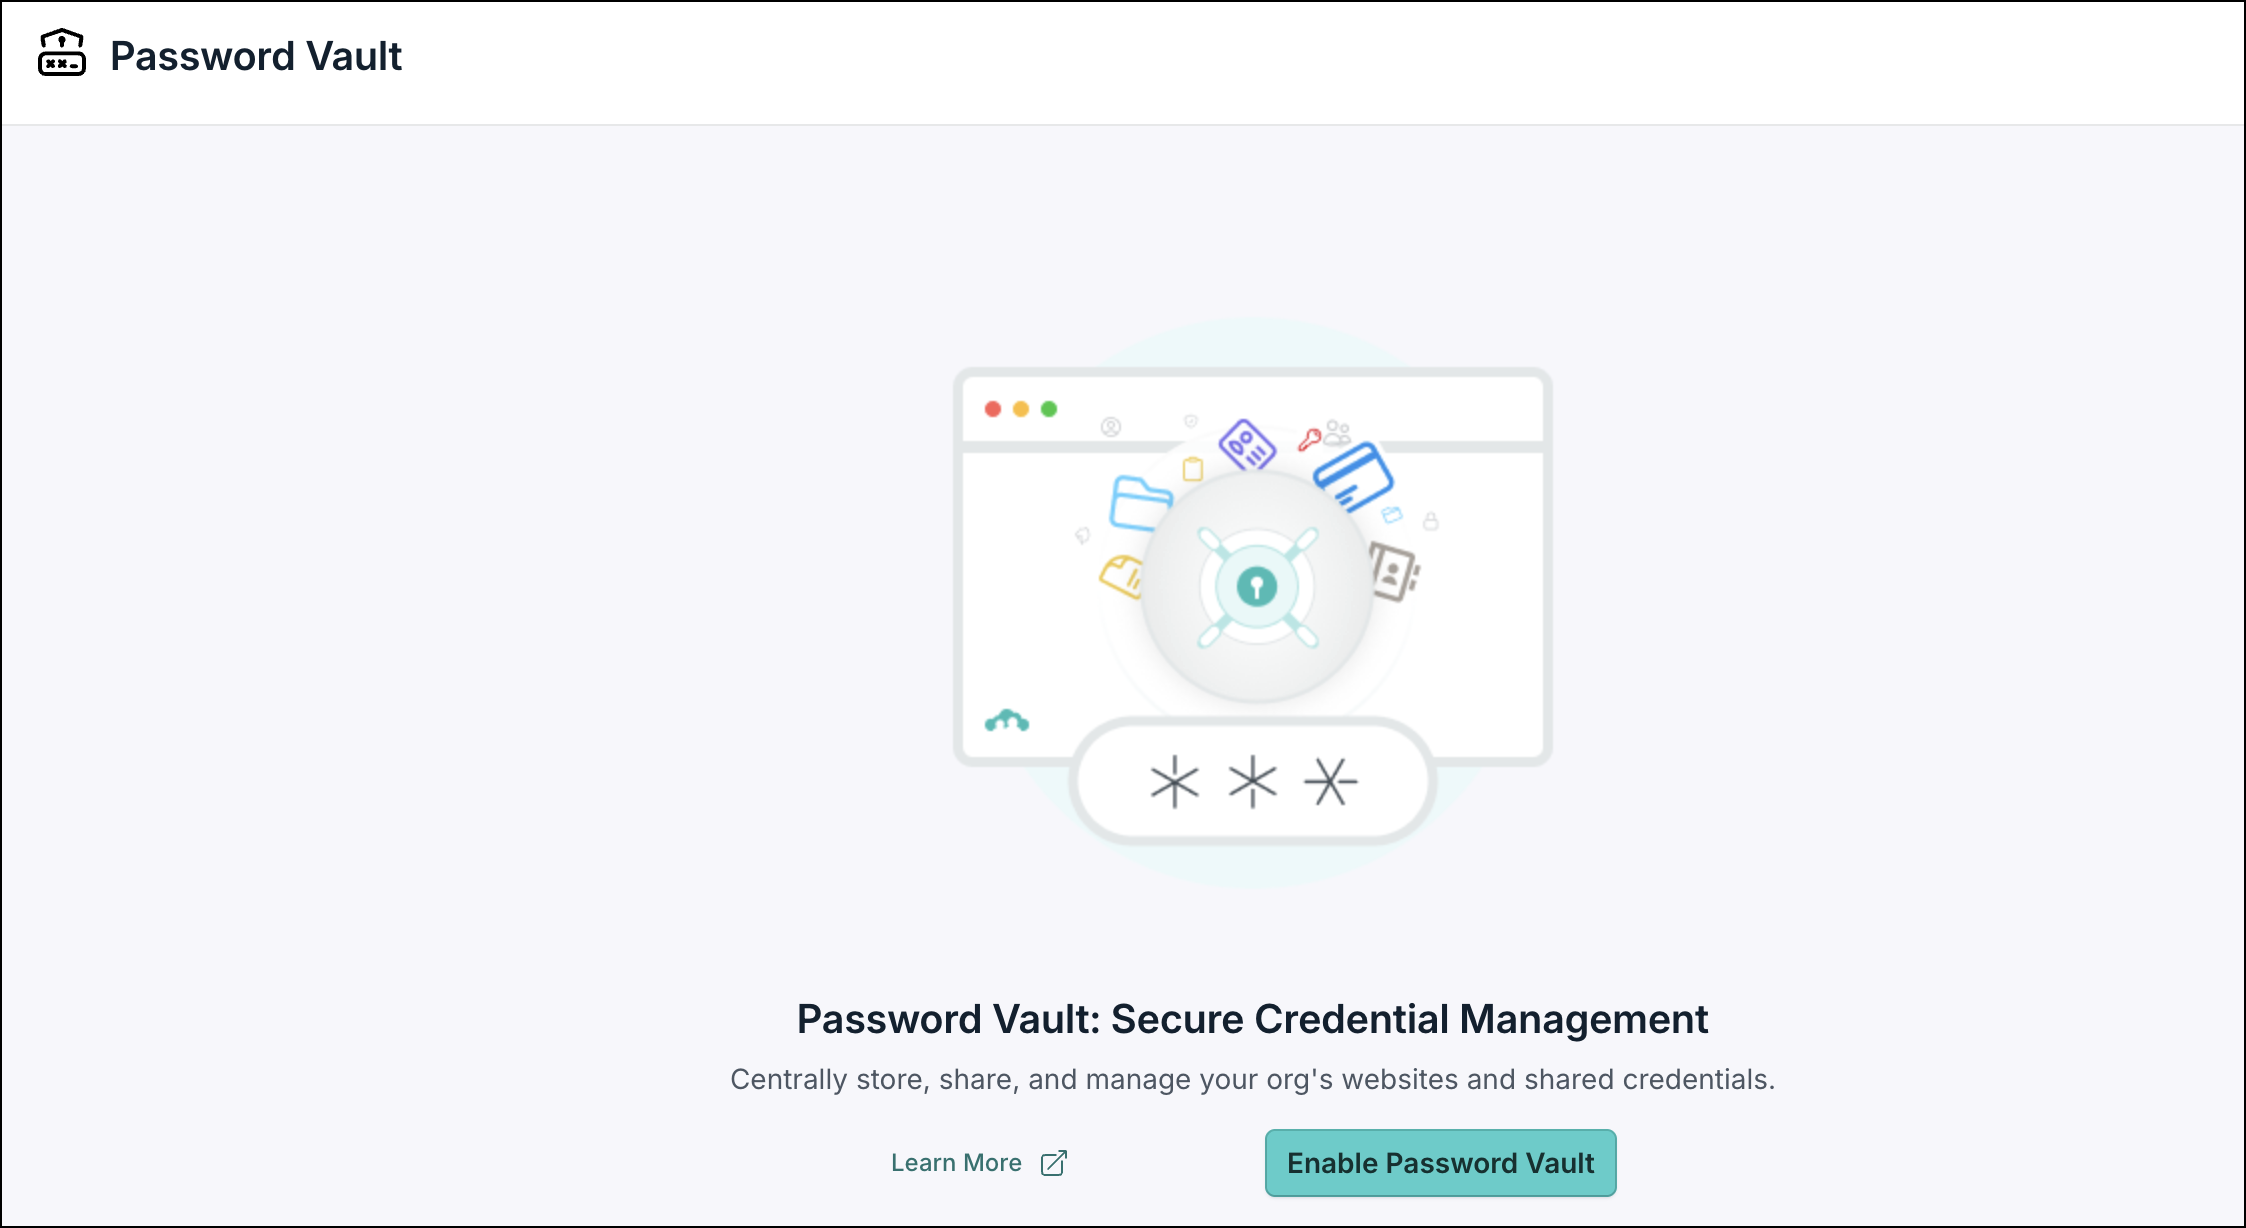
- Click Enable Password Vault.
User Enrollment
Upon user group enrollment, users receive an email to log in to the user portal to access Password Vault. Users can see the tab in the left navigation when they log in to the JumpCloud user portal.
Enrolling User Groups
To enroll user groups in Password Vault:
- Log in to JumpCloud Admin Portal.
- Go to Access > Password Vault > Users.
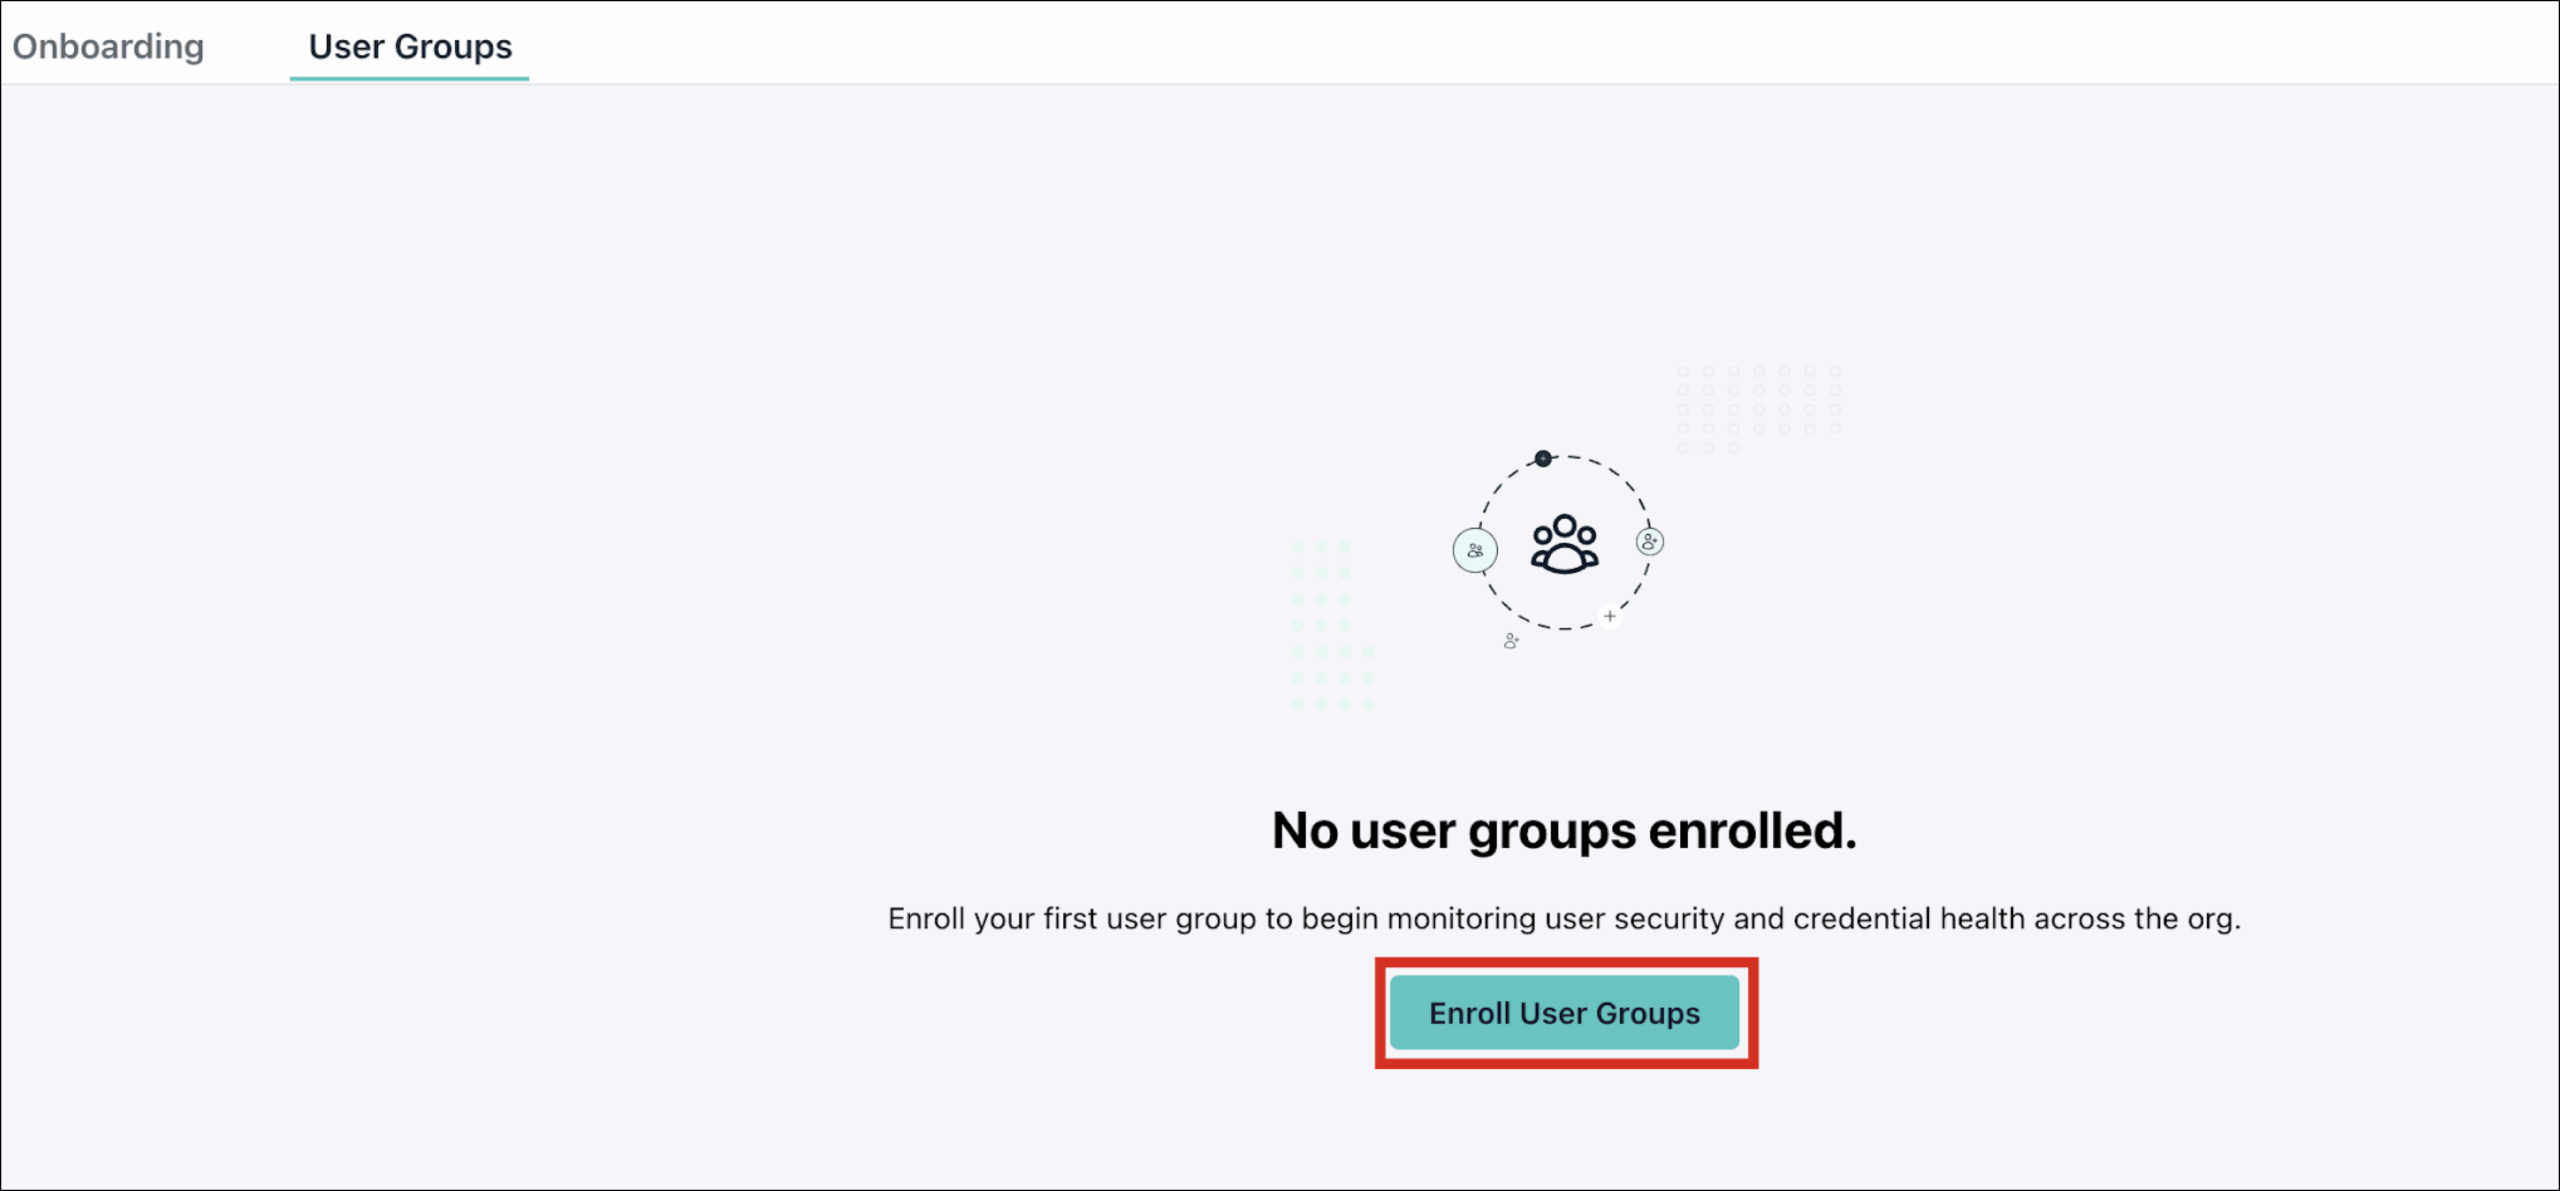
- Click the Enroll User Groups button. A popup appears.
- Select the desired user groups and click Enroll User Groups.
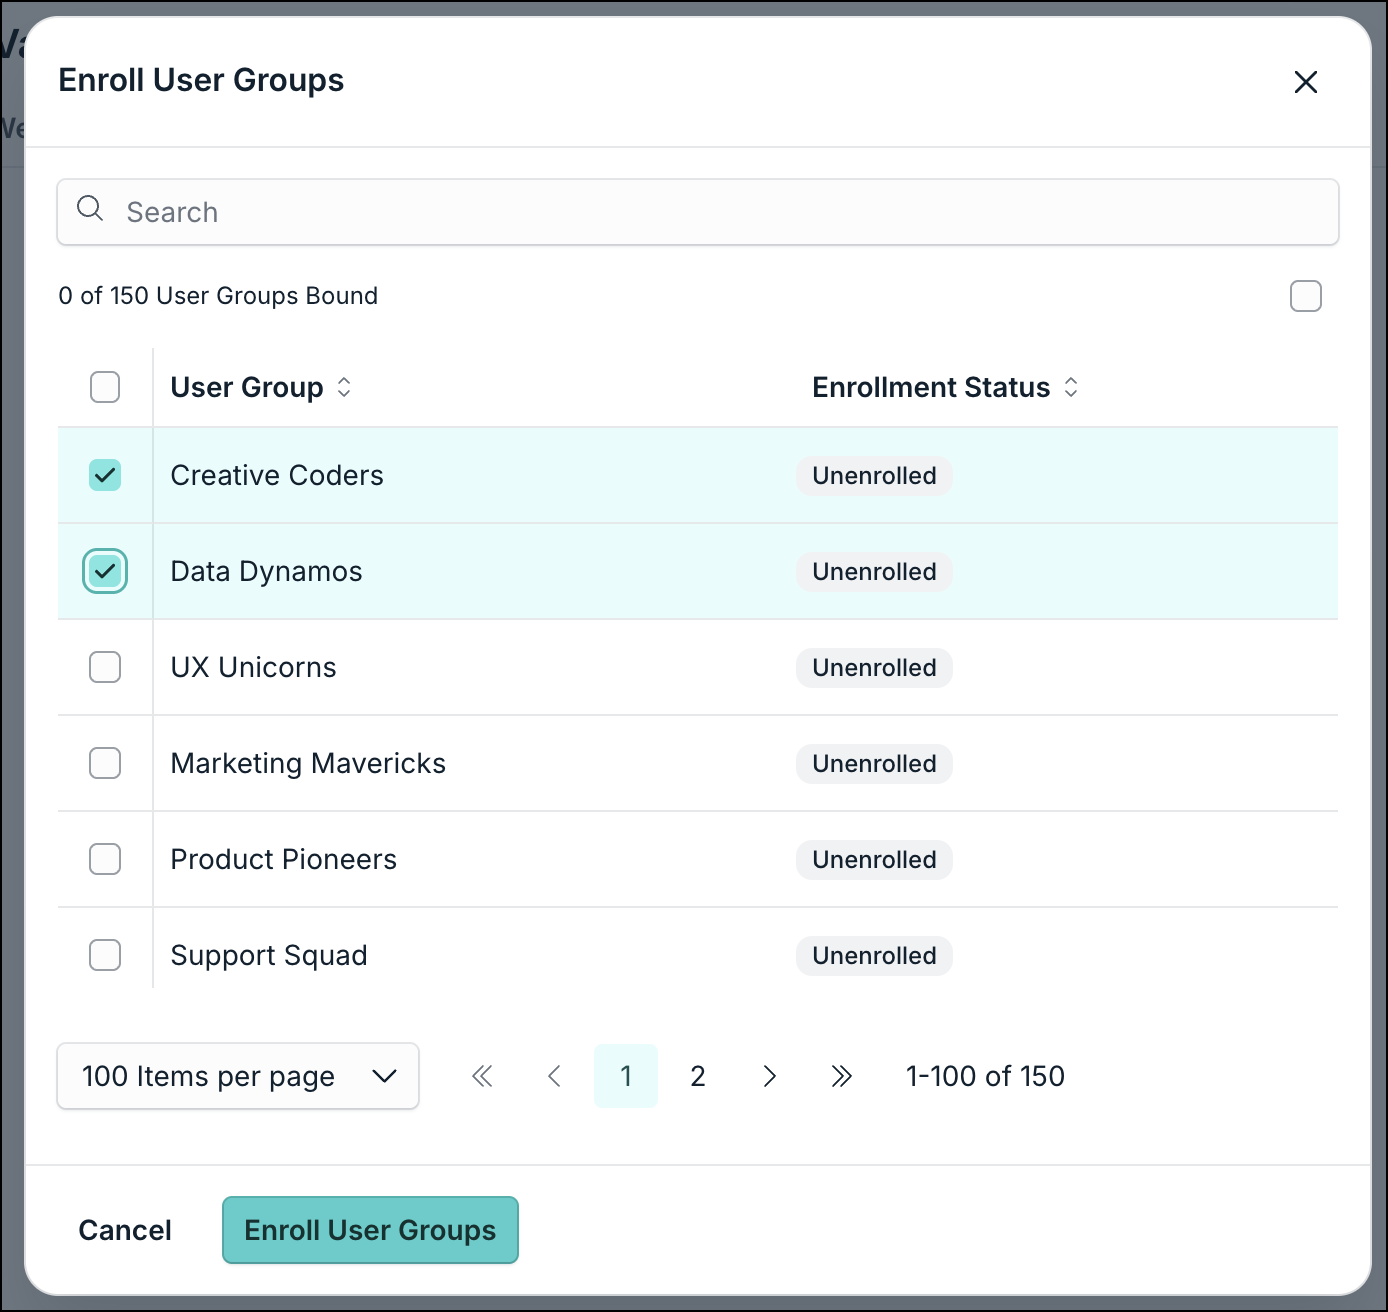
You have successfully enrolled a user group in Password Vault.
Share Resources and Managing Permissions in Bulk
Admins can efficiently organize and secure access to credentials and websites by managing permissions at the user group level, while maintaining a clear overview of access rights.
To share multiple resources:
- Go to the Users tab.
- Next to a user group, click the Manage Permissions button.
- In the Add Resources popup, select the websites and credentials that you want to share with the user group. Also, select the permissions on the right.
- Manage: The user can manage, edit, delete the resource.
- View Detail: View more details such as ID, URI, Name, etc.
- View Secret (credentials only): View the password.
- Connect: Open the website and log in.
The selected permissions will determine the level of access that the users have for these resources.
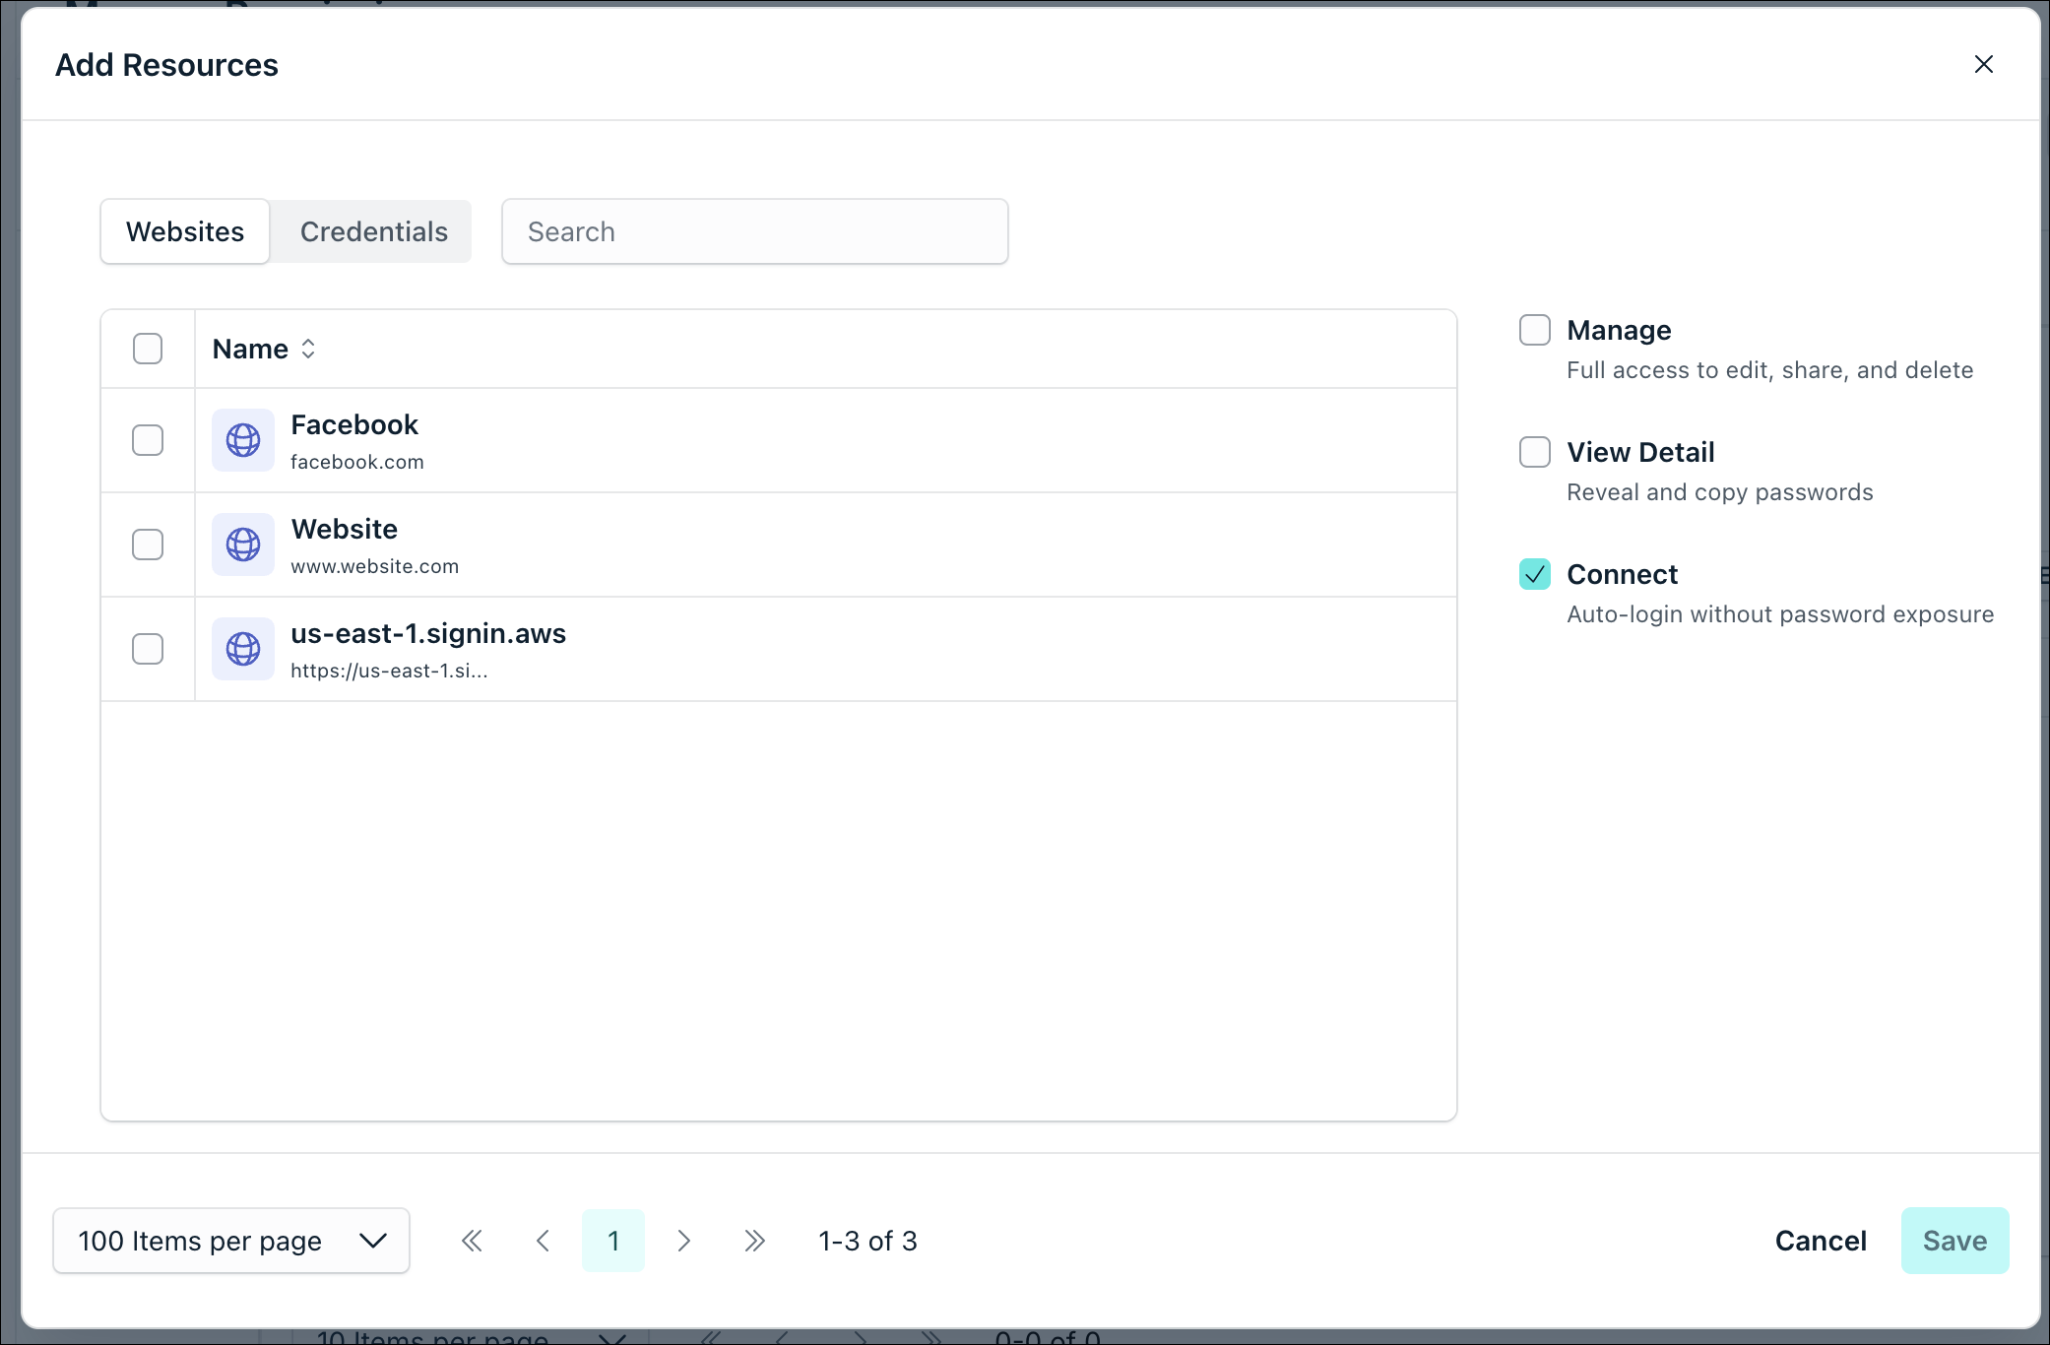
- Once done, click Save.
Now you can see the selected resources and the respective assigned permissions for this user group.
To remove everyone’s access in a user group, click the three dots next to a user group and then click Revoke Access.
Add both the website and the linked credential to ensure that users in the group can successfully launch the website using that credential.
Browser Extension
Password Vault autofill capabilities are available using the JumpCloud Go extension. The JumpCloud Go extension provides an all-encompassing platform experience capable of SaaS management, JC Go authentication, SSO Access and password management. These features are independent of each other. Password management capability does not require device registration.
Deploying JumpCloud Go
Installing the JumpCloud Go Browser Extension
The JumpCloud Go browser extension is required to use Password Vault. Admins can install it on their devices in the following ways:
- Chrome only: Deploy the browser extension to multiple devices using a JumpCloud policy or Google’s Chrome Browser Cloud Management (CBCM).
Chrome: Using CBCM to Deploy the Extension
If your org is already using Google Workspace, you can deploy the JumpCloud Browser Extension with CBCM. See Chrome Browser Cloud Management documentation.
To install the JumpCloud Go Browser Extension via CBCM:
- Go to the Google Admin console and log in as a Google Administrator.
- Go to Devices > Chrome > Apps & extensions > Users & browsers.
- Click ( + ) at the bottom of the screen, then select the Chrome icon to add a new extension from the Chrome Web Store.
- Search for the JumpCloud Go Browser Extension and click Select to add it.
- Click JumpCloud Go Browser Extension in the list to expand the menu, and in the right aside under Installation policy, select Force install.
- Selecting Force install in the Google Admin console will force the browser extension to install on managed Chrome browsers. See Google’s Managing Extensions in Your Enterprise.
You can use JumpCloud Browser Patch Management to enroll your devices in Google Chrome Browser Cloud Management and enforce the managed browser extensions. See Chrome Browser Cloud Management Settings.
If your organization is not using Google Workspace and CBCM, Admins can deploy the browser extension to macOS and Windows devices using a JumpCloud policy. For instructions on using a policy to deploy the browser extension, see Create a Mac or Windows Force-Installed Extension List Policy.
Installing JumpCloud Go on Your Browsers
Users can install the JumpCloud browser extension. Click the following links to download and install the JumpCloud Go extension for your respective browsers:
- Chrome app store
- Firefox
- Safari (Coming soon)
- Microsoft Edge
- Opera
The autofill icon is displayed when users click the username field while logging in.
Mobile Application
JumpCloud Protect Mobile app (available both in Android and iOS) provides an integrated experience combining User MFA and Password Vault experience.Users can retrieve and autofill Password Vault credentials into other mobile applications using JC Protect.
To set up Password Vault in the Protect app:
- Open the JumpCloud Protect app.
- Go to the Password Vault tab. Click Login to JumpCloud.
- Enter your credentials. After signing in, you see a tile for each credential type you’ve stored in Password Vault, along with the number of items in each.
- Click the All Folders dropdown at the top and select any folder to open it.
The tiles are updated to show the items in that folder. - Click a tile, such as Passwords, to see the items in it.
When you click any credential, all the details for that credential are displayed. The sensitive information is masked and can be accessed only when you click the eye icon.
Overview
The Overview page provides visibility into some of the most important Password Vault statistics like:
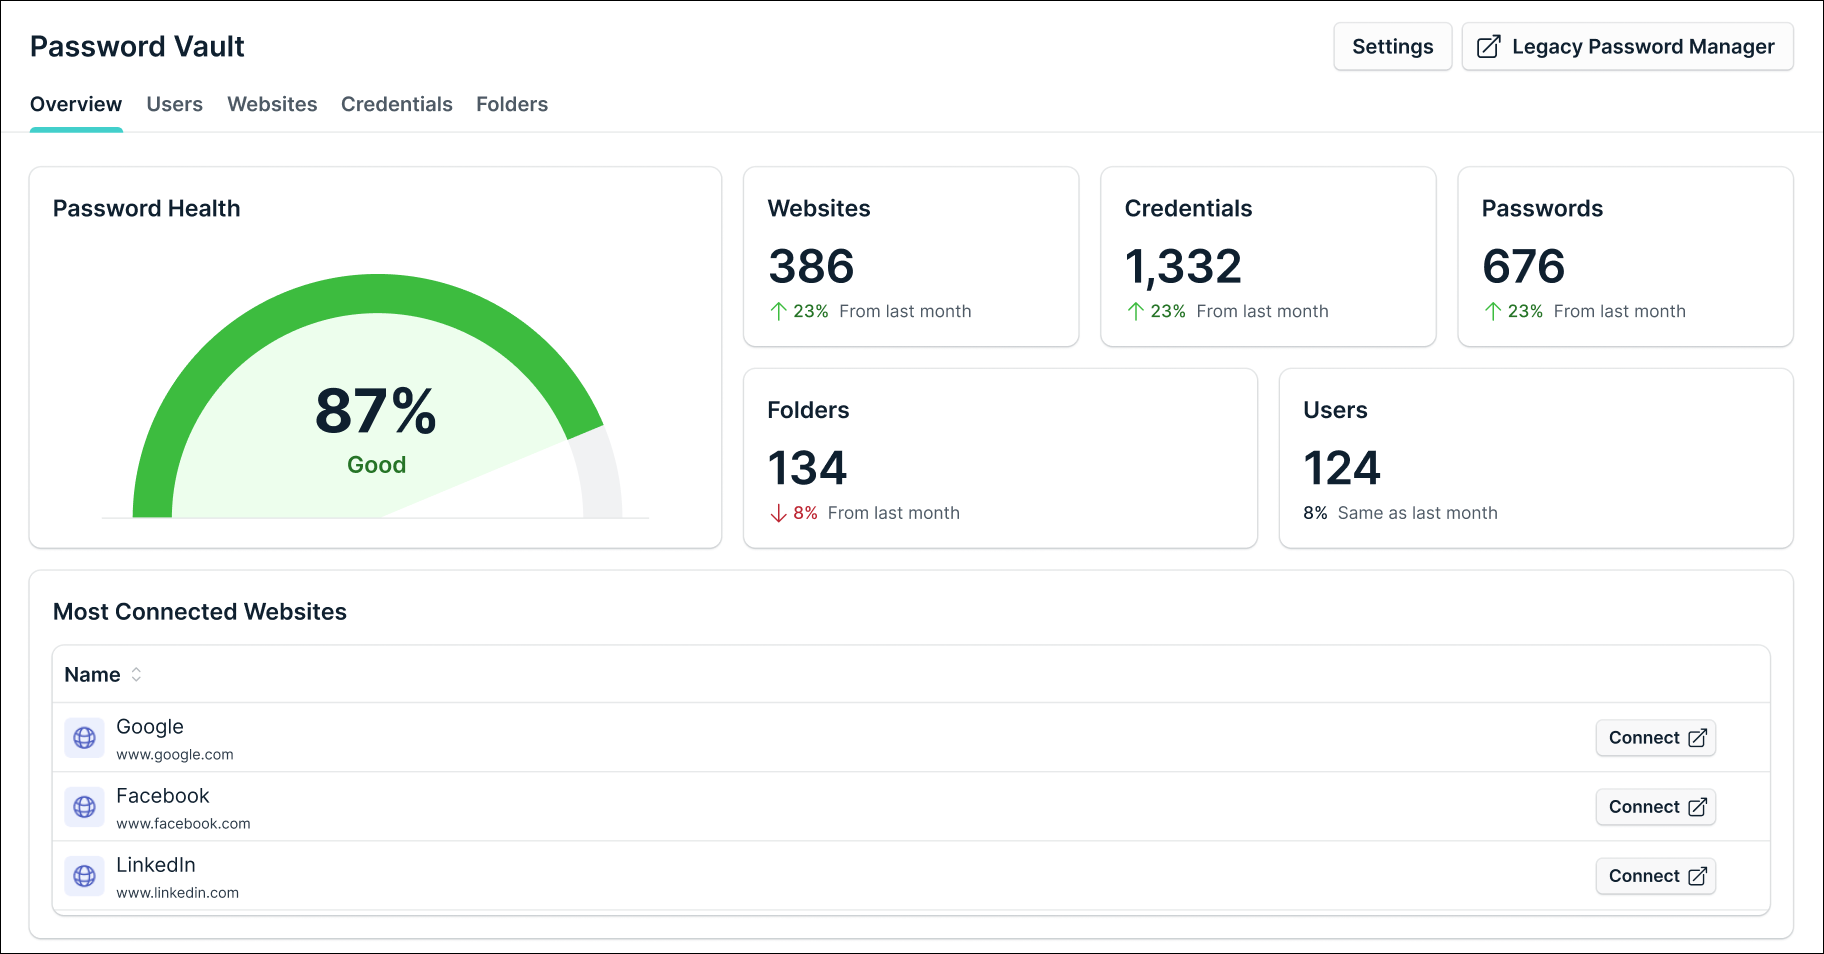
- Password Health
- Resources (websites, credentials, folders, users, etc.)
- Most Connected Websites
- Expiring and Expired credentials
- Weak Passwords and Inactive Credentials
The Overview page within the admin portal provides the statistics of all organizational credentials whereas the overview page within the user portal provides statistics on credentials owned by and shared with the user.
The View All button next to each tile takes you to the respective tab in Password Vault where all the resources are filtered. For example, clicking the View All button in the Weak Passwords tile takes you to the Credentials tab where all the weak passwords are filtered and displayed.
Websites
The website page allows administrators to configure and manage a non-SSO website application. The Admin can add multiple passwords to the same website and share with users and user groups.
Adding a New Website
- Open Password Vault.
- Go to Websites and click the Add button. The Add Website page is displayed.
- On this page, enter the following details:
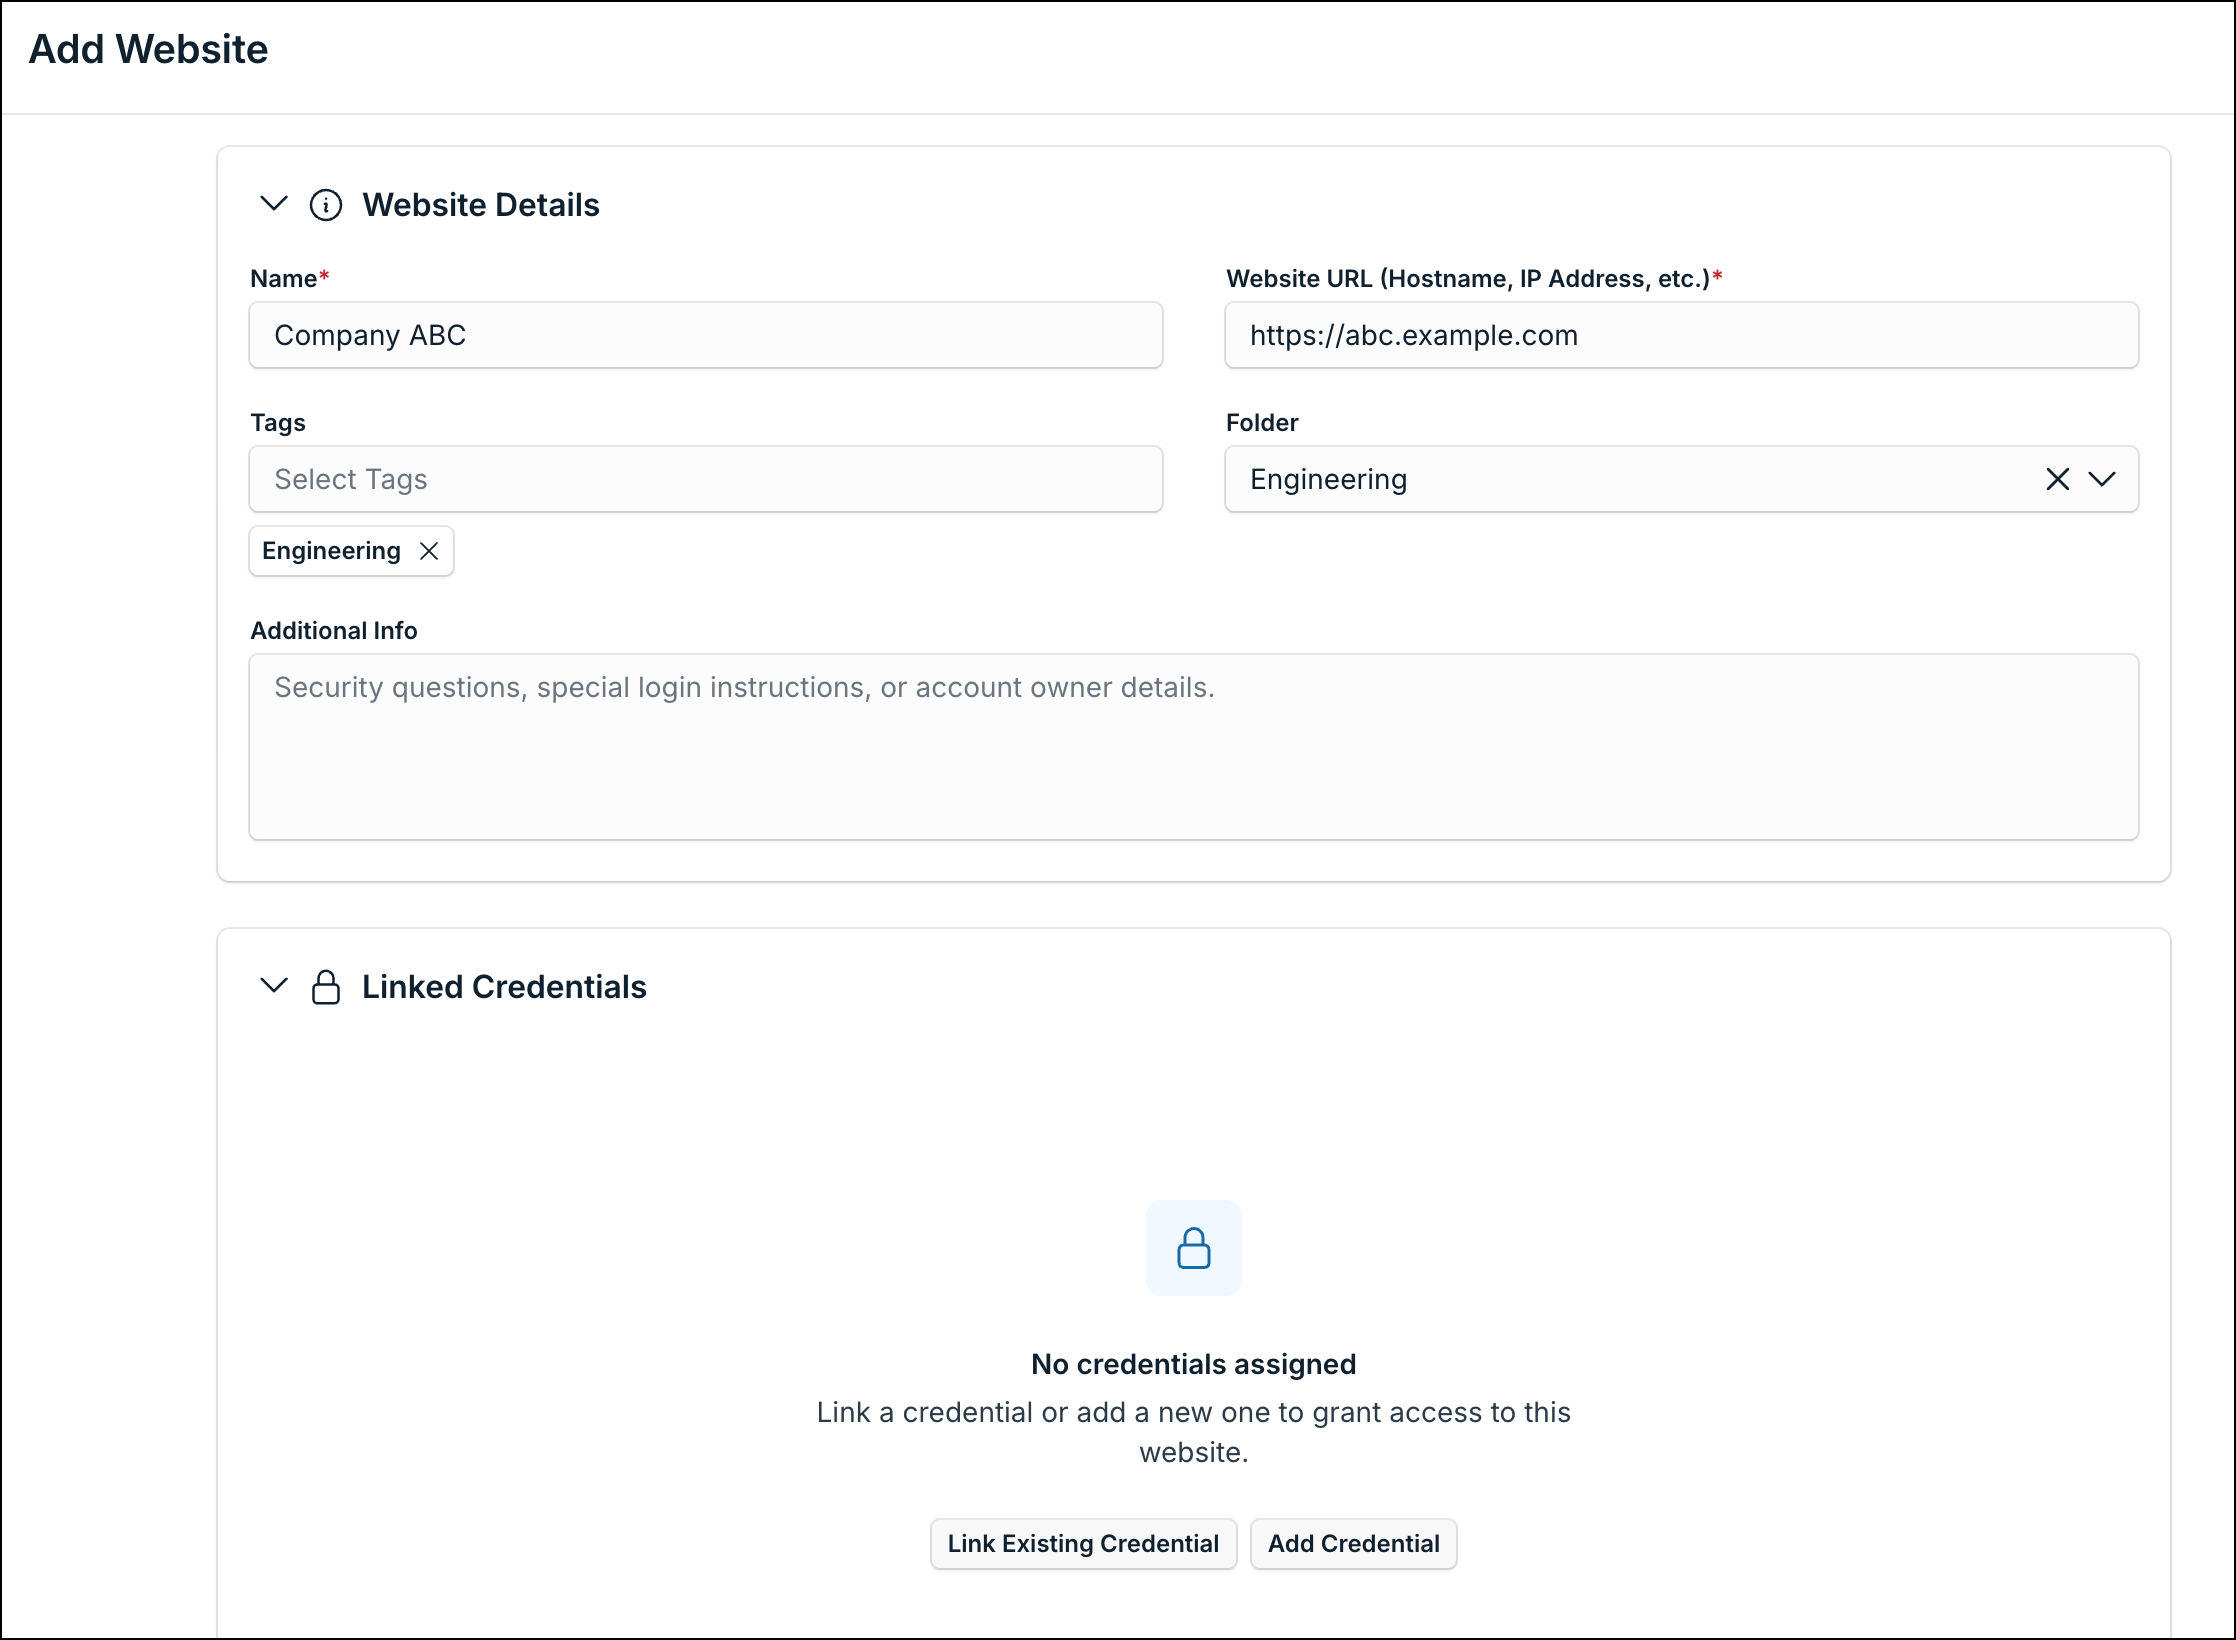
- Name: A clear name to help you identify the site (e.g., "Company LinkedIn Account")
- Website URL: The full website address, hostname, or IP address for access.
- Tags
- Folder
- Additional Info
- Under Linked Credentials, click Link Existing Credential to select a credential that's already stored in Password Vault, or click Add Credential to create a new one.
- Under Sharing Preferences, add the specific users or groups who should have permission to use this credential. A website along with multiple linked credentials can be shared with Users and Groups utilizing Sharing Preferences. Websites can be shared as per 3 access permission levels: Manage, View Detail, and Connect.
| Access Permissions | Description |
|---|---|
| Manage | Provides full ownership of the website allowing the user to edit and delete the website. |
| View Detail | Allows users to view the metadata of the website. |
| Connect | Allows users to launch the website URL. |
- Autofill parameters: Set autofill parameters so that the vault can identify username and password fields that might be named differently and are not automatically recognized by the extension.
- Click Save.
- Your website is now successfully added!
To ensure every login is secure and audited, always launch websites from the Password Vault platform.
For every website, you can perform the following actions:
- Connect: Launch the website and autofill the details using linked credentials.
- View the website details.
- View the website activity.
- Create a duplicate of the website.
- Archive the website data.
- Delete the website.
Additional Actions
You can perform the following additional actions on this page:
- Search: Search from available websites.
- Filter: Filter the websites according to various parameters.
- Refresh: Click this button to refresh the Websites page.
- Export: Click this button to export the available websites’ data.
Credentials
This page allows admins to manage and share passwords, keys, and other traditional credentials. There are no limitations on the number of credentials you can add to the Password Vault.
Credentials are categorized into two types:
- Organizational: By default (this setting can be changed) we assume all credentials that are not personal are organizational and can be managed by administrators who can 'take ownership' of the credentials and manage access. These credentials support folder-based sharing and can be added to Shared folders.
- Personal: These can’t be accessed by the Organizational Admin and will be deleted once the user leaves the Org. These can be organized into personal folders, but cannot be shared via folders. Personal credentials can only be shared individually.
Based on the access permission level for each credential, you can perform the following actions.
- View Secret: allows the user to view the secret of the credential.
- View the metadata of the credential. You can also view secrets after clicking Take Ownership.
- Click the three dots next to the View Secret button to view activity details, duplicate, archive, or delete the credential.
Adding a Credential
To add a credential from the Credentials tab:
- Log in to the JumpCloud User Portal.
- Go to Password Vault > Credentials.
- Click the Add button and enter the following required credential information.
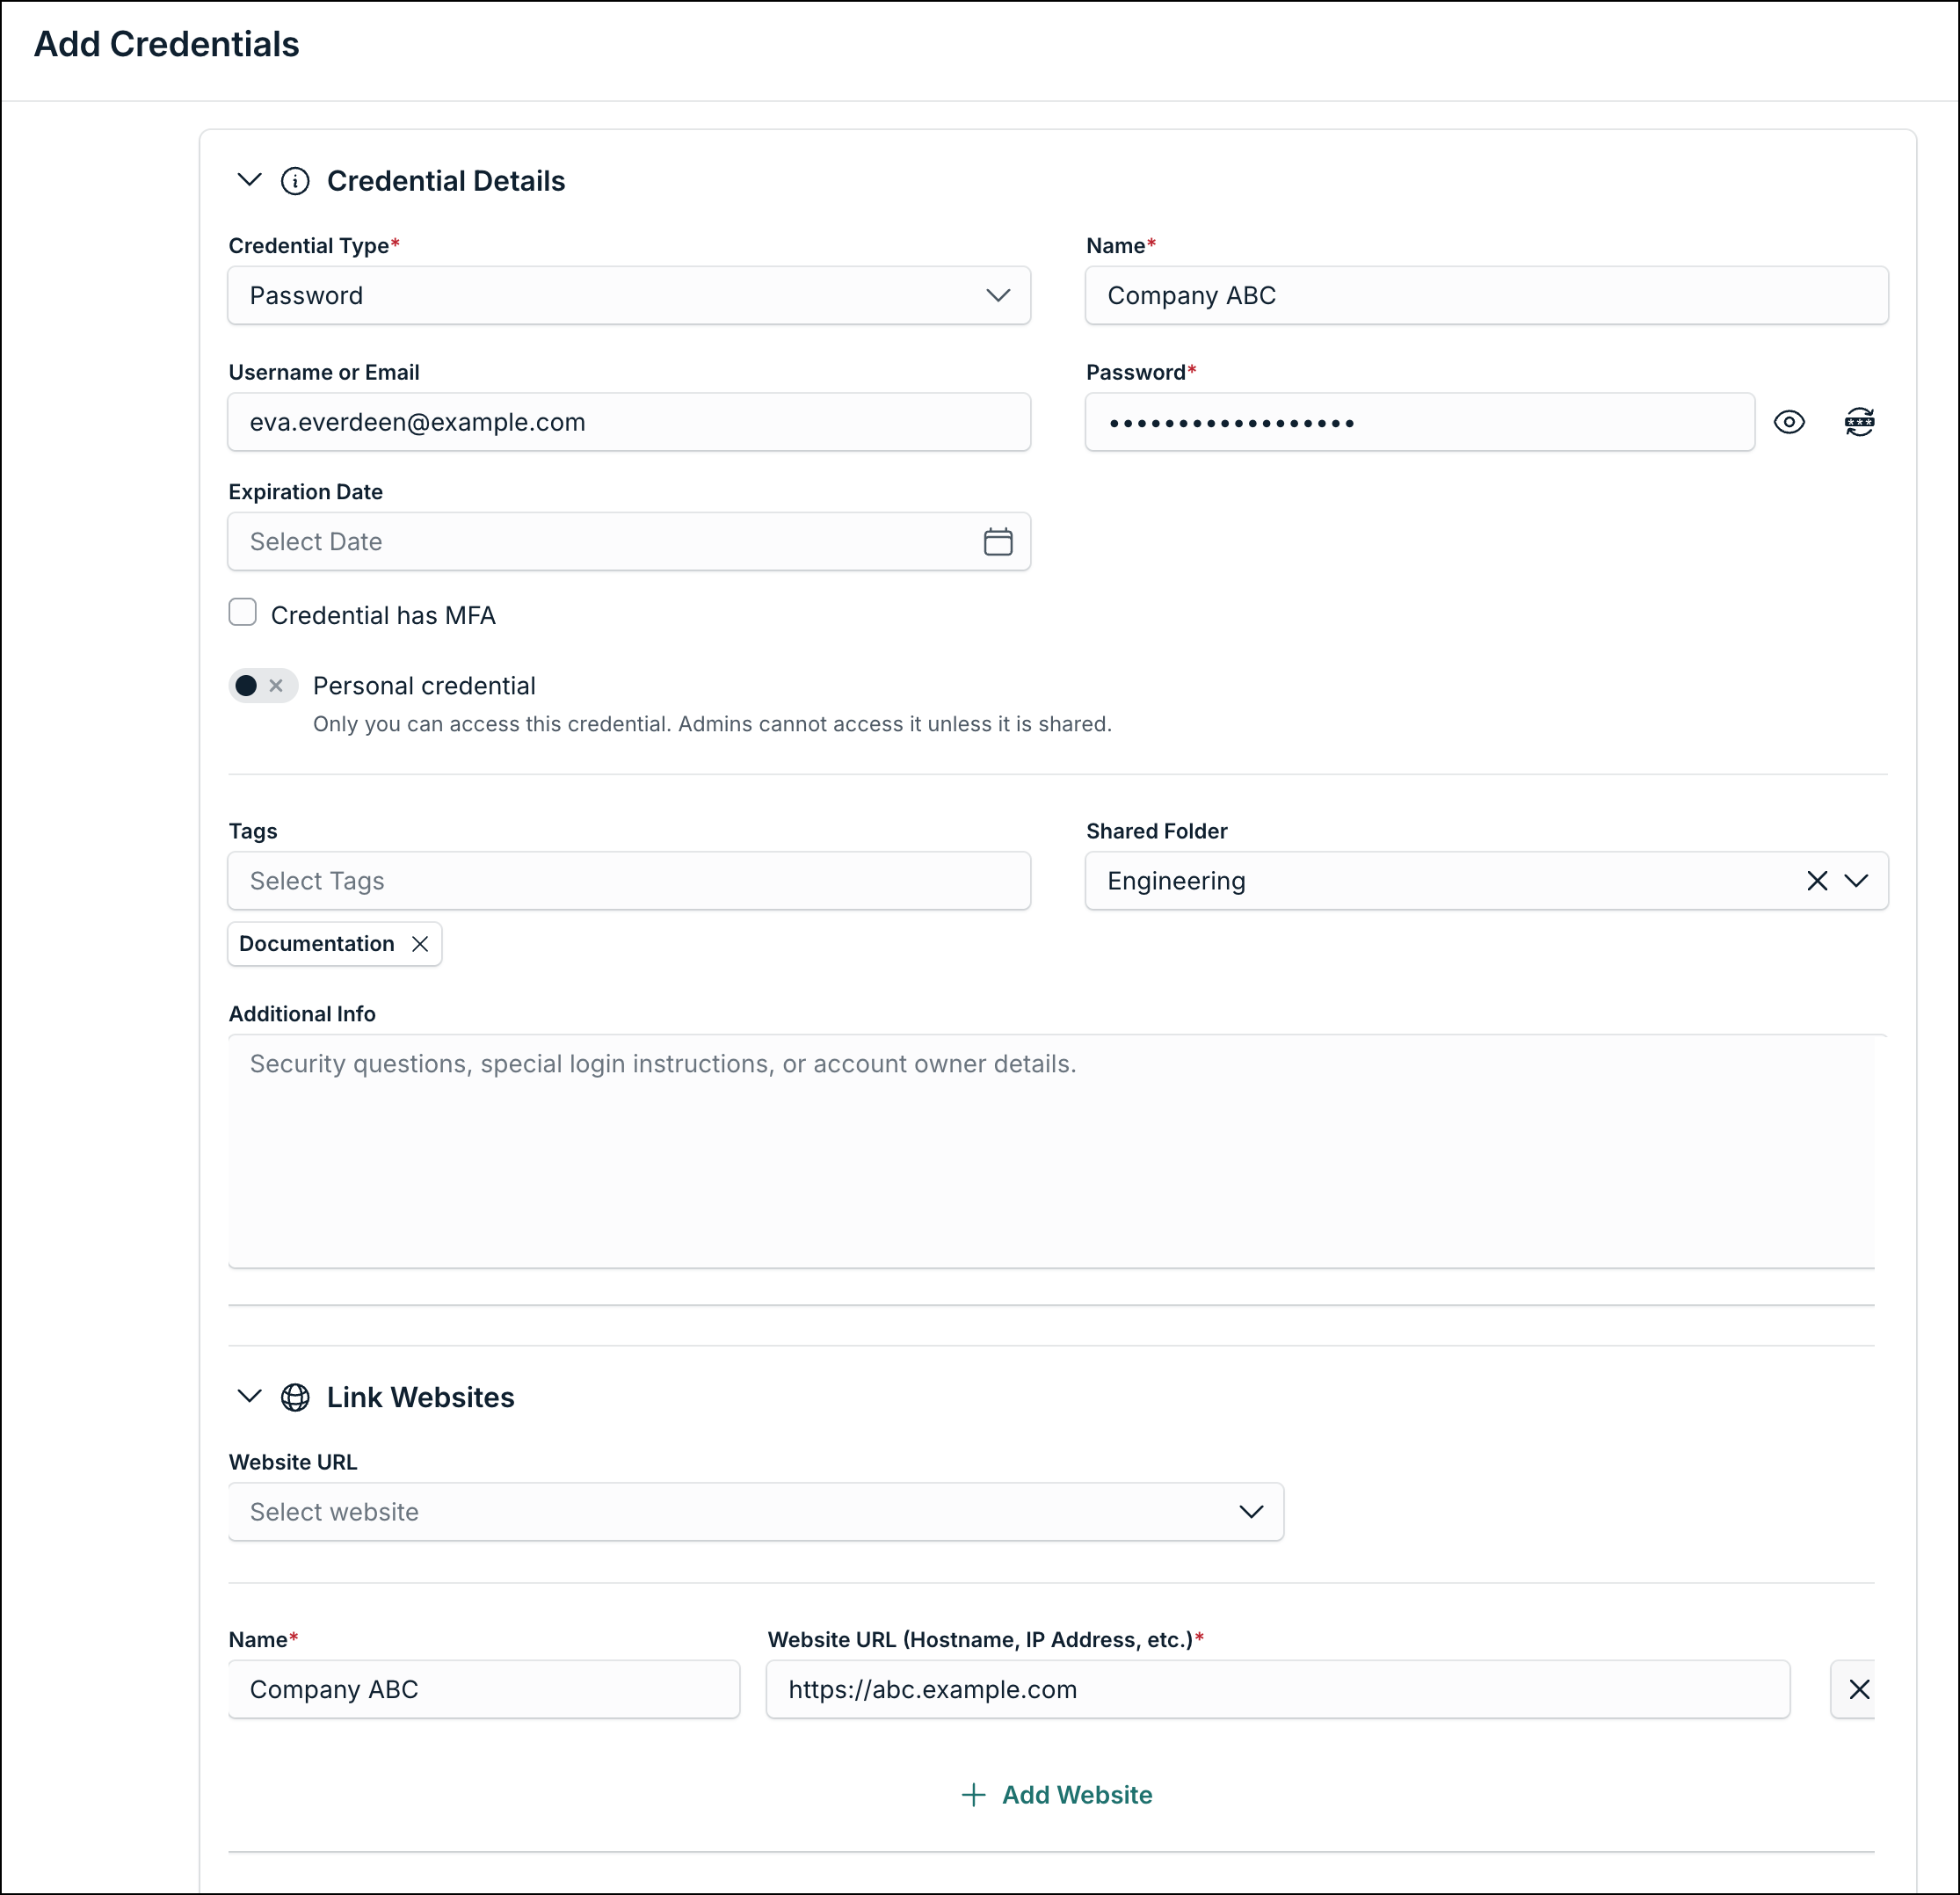
- Credential Type
- Name
- Username or Email
- Password
- Expiration Date
- Turn on the Personal credential toggle to save as a personal credential.
- Select the required Tags and Shared Folder from the dropdowns.
- Under Link Websites, select from dropdown or add websites to link to this credential.
- In Sharing Preferences, click Add to share the credential with other users. Also, assign them appropriate access by selecting the required checkboxes next to their names.
- Click Create to store the credential.
Credentials can be shared as per 4 access permission levels: Connect, View Secret, View Detail and Manage.
| Access Permissions | Description |
|---|---|
| Manage | Provides full ownership of the credential to the end user. The user can edit, share, and delete the credential. |
| View Detail | Allows users to view the metadata of the credentials. This includes ID, created at, modified, etc. |
| View Secret | Allows users to view the credentials. |
| Connect | Allows users to auto-fill without exposing the secret. |
Credentials can be shared either individually or via shared folders.
Additional Actions
You can perform the following additional actions on this page:
- Search: Search from available credentials.
- Filter: Filter the credentials according to various parameters.
- Refresh: Click this button to refresh the Credentials page.
- Export: Click this button to export the available credentials’ data.
Importing Credentials
You can bulk import credentials into the Password Vault using a CSV or Excel file.
- Go to Credentials.
- Click Import.
- Upload your file. If you do not have a file ready, click Download Template to use our pre-formatted spreadsheet.
- Map your file's columns to the corresponding fields in the Password Vault.
When mapping the “website URL” field for Password types, the option Create a single website for passwords with the same URL is selected by default. Keep this enabled to automatically group entries.
- Select your desired sharing preferences or shared folder. Credential can be shared either individually or via folders. Both actions are not possible.
- Click Import to start the process.
Folders
The folders page allows users to group multiple websites and credentials in folders and share it across to both users and user groups.
You can create the following types of folders:
-
Personal folders: Used to store personal credentials. These can’t be accessed by the Organizational Admin and will be deleted once the user leaves the Org.
-
Shared folders: Used to share websites and credentials with Users and Groups with four different access permissions:
Folder Access Permissions in Password Vault
| Folder Access Permission | Description |
|---|---|
| Connect | Only allows users to auto-login on to the websites without exposing the credentials |
| View | New Access Permission, unavailable in Legacy Password Manager. Users can view the secret and autofill credentials on website forms. |
| Edit | Users can add, edit, delete credentials and websites present in the folders. Users can view the secret and autofill credentials on website forms. |
| Manage | Provides users with complete ownership of the websites/credential. Users can view, edit, share, and delete the websites/credentials and folder. |
Personal Folders
The credentials saved in these folders are visible to you only. These can’t be accessed by others unless shared individually by the folder owner. When you click a folder, all the credentials in it are displayed along with their details.
Adding a New Personal Folder
To add a new personal folder:
- Log in to the JumpCloud admin portal.
- Go to Access > Password Vault > Folders.
- Click the Create button.
- Enter the following details:
- Folder name and description
- Folder type: You can turn on the Personal Folder toggle if you want this folder to be personal. New folders are shared by default.
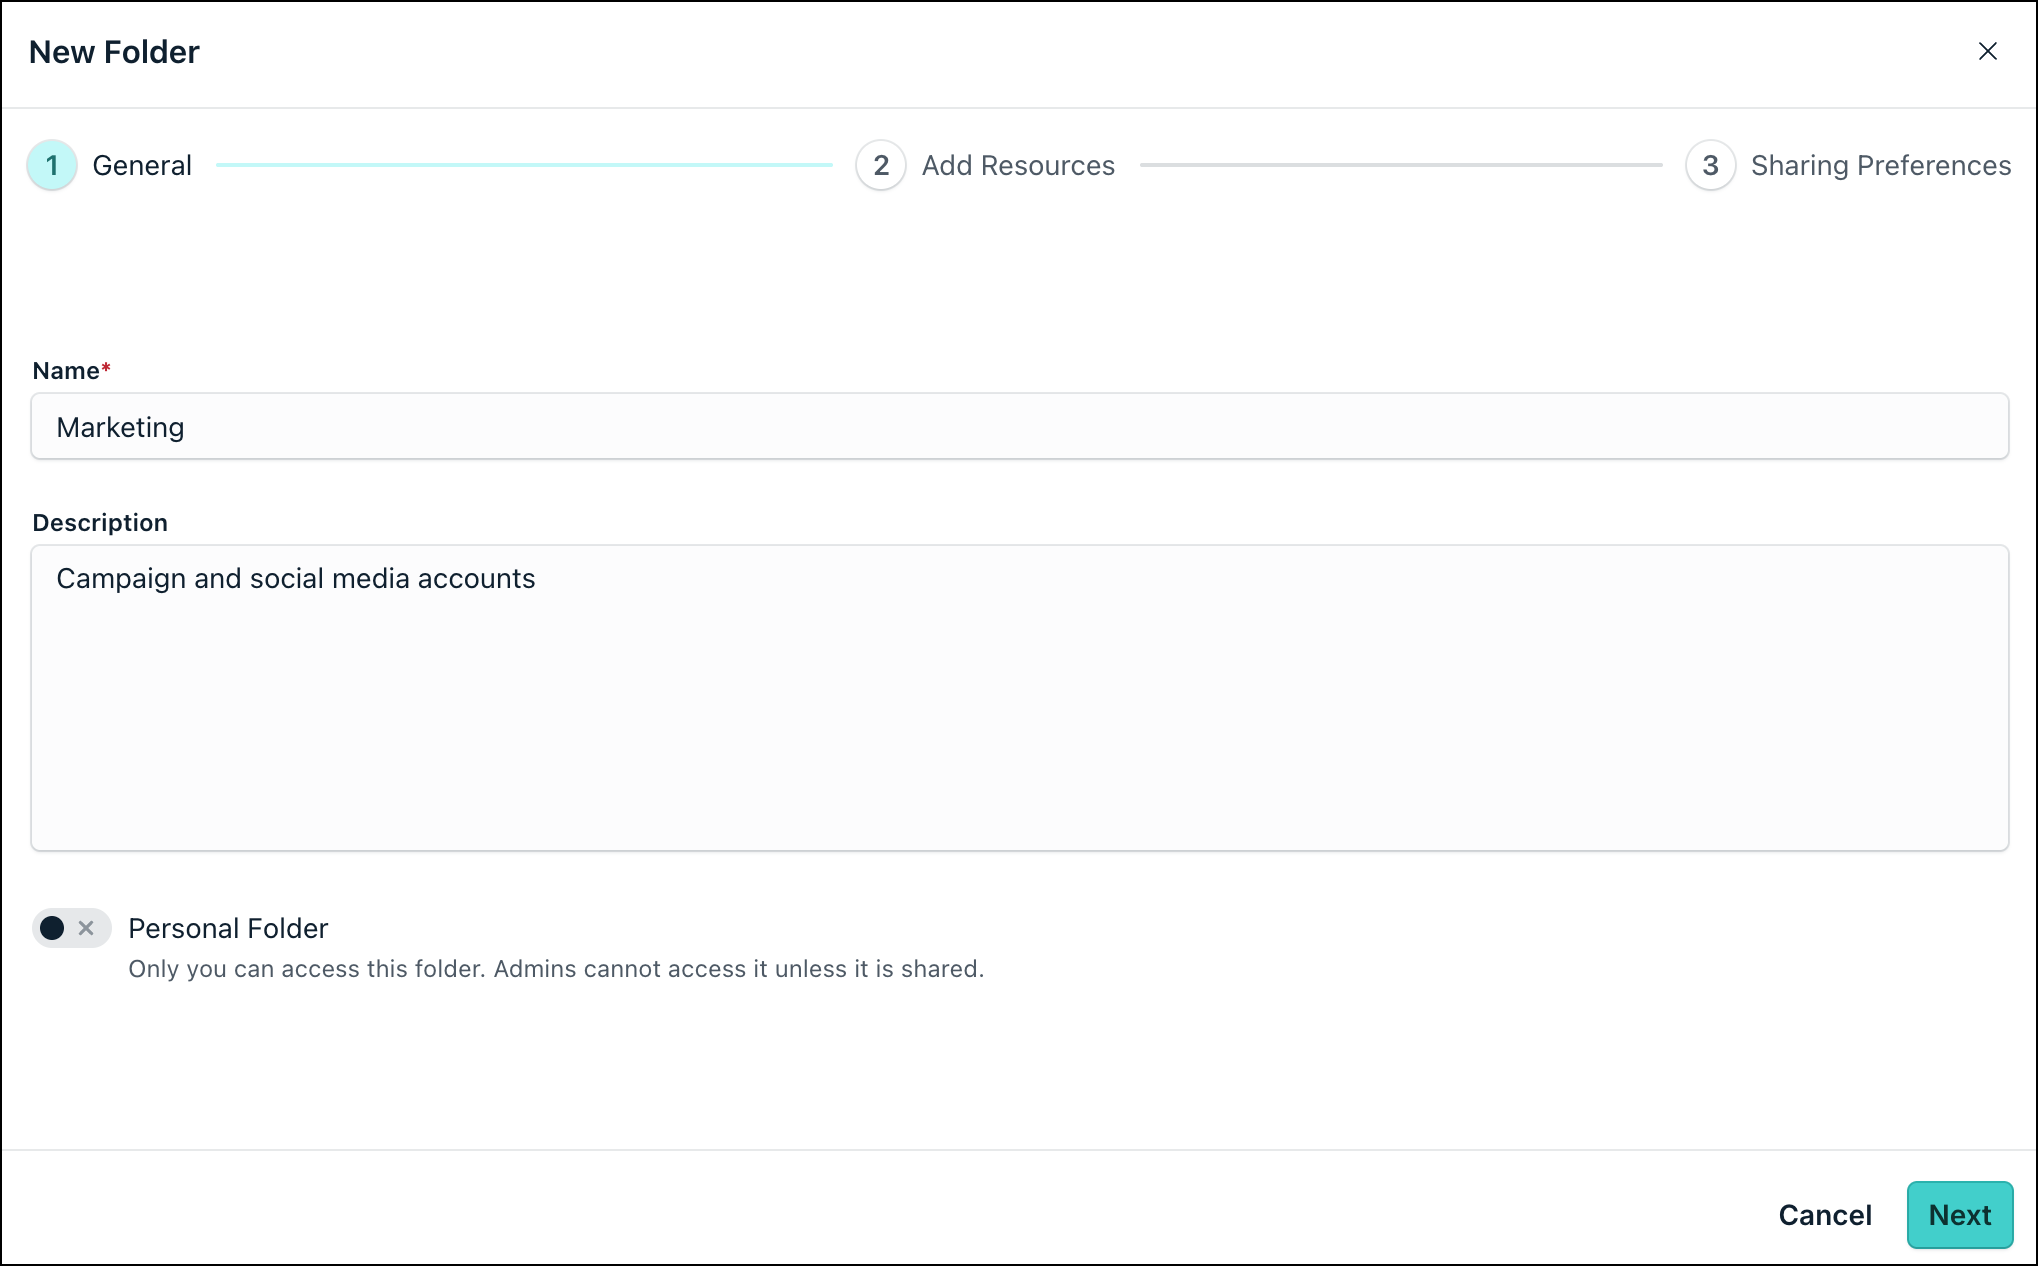
- Click Next.
- Add Websites/ Credentials: Choose the resources to add this folder.
- After selecting all the credentials, click Create.
A new personal folder is created.
Shared Folders
Use Shared Folders to organize and securely distribute credentials to team members.
- Credentials can be shared either individually or via a folder, but not both.
- A credential or website can be assigned to only one folder at a time.
Adding a New Shared Folder
To add a new shared folder:
- Log in to the JumpCloud admin portal.
- Go to Access > Password Vault > Folders.
- Click the Create button.
- Enter the following details:
- Folder name and description
- Leave the Personal Folder toggle off. New folders are shared by default.
- Click Next.
- Add Websites/ Credentials: Choose the resources to add the shared folder. Click Next.
- Select users/ user groups with whom you want to share the contents of the folder.
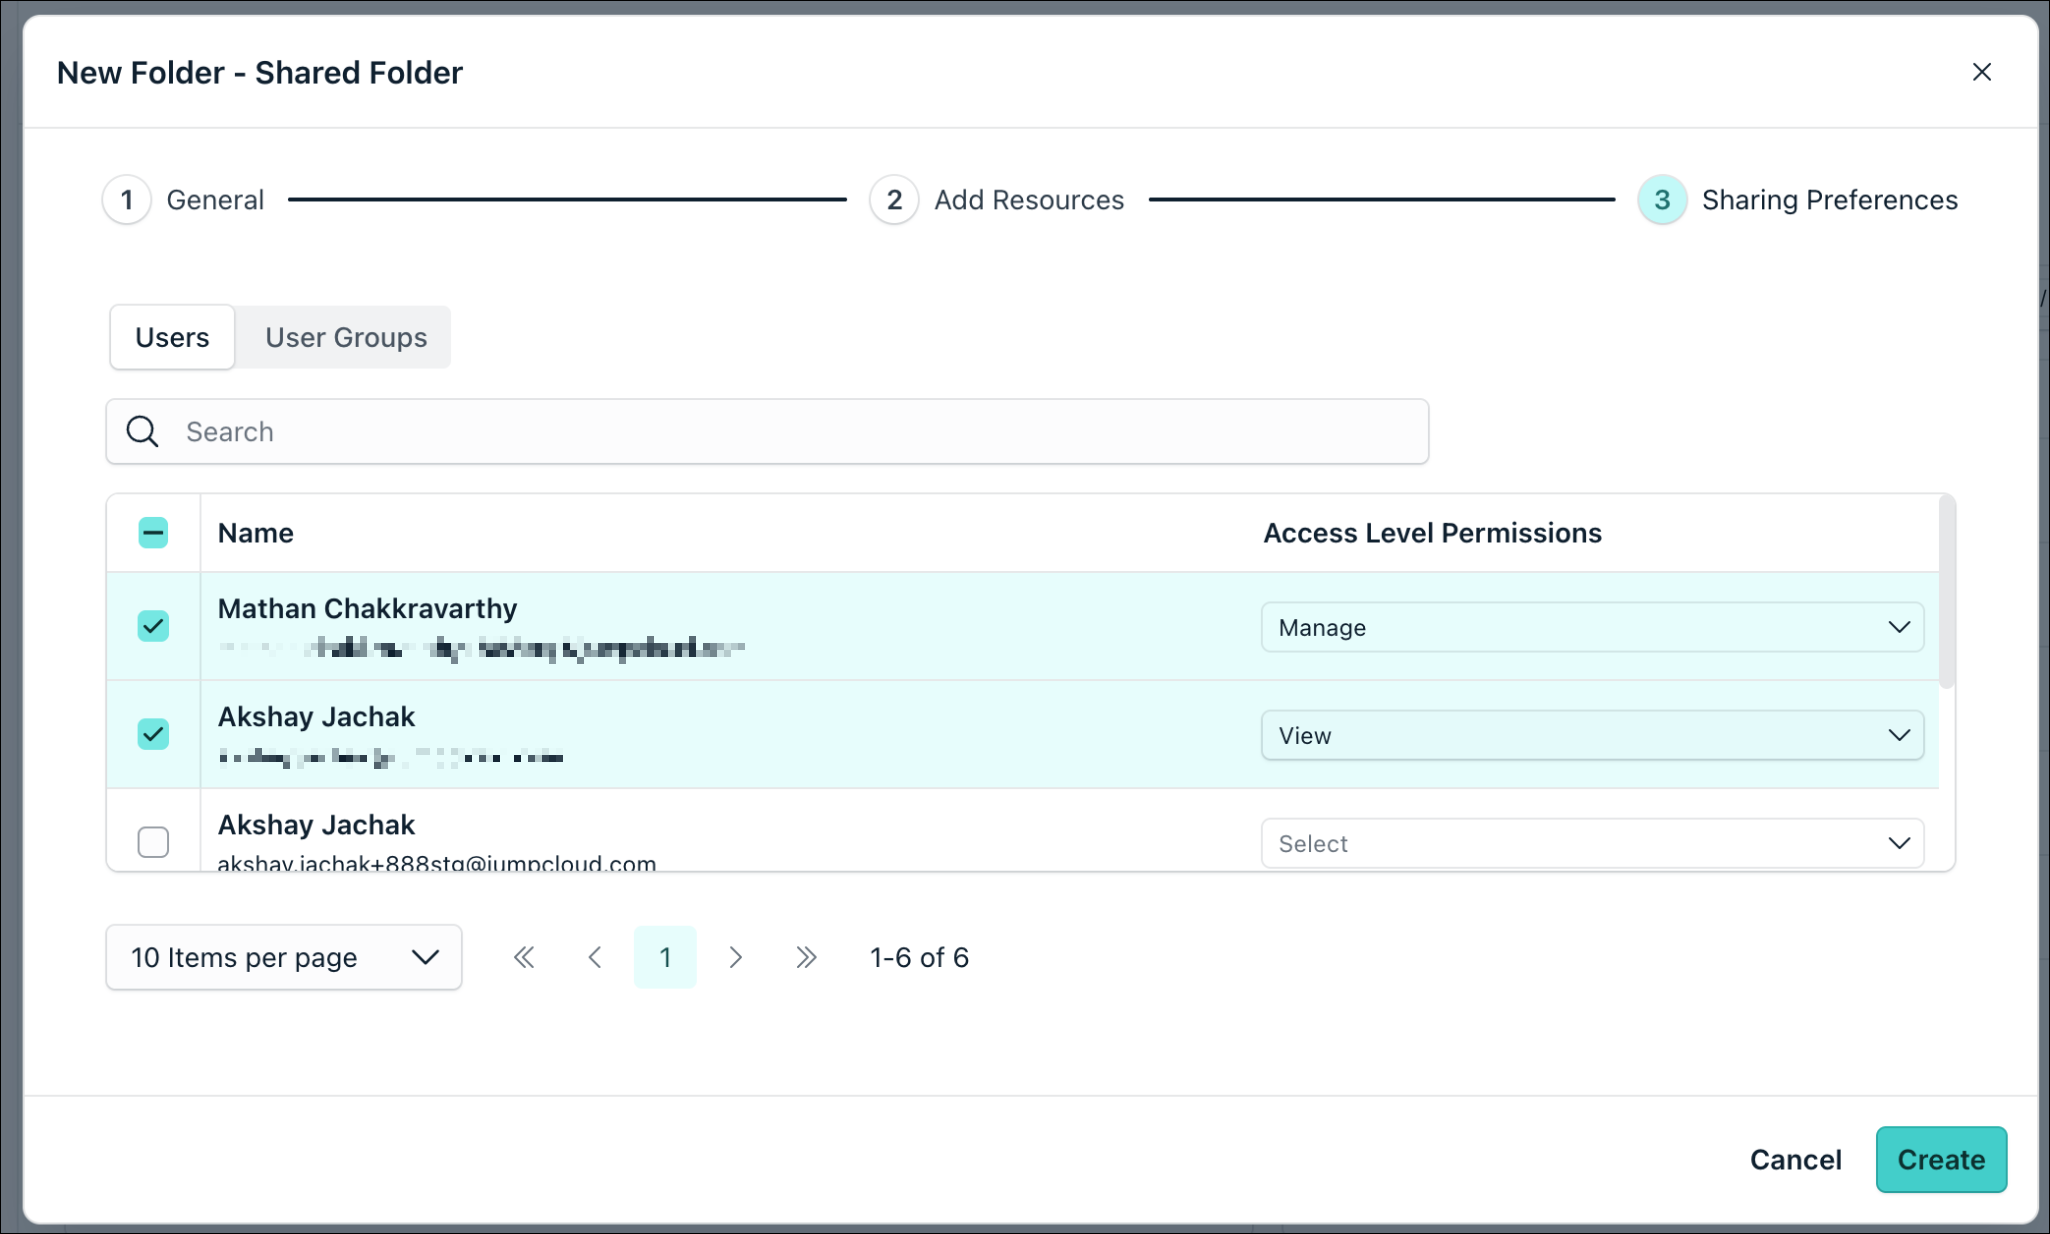
- Once done, click Create.
A new shared folder is created. Once shared, it appears in the folders tab for all the added users/ users groups.
You can perform the following actions on this page:
- Search for websites and credentials.
- Filter by credential types.
- Refresh: Refresh the folder data.
- Add: Add existing websites or credentials to the folder.
- Share: Share the folder content with more users/ user groups.
- Edit: Edit the folder name and description.
- Delete: Delete the folders.
Settings
Admins can see the following options on this page.
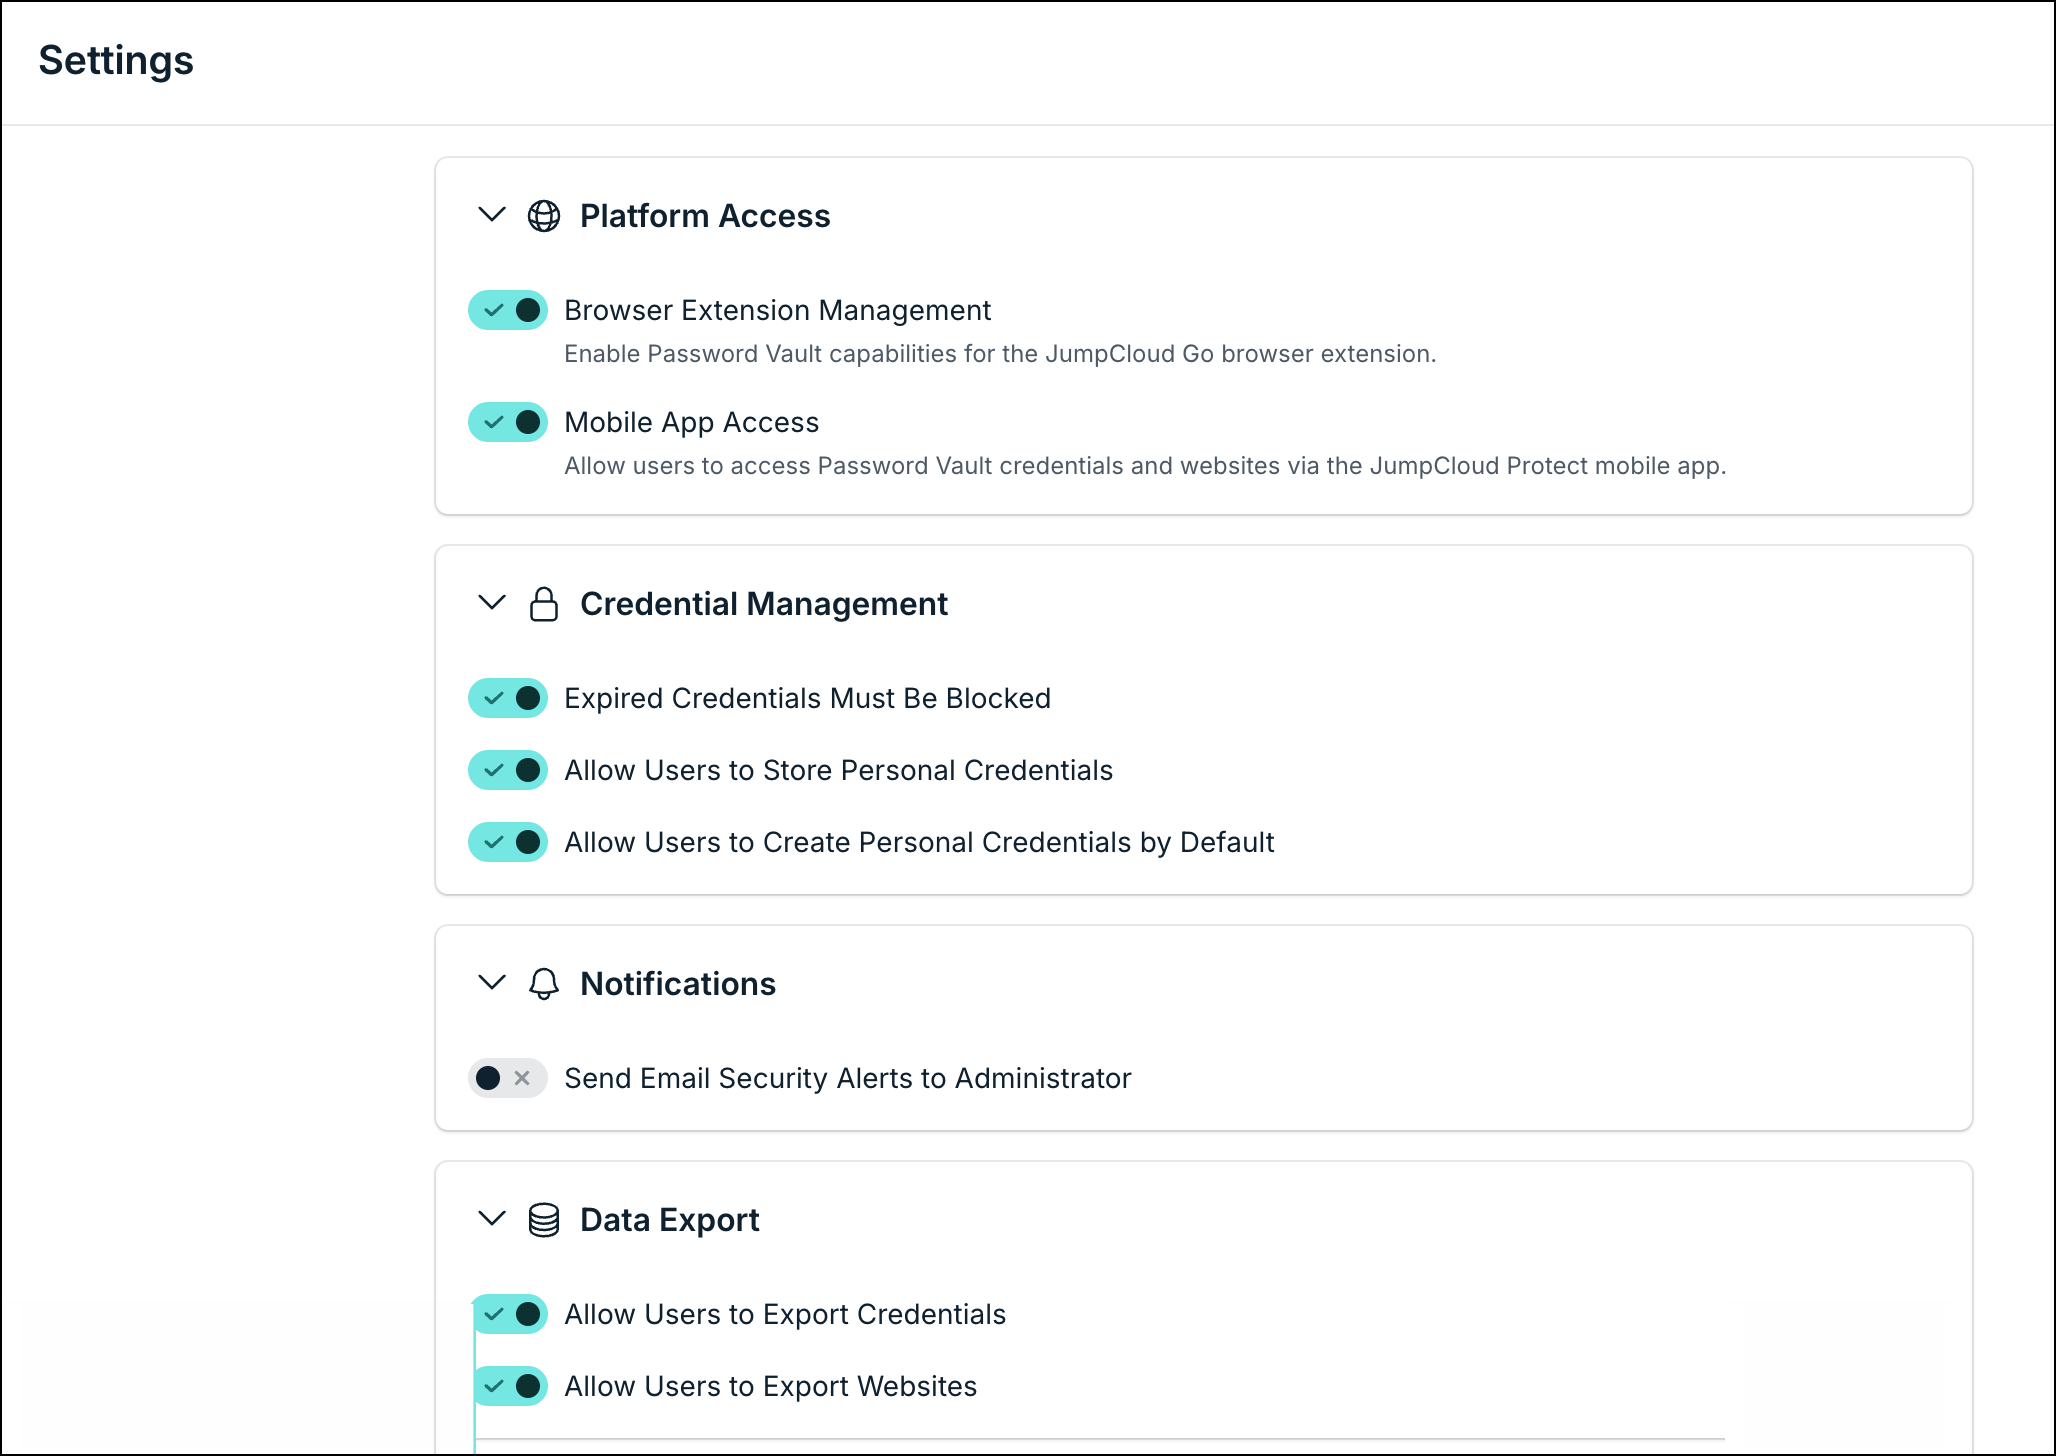
- Platform Access
- Browser Extension Management: Enable Password Vault capabilities such as autofill, username/password capture, etc. through the JumpCloud Go extension.
- Mobile App Access: Allow users to access Password Vault credentials and websites via the JumpCloud Protect mobile app.
- Credential Management
- Expired Credentials Must Be Blocked: Block expired credentials, requiring the user to rotate the password before accessing it.
- Allow Users to Store Personal Credentials
- Allow Users to Create Personal Credentials by Default
- Notifications
- Send Email Security Alerts to Administrator: Select the toggle button to inform Admins about security alerts through email notification.
- Data Export: Turn the Allow Users to Export Credentials and Allow Users to Export Websites toggles on or off to control whether users can export this data in the user portal. Export via admin portal is always supported.
Audit Logs
You can find the audit logs in the Directory Insights section. You can see the details for various actions performed by users. See View the Directory Insights data Activity Log to learn more.
Was this information helpful?