CrowdStrike Integration
CrowdStrike provides cloud security and threat detection software. Falcon Agent installation supports Windows and macOS devices from the JumpCloud Admin Portal. On macOS, you must apply a JumpCloud policy that creates a Mobile Device Management (MDM) profile and sets the permissions the CrowdStrike Falcon Agent requires. If the Mac uses an Intel processor and runs the CrowdStrike firmware analysis tool with a kernel extension, you must apply a second policy.
JumpCloud integrates with CrowdStrike Falcon in the following places:
- Deploying the CrowdStrike Falcon Agent to Windows and macOS devices.
- Using CrowdStrike endpoint posture data as a condition in Conditional Access Policies (CAPs).
- Syncing CrowdStrike license data into AI & SaaS Management through a Connector.
Prerequisites
- Administrative access to the CrowdStrike Portal.
- Access to the JumpCloud Admin Portal with a role that can create policies, commands, and Connectors.
- Your CrowdStrike Customer ID (CCID) checksum, available on the Falcon Sensor download page. Required by both macOS CrowdStrike policies.
- Target devices must be registered with JumpCloud Go, and Users must be logged in to JumpCloud Go, to run the full set of CrowdStrike device health checks used by CAPs. If JumpCloud Go is not available, Users can use Google Chrome when Device Trust (DTC) is configured. See Configure Google Chrome Enterprise Device Trust with JumpCloud to learn more.
Considerations
If your data is stored outside of the US, check which login URL you should be using depending on your region. If your organization uses LDAP, RADIUS, or requires firewall allow list configuration, the Fully Qualified Domain Names (FQDNs) will also be region specific. See JumpCloud Data Centers for the URLs, FQDNs, and IP addresses.
- For macOS devices, create and apply the CrowdStrike policy before you deploy the CrowdStrike app.
- The CrowdStrike EDR (Endpoint Detection and Response) conditions in a CAP require managed devices with JumpCloud Go. CrowdStrike EDR checks are not available on unmanaged devices or through Chrome DTC.
- Based on the size of your organization, the initial CrowdStrike Connector data collection may take up to an hour.
Installing the CrowdStrike Falcon Agent
macOS
- Log in to your CrowdStrike Portal.
- Create a new CrowdStrike API Client with Sensor Download - Read Scope by performing these steps:
- Click the hamburger menu.
image - Select Support and Resources.
- UnderResources and Tools, click API clients and keys.
- Click Add new API Client.
- Enter the Client Name and Description.
- Navigate to Sensor Download, select Readscope, and click Add.
image
- Click the hamburger menu.
- Save the Client ID, Secret, and Base URL Information for future use.
- Log in to the JumpCloud Admin Portal.
- Go toDevice Management > Commands.
- Select the Commands tab, then click (+) and choose Command from Template.
- Select MacOS and locate the the Mac - Install CrowdStrike Falcon Agent template. See Get Started: Commands for more information.
- Click Configure.
- (Optional) You can edit the default name for this command or type a new name.
- Click Run As, then choose root.
- Under Type, click Mac.
- Edit the script to update the CSBaseAddress, CSClientID, CSClientSecret, and (if applicable) CSInstallToken with the information collected in Step 3.
- Only set the CSInstallToken variable if you have Require Token enabled in your CrowdStrike org under Host setup and management > Deploy > Installation tokens.
image 3
- Only set the CSInstallToken variable if you have Require Token enabled in your CrowdStrike org under Host setup and management > Deploy > Installation tokens.
This script works for many situations; you might need to alter some variables for your organization. For more information, see the CrowdStrike documentation.
- If you want to schedule when the command runs or trigger the command, click Event and choose another option. The default is Run Manually.
- Under Options, increase the timeout if you want. The CrowdStrike default is 600 seconds.
- The command may throw a 124 error if the command times out. This is more likely to occur on slower networks.
- Under TTL Settings, verify that Use Smart Defaultsis selected.
- Assign the Falcon agent to your devices:
- If you are assigning the Falcon Agent to individual devices, select the Devices tab and select the checkbox next to each device where you want to install the agent.
- If you are assigning the Falcon Agent to groups of devices, select the Device Groups tab and select the checkbox next to each device group where you want to install the agent.
- Click save, then click save again.
- Run the command by selecting the checkbox next to the command on the Commands page and clicking run now. If the command doesn’t run, verify that you have root permissions.
If your organization is treating Full Disk Access of tools other than Falcon as an Immediate remediation item for your security posture and ZTA score, CrowdStrike will alert when other software has Full Disk Access. JumpCloud requires Full Disk Access to control PAM module settings on a macOS device. This may cause an alert that you could interpret as the CrowdStrike Falcon agent not having access to the Full Disk Access settings. That is not the case. In the event that Full Disk Access is listed as a red item in the ZTA score breakdown, that is because an application that is not Falcon has Full Disk Access.
- After the command finishes, select the Results tab on the Command page. An exit code of 0 indicates that the command ran successfully. If multiple commands are processed at runtime, only the last exit code is reported. For a list of all exit codes, see Understand Command Results.
For installation troubleshooting information, see Troubleshooting below.
Windows
To install the CrowdStrike Falcon Agent on a Windows device:
- Log into your CrowdStrike Portal.
- Create a new CrowdStrike API Client with Sensor Download - Read Scope by performing the following:
- Click the hamburger menu.

- Select Support and Resources.
- UnderResources and Tools, click API clients and keys.
- Click Add new API Client.
- Enter the Client Name and Description.
- Navigate to Sensor Download and select Readscope.

- Click Add.
- Click the hamburger menu.
- Save the Client ID, Secret, and Base URL Information for future use.
- Log in to the JumpCloud Admin Portal.
- Go toDevice Management > Commands.
- Select the Commands tab, then click (+) and choose Command from Template.
- Select Windows and locate the the Windows - Install CrowdStrike Falcon Agent template. See Get Started: Commands for more information.
- Click configure.
- (Optional) You can edit the default name for this command or type a new name.
- Under Type, click Windows.
- Edit the script to update the CSBaseAddress, CSClientID, CSClientSecret, and (if applicable) CSInstallToken with the information collected in Step 3.
- Only set the CSInstallToken variable if you have Require Token enabled in your CrowdStrike org under Host setup and management > Deploy > Installation tokens.
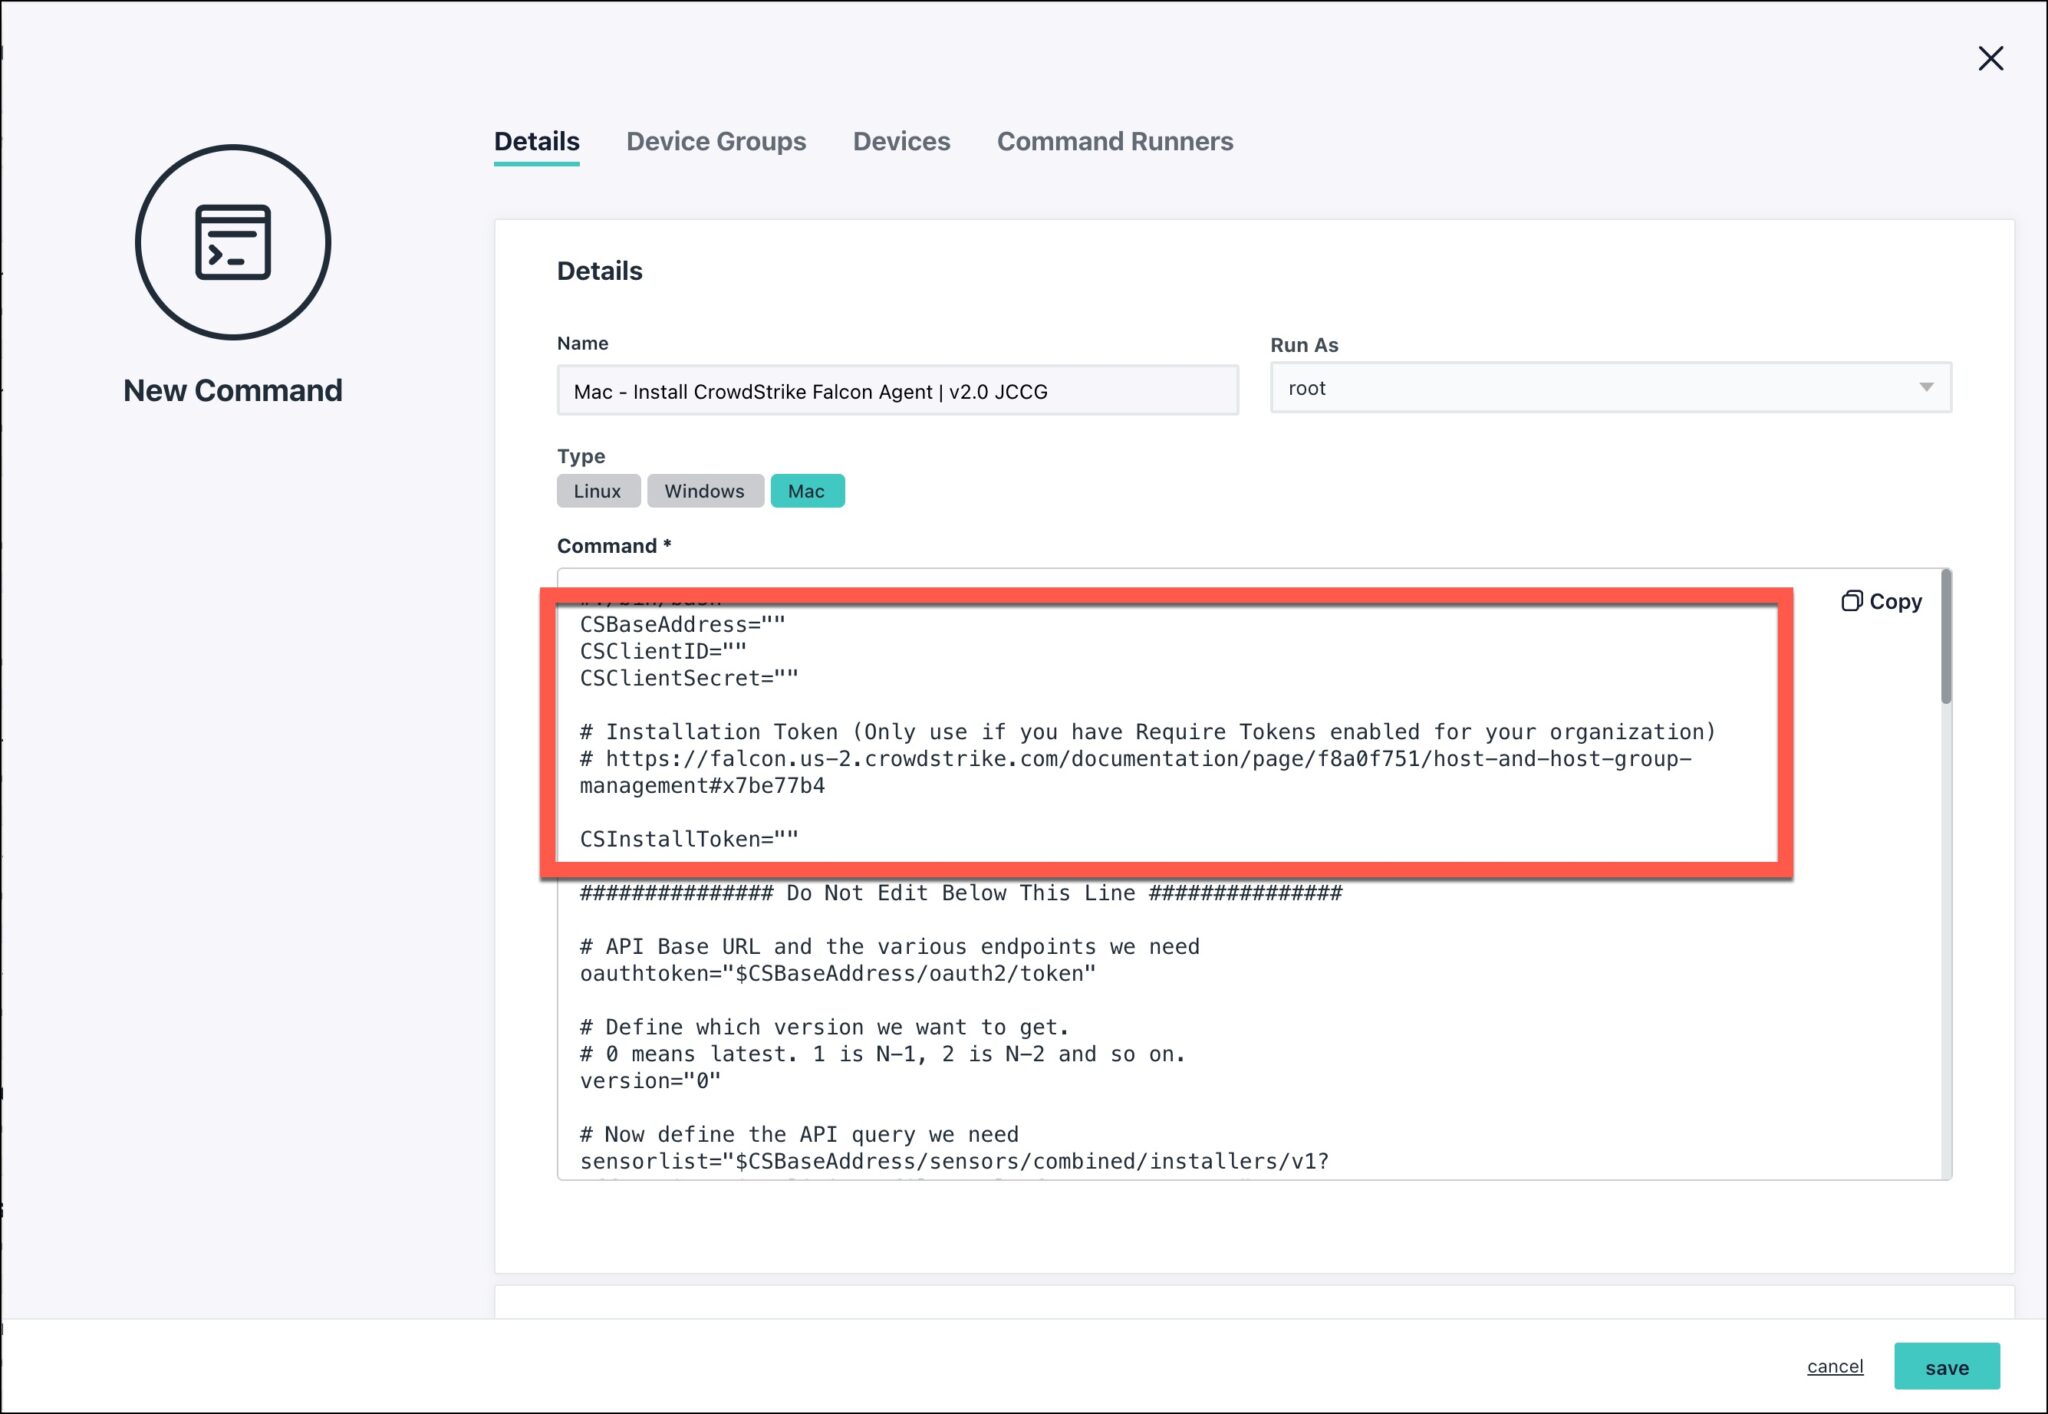
- Only set the CSInstallToken variable if you have Require Token enabled in your CrowdStrike org under Host setup and management > Deploy > Installation tokens.
This script works for many situations; you might need to alter some variables for your organization. For more information, see the CrowdStrike documentation.
- Click Launch Event, then chooseRun as Repeatingto run the command at the top of every hour.
- Under Options, ensure that the interval is set to 3600 seconds (1 hour).
- The command may throw a 124 error if the command times out. This is more likely to occur on slower networks.
- Assign the Falcon agent to your devices:
- If you are assigning the Falcon Agent to individual devices, select the Devices tab and select the checkbox next to each device where you want to install the agent.
- If you are assigning the Falcon Agent to groups of devices, select the Device Groups tab and select the checkbox next to each device group where you want to install the agent.
- Click save, then click save again.
- Run the command by selecting the checkbox next to the command on the Commands page and clickingrun now. If the command doesn’t run, verify that you have root permissions.
- After the command finishes, select the Results tab on the Commands page. An exit code of 0 indicates that the command ran successfully. If multiple commands are processed at runtime, only the last exit code is reported. For a list of exit codes, see Understand Command Results.
- Click view to see more information about the results.
For installation troubleshooting information, see Troubleshooting below.
Troubleshooting
Using a Command to Check Installation Stations
You can use a JumpCloud command to quickly check the status of a CrowdStrike agent installation.
This script only verifies CrowdStrike installation status. If a device has an older version installed, it will not automatically update the agent.
To troubleshoot a macOS CrowdStrike installation:
- Go to Device Management > Commands.
- Select the Commands tab, then click (+) and choose New Command.
- Enter a name for this command and choose root for Run As.
- Select the OS where you are installing the CrowdStrike agent.
- Type /Applications/Falcon.app/Contents/Resources/falconctl stats in the Command area, then click save.
- On the Commands page, select the checkbox for the new command you created and click Run Now.
- Select the Results tab and verify that the Sensor operation value is true. Check this section, which is in the larger body of data that is returned from the falconctl binary:
=== agent_info ===
version: 6.39.15205.0
agentID: C804001A-9C8E-4A7F-B1CB-XXXXXXXXXXX
customerID: 84A8FF05-967F-4CFF-BB90-XXXXXXXXXX
Sensor operational: true
If you run the CrowdStrike PowerShell script and receive an error and become blocked by CrowdStrike, adding the JumpCloud agent to an allow list often resolves the issue.
Command Fails with Exit Code 124 (Timeout)
Symptoms
When deploying the Falcon Agent on Windows devices using a JumpCloud Command, the installation may fail and return Exit Code: 124.
See Understand Command Results to learn more about other possible command results and failures.
Cause
This indicates that the installer took longer to complete than the command's configured Timeout value, causing JumpCloud to terminate the process before it could finish.
Resolution
To resolve this issue, try the following steps:
- Increase the Command Timeout: The default timeout for JumpCloud commands may be too short for MSI installers.
- Verify Silent Installation Flags: Ensure your installation script includes the proper silent install flags (such as
/quietand/norestart). If the MSI installer triggers a visible UI prompt in the background, the installation will hang indefinitely until the JumpCloud timeout terminates it. - Clear Installer Locks: If the command still times out after increasing the limit, the Windows Installer service (
msiexec.exe) might be locked by another process (such as a background Windows Update). Reboot the target device to clear any pending update or installer locks, and then run the command again.
After the command executes successfully, verify the Falcon Agent is present on the device by checking C:\Program Files\CrowdStrike. If you need to investigate further, check the local CrowdStrike installation logs located at C:\Windows\Temp\CSFalconInstall.log. Jump to Using a Command to Check Installation Status to verify installation using a command.
Creating a macOS CrowdStrike Policy
Every macOS device requires the CrowdStrike Falcon MDM Settings (No kernel extension) policy. If you have a Mac with an Intel processor that includes a kernel extension policy to run CrowdStrike’s firmware analysis tool, apply the CrowdStrike Falcon Firmware Analysis Settings Policy (Intel only) as well.
- CrowdStrike Falcon MDM Settings (No kernel extension) Policy: use this general policy to configure all Mac computers. It installs Full Disk Access, Notifications, System Extensions, and Web Content Filter permissions, and creates an MDM licensing profile.
- CrowdStrike Falcon Firmware Analysis Settings Policy (Intel only): use this policy for Mac computers with Intel processors that include a kernel extension to run CrowdStrike’s firmware analysis tool. It installs the permissions the Falcon Firmware Analysis tool needs. Apply this policy alongside the CrowdStrike Falcon MDM Settings policy on every Mac with an Intel processor that runs the firmware analysis tool.
Have your CrowdStrike Customer ID (CCID) checksum handy because both CrowdStrike policies will use it to create the MDM profile.
To create a macOS CrowdStrike Policy:
- Log in to the JumpCloud Admin Portal.
If your data is stored outside of the US, check which login URL you should be using depending on your region. If your organization uses LDAP, RADIUS, or requires firewall allow list configuration, the Fully Qualified Domain Names (FQDNs) will also be region specific. See JumpCloud Data Centers for the URLs, FQDNs, and IP addresses.
- Go toDevice Management > Policy Management.
- Select the All tab, then click (+) and select the Mac tab.
- To create a policy for a silicon macOS device or a macOS device that uses an Intel processor, locate the **CrowdStrike Falcon MDM Settings (No kernel extension)**policy, then click configure.
-
(Optional) Under Policy Name, enter a new, unique name for the policy or keep the default.
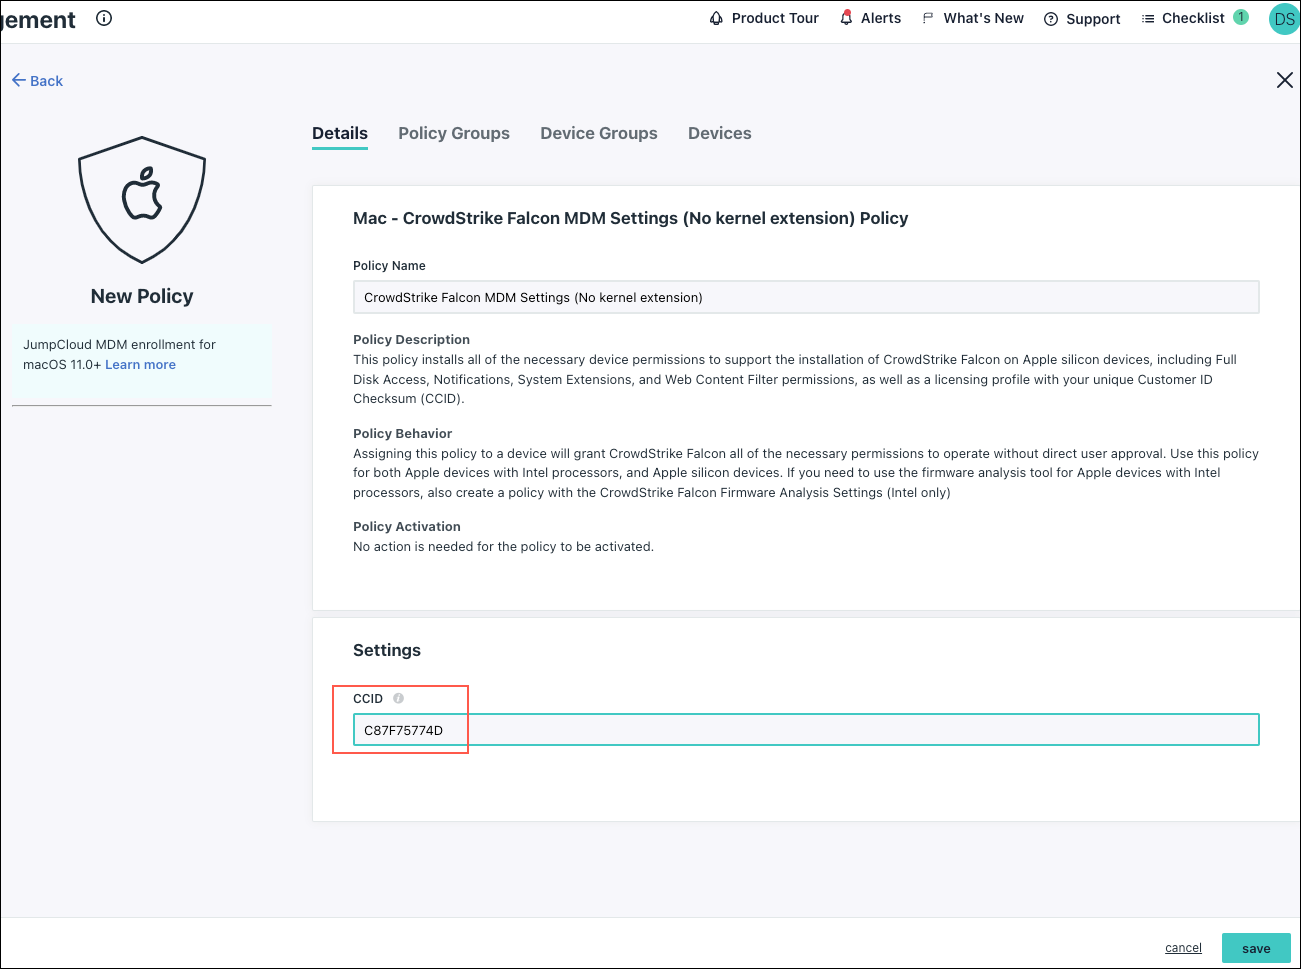
-
Under CCID, enter your CCID. Locate your CCID on the Falcon Sensor download page. Including the CCID in this policy automatically licenses Falcon on your macOS devices so you don’t need to run an activation command.
-
(Optional) Select the Device Groups tab, then select one or more device groups where you'll apply this policy.
-
(Optional) Select the Devices tab, then select one or more devices where you'll apply this policy.
-
Click save, then click save again.
-
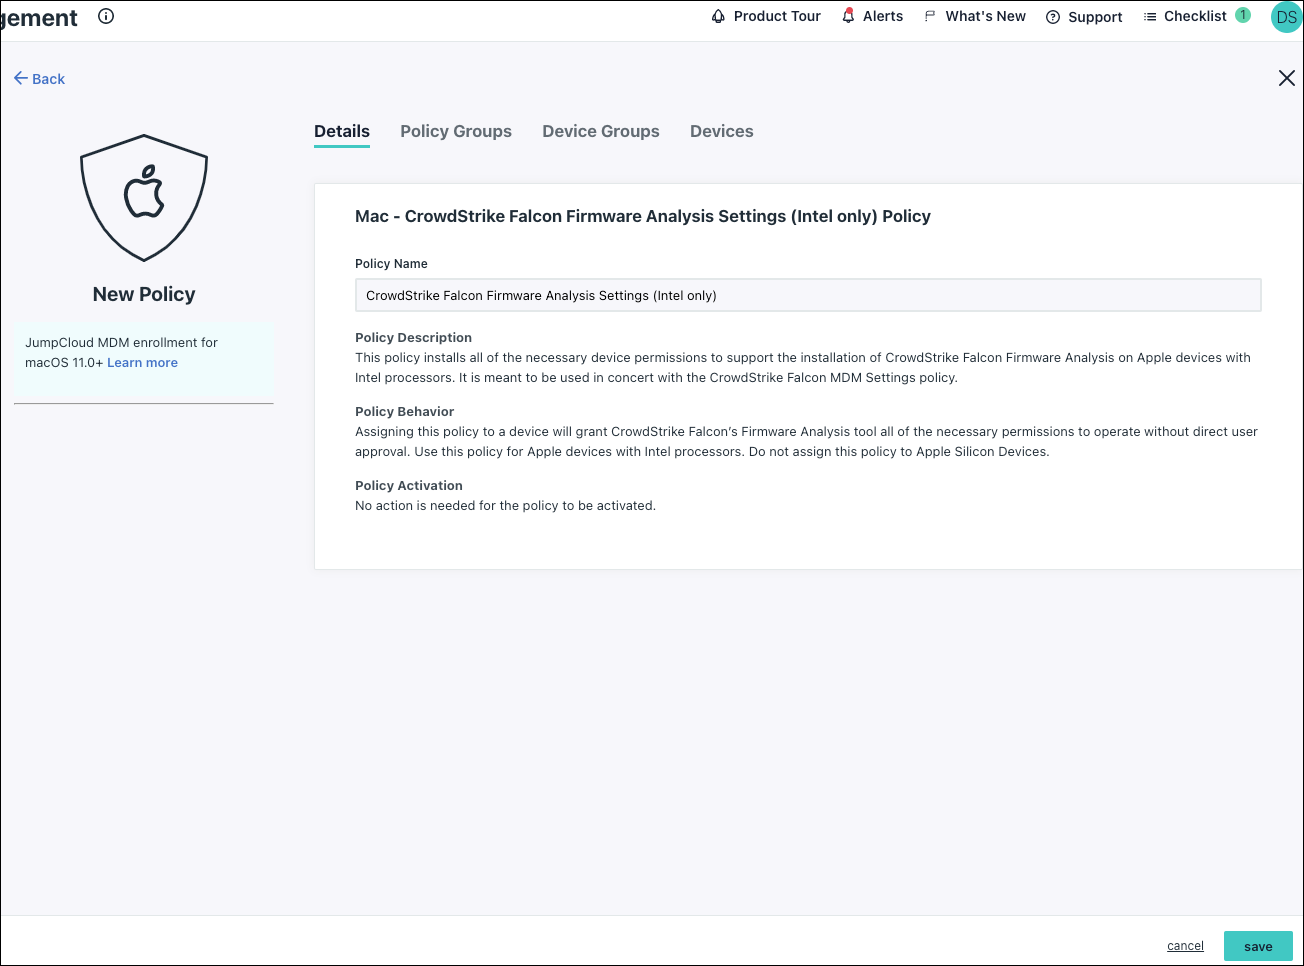
- To create a policy for a macOS device that uses an Intel processor to run CrowdStrike’s firmware analysis tool, locate the CrowdStrike Falcon Firmware Analysis Settings Policy (Intel only), then click configure.
- (Optional) On the New Policy panel, enter a new, unique name for the policy or keep the default.
- (Optional) Select the Device Groups tab, then select one or more device groups where you'll apply this policy.
- (Optional) Select the Devices tab, then select one or more devices where you'll apply this policy.
- Click save, then click save again.
- (Optional) On the New Policy panel, enter a new, unique name for the policy or keep the default.
- Run the command you created in To install the CrowdStrike Falcon Agent on a macOS device below by selecting the checkbox next to the command on the Commands page and clicking run now.
If the command doesn’t run, verify that you have root permissions.
- After the command finishes, select the Results tab on the Commands page. An exit code of 0 indicates that the command ran successfully. If multiple commands are processed at runtime, only the last exit code is reported. For a list of all exit codes, see Understand Command Results.
- Verify that your CrowdStrike policy was applied on the macOS device (From the Apple menu, System Settings > Privacy & Security > Profiles):
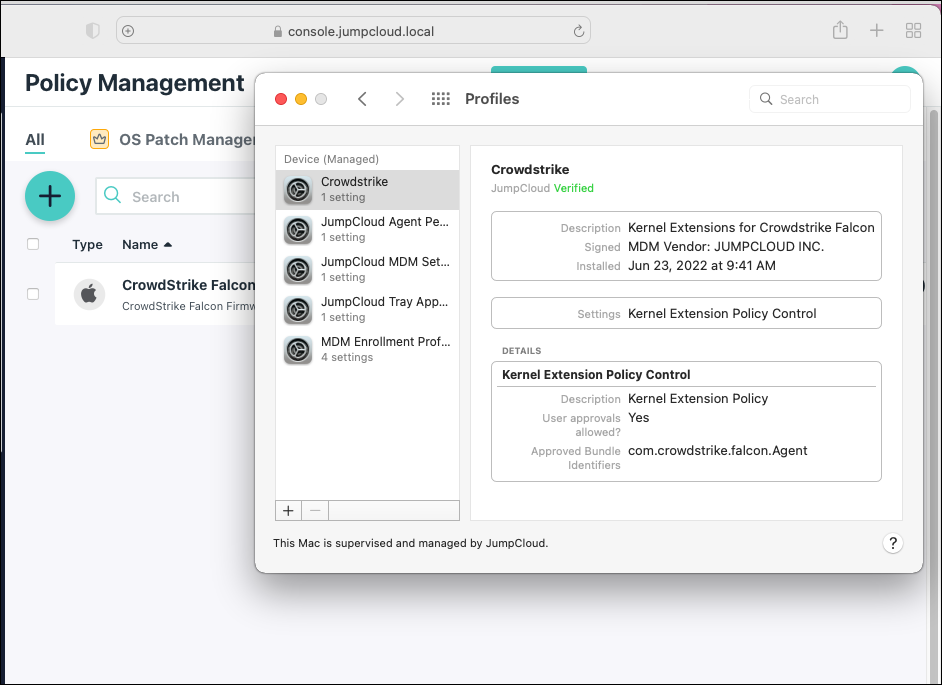
To further verify the policy, run this command:
/usr/libexec/PlistBuddy -c "print" /Library/Application Support/com.apple.TCC/MDMOverrides.plist
The CrowdStrike policy does not appear in Apple’s System Settings > Privacy & Security > Full Disk Access location. That location contains policies that the user approves or has approved, rather than Admin-approved policies like the Application Privacy Preferences Policy.
MacOS 15 Sequoia will disable the option to toggle the Crowdstrike extension under System Settings > General > Login Items & Extensions > Endpoint Security Extensions for end users.
Configuring Conditional Access Policies With CrowdStrike
Conditional Access Policy (CAP) configurations support conditions based on device health posture. These conditions let you deny or allow access based on CrowdStrike device signals, and give you device-level enforcement to support Zero Trust, compliance, and evolving security needs.
The CrowdStrike CAP conditions apply on managed devices that use JumpCloud Go. They are not available on unmanaged devices or through Chrome DTC.
| Managed Devices | Unmanaged Devices | |||
|---|---|---|---|---|
| JumpCloud Go | Chrome DTC | JumpCloud Go | Chrome DTC | |
| OS Version | Yes | Yes | No | Yes |
| EDR (CrowdStrike) | Yes | No | No | No |
| Disc Encryption | Yes | Yes | No | Yes |
| Firewall Status (Private Preview) | Yes | Yes | No | Yes |
The EDR CrowdStrike conditions block access automatically when the EDR agent is missing, stopped, or unhealthy. If the ZTA score is missing, see Troubleshoot: ZTA Score Data File Missing or Empty to learn more.
EDR Agent CrowdStrike (Status)
Use this condition to apply policies based on whether the CrowdStrike Falcon agent is active.
EDR Agent CrowdStrike (Version)
Use this condition to restrict access based on the specific version of the installed CrowdStrike agent.
Format
This condition supports version formats until 2 decimal points only.
Example
The Admin wants to apply a CAP to devices having the OS version as 10.2.7:
- If the Admin selects the Equals operator, they need to enter the EDR agent version as 10.2.7 (the same exact version).
- If the Admin selects the Greater Than operator, they can enter the agent version as 10.1, 10.2.8, etc.
- If the Admin selects the Less Than operator, they can enter the agent version as 10.3, 10.2.8 etc.
EDR Agent Crowdstrike (ZTA score)
Use this condition to apply policies based on the Zero Trust Assessment (ZTA) score generated by CrowdStrike.
Format
This condition supports whole number format.
Example
The Admin wants to apply a CAP to devices having the EDR agent ZTA score of 50:
- The Admin can select the Equals operator and enter the ZTA score as 50.
The ZTA score condition is not supported for Linux, Android, and iOS devices.
The EDR based conditions will ensure the user access is automatically blocked if the EDR agent is missing, stopped, or unhealthy. If the ZTA score is missing, see Troubleshoot: ZTA Score Data File Missing or Empty to learn more.
Format
This condition supports version formats until 2 decimal points only.
Example
See the above example (under EDR Agent Crowdstrike Version) to know how this condition works.
Configuring the CrowdStrike Connector for AI & SaaS Management
JumpCloud AI & SaaS Management gives you visibility and control over shadow IT, including AI and SaaS app usage in your org. Connectors detect shadow IT without asking Users to install a browser extension, and expand your usage and security insights.
The CrowdStrike Connector retrieves the license list from the CrowdStrike API. It polls at a regular interval to capture new Users and keep the data current.
Prerequisites
- You must have administrative access to CrowdStrike.
Considerations
- Based on your organization’s size, the initial collection of data may take some time, up to an hour.
Configuring CrowdStrike
- Log in to CrowdStrike.
- In the top left, open the navigator and click Support and resources.
- Click API clients and keys.
- Click Create API Client.
- Enter a name and description.
- In the scopes list, enable Identity Management | Read.
- Click Create.
Configuring JumpCloud
- Log in to the JumpCloud Admin Portal.
If your data is stored outside of the US, check which login URL you should be using depending on your region. If your organization uses LDAP, RADIUS, or requires firewall allow list configuration, the Fully Qualified Domain Names (FQDNs) will also be region specific. See JumpCloud Data Centers for the URLs, FQDNs, and IP addresses.
- Go to Access > AI & SaaS Management > Settings.
- Under AI & SaaS Management Settings, click the Connectors tab, then click + Add Connector.
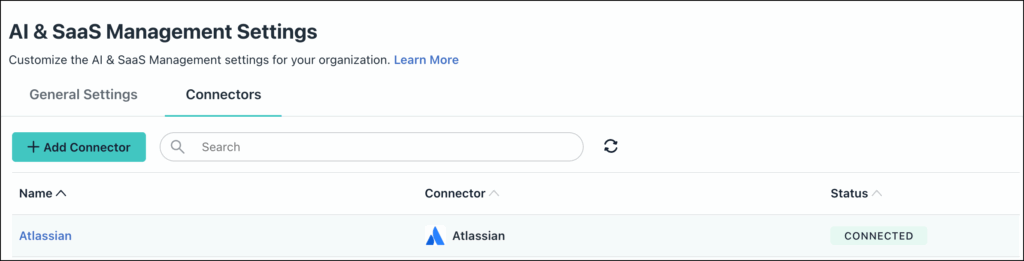
- Select CrowdStrike and click Connect.
- Enter a name and click Connect.
- Enter the client id copied in the previous section to the CrowdStrike Client ID field.
- Enter the client secret copied in the previous section to the CrowdStrike Client Secretfield.
- Select your CrowdStrike region.
- Click Save Connector.
- You will now see CrowdStrike in your list of Connectors.
If permissions are accidentally removed, or if the admin who configured left your organization, the connector will stop working and you will be prompted to Reconnect.

Required Permissions
- Permission Scope
- Read to fetch users from the API.
Uninstall/Remove
- On the Connector’s detail page, click on Delete Connector and follow the prompts.
- To revoke the permissions granted to JumpCloud, delete the API client in CrowdStrike.
Was this information helpful?