Create a User Level Windows Custom Registry Keys Policy
Use this user policy to manage specific Windows registry values in an assigned User’s profile when JumpCloud does not provide an equivalent built-in policy. Assign the policy to Users or user groups. JumpCloud delivers the settings when that User signs in to an eligible Windows device.
This is a user-level policy. The JumpCloud Agent writes values under HKEY_CURRENT_USER or the targeted User’s HKEY_USERS\<SID> hive. Settings apply only to the assigned User. They do not change another User’s profile on a shared device and never fall back to device scope.
For the device-level policy, see Create Your Own Windows Policy Using Registry Keys.
Prerequisites
- JumpCloud Agent installed on target Windows devices.
- Agent can map the assigned JumpCloud User to the active Windows user security identifier (SID).
- Permission to create, edit, assign, and delete policies in Policy Management.
Considerations
- Delivery is Agent-based. Windows MDM enrollment is not required.
- Applies when the bound user logs in or when a policy is bound while the user is already logged in. No device restart is required.
Creating the Policy
Configure the policy, then assign users or user groups.
- Log in to the JumpCloud Admin Portal.
- Go to Device Management > Policy Management.
- Click (+) Add New.
- Select User Policy.
- Select the Windows tab.
- Search for and select Custom Registry Keys, then click Configure.
- On the Details tab, configure settings below.
- (Optional) In Policy name, enter a unique name, or keep Custom Registry Keys.
- (Optional) In Policy notes, enter creation date and deployment notes.
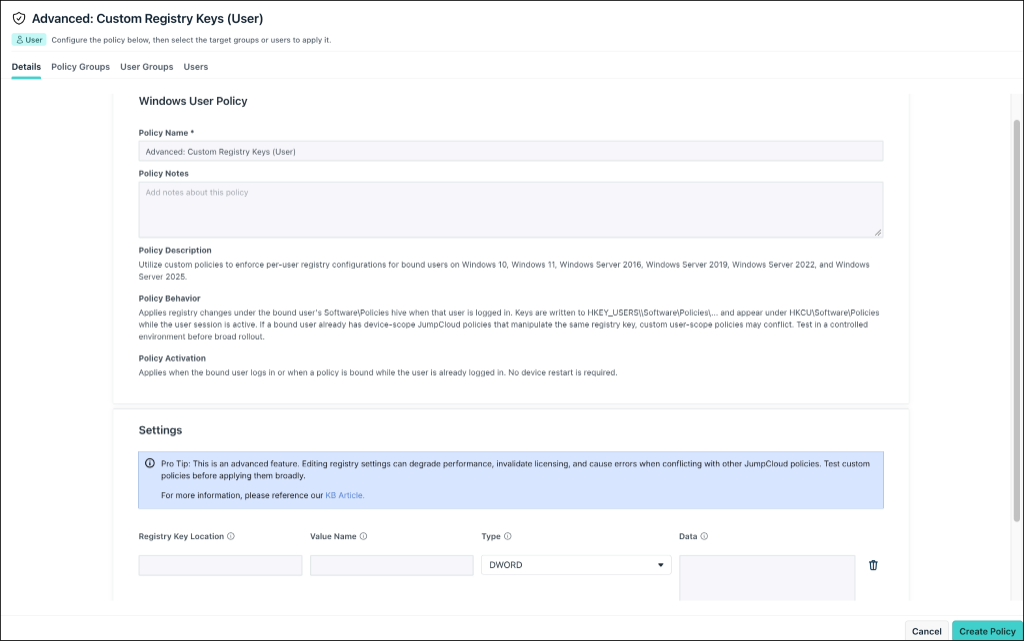
Configuring Registry Keys
Under Settings, configure each key relative to HKEY_CURRENT_USER. Do not include HKCU. The Agent applies values to that User’s hive (HKEY_CURRENT_USER when active, or mapped HKEY_USERS\<SID>).
| Field | Description |
|---|---|
| Registry key location | Required. Path relative to HKEY_CURRENT_USER. Helper text: Relative to HKEY_CURRENT_USER. Do not include HKCU. Example: Software\Policies\Google\Chrome. |
| Value name | Required. Registry value to create or update. Example: HomepageLocation. |
| Type | Required. STRING, DWORD, QWORD, MULTI_STRING, EXPAND_STRING, or BINARY. |
| Data | Required. Value that matches Type. |
- Enter Registry key location.
- Enter Value name.
- Select Type.
- Enter Data.
- (Optional) Click (+) Add Registry Key for another key or value.
- (Optional) Click Delete registry key to remove a row.
- Repeat for each additional registry key.
- Prefer Software\Policies for GPO-style settings and verify registry paths in documentation prior to saving.
- Incorrect values can cause system or app errors; test thoroughly before deployment.
- The Agent overwrites values only if they differ from the policy definition.
Applying the Policy
- (Optional) On Policy Groups, select one or more reusable user-policy groups.
- On User Groups, select one or more user groups. For multi-OS groups, the policy applies when a User signs in to an eligible Windows device with the JumpCloud Agent.
- Or, on Users, select one or more Users.
- Click Create policy.
Viewing Policy Status
- Go to Device Management > Policy Management.
- Open the Advanced: Custom Registry Keys policy.
- Select the Status tab.
- Review results. Click view for the last result log on a device.
Errors appear in Exit Status. Exit Status 0 means no errors when applying or enforcing the policy. Results can show Awaiting user session when the User is not signed in. Delivery continues after the next eligible login or check-in.
Was this information helpful?