Create a Device Level macOS Software Update Preferences Policy
The Software Update Preferences Policy controls how and when automatic software updates are installed on macOS devices for App Store updates, macOS version updates, critical updates, and pre-releases. Automating software updates can ensure that your users are in compliance and running the latest versions. This policy does not control major macOS upgrades.
This is a device level policy that applies system-wide to the device and all of its users. You can bind this policy to individual devices or device groups. For policies that apply to a specific user's profile across devices, see Get Started: Policies and Learn More section of this article.
This policy controls the update settings available on macOS devices in System Settings > General > Software Update > Automatic Updates. These settings determine how updates are downloaded and installed on user devices.
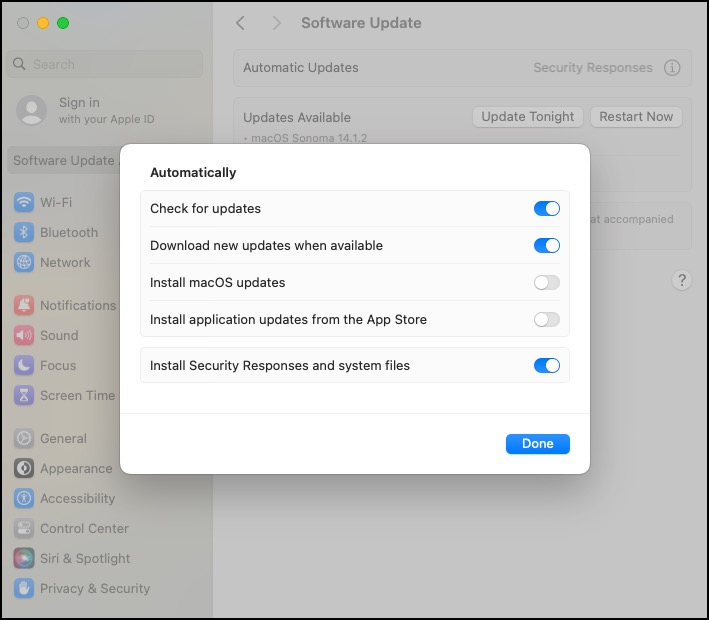
- The settings in this policy are separate from JumpCloud Patch policies. If you want to automatically install updates without user interaction, this can only be achieved with Patch Management.
- However, you can use this policy to prevent users from controlling how software is updated on their devices by deselecting the Settings in this policy.
The policy works on all devices running JumpCloud-supported macOS versions that are enrolled in Mobile Device Management (MDM).
Prerequisites
- Apple Mobile Device Management (MDM) must be configured for your organization and Mac computers must be enrolled in JumpCloud MDM. See Set up Apple MDM.
- This policy is supported on Mac computers running macOS 10.7 and later.
- Target Mac computers must have an active network connection for this policy to take effect.
Considerations
- A restart of the device is required for the policy to take effect.
Creating the Policy
To create a Software Update Preferences policy for Mac computers, do the following:
Selecting the Policy Template
- Log in to the JumpCloud Admin portal.
If your data is stored outside of the US, check which login URL you should be using depending on your region. If your organization uses LDAP, RADIUS, or requires firewall allow list configuration, the Fully Qualified Domain Names (FQDNs) will also be region specific. See JumpCloud Data Centers for the URLs, FQDNs, and IP addresses.
- Go to Device Management > Policy Management. The Policy Management page is displayed.
- On the Policy Management page, click +Add New.
- Select Device Policy to assign the policy to devices and device groups. On the New Device Policy page:
- Select the macOS tab.
- Search and select the required policy and click Configure. The Details tab of the policy is displayed.
- On the Details tab, configure the required policy configuration settings.
- (Optional) In the Policy Name field, enter a new name for the policy or keep the default. Policy names must be unique.
- (Optional) In the Policy Notes field, enter details such as creation date of the policy, and information on testing and deployment of the policy.
Configuring the Policy
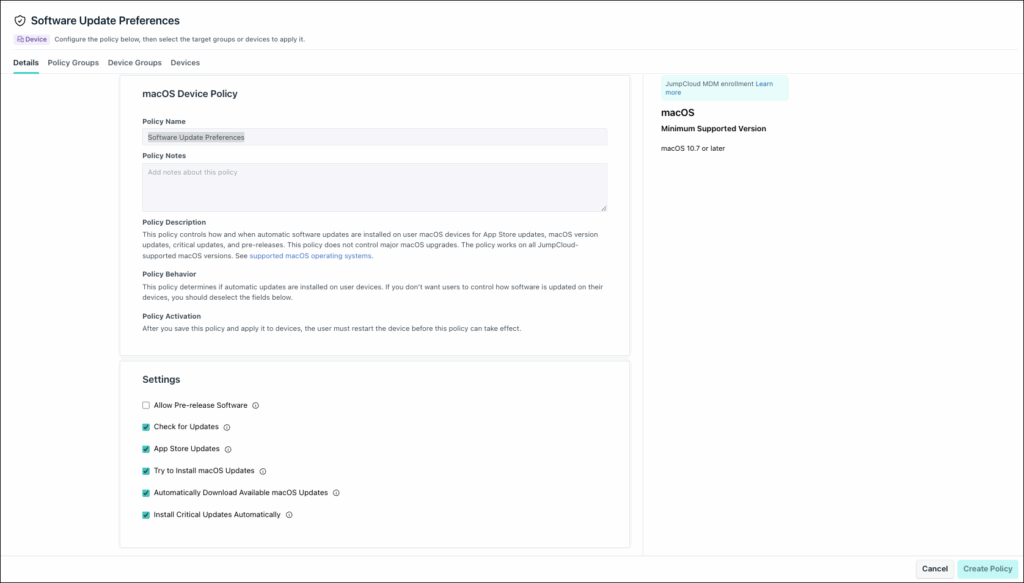
- Under Settings, configure these fields:
- Select Pre-release Software to include pre-release (beta) software in software update prompts on user devices.
- Select App Store Updates to automatically install app updates from Apple’s App Store.
- Select macOS Updates to automatically install OS updates from Apple.
- Select macOS Downloads to automatically download new macOS updates from Apple, and prompt the user to install them.
- Select Critical Updates to automatically install critical macOS updates, including system data files and security updates.
Applying the Policy
- (Optional) Select the Policy Groups tab. Select one or more policy groups where you want to add this policy.
- Select the Device Groups tab. Select one or more device groups where you want to apply this policy. For device groups with multiple OS member types, the policy only applies when a user logs into a supported Mac computer that is enrolled in Apple MDM.
- Or, select the Devices tab. Select one or more devices whom you want to add this policy to.
- Click Create Policy. A success message is displayed indicating the completion of policy creation.
Viewing Policy Status
- Select the Statustab.
- To see the last Result Log for a device where this policy is applied, click view.
- If any errors occur, they're listed inExit Status. If you have an Exit Status of 0, no errors occurred when applying or enforcing this policy.
Was this information helpful?